background image

Ad
d

itiona

l In

fo

rm
atio

n

33

GB

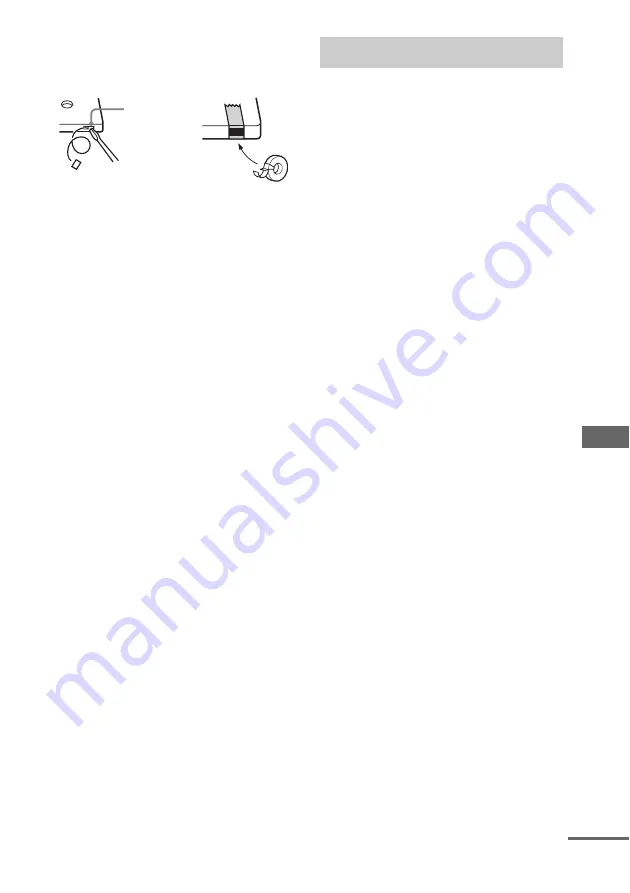
To save a tape permanently

To prevent a tape from being accidentally recorded 
over, break off the cassette tab from side A or B as 
illustrated.

If you later want to reuse the tape for recording, cover 
the broken tab with adhesive tape.

Before placing a cassette in the tape 
deck

Take up any slack in the tape. Otherwise, the tape may 
get entangled in the parts of the tape deck and become 
damaged.

When using a tape longer than 
90 minutes

The tape is very elastic. Do not change the tape 
operations such as play, stop, and fast-winding 
frequently. The tape may get entangled in the tape 
deck.

Cleaning the tape heads

Clean the tape heads after every 10 hours of use.

Be sure to clean the tape heads before you start an 
important recording or after playing an old tape.

Use a separately sold dry-type or wet-type cleaning 
cassette. For details, refer to the instructions of the 
cleaning cassette.

Demagnetizing the tape heads

Demagnetize the tape heads and the metal parts that 
have contact with the tape after every 20 to 30 hours of 
use with a separately sold demagnetizing cassette. For 
details, refer to the instructions of the demagnetizing 
cassette.

Main unit

Amplifier section

European model:

DIN power output (rated): 60 + 60 watts (4 ohms at 

1 kHz, DIN)

Continuous RMS power output (reference):

75 + 75 watts (4 ohms at 
1 kHz, 10% THD)

Other models:

The following measured at AC 220 – 240 V, 50/60 Hz
DIN power output (rated) 60 + 60 watts

(4 ohms at 1 kHz, DIN)

Continuous RMS power output (reference)

75 + 75 watts
(4 ohms at 1 kHz, 10% 
THD)

Inputs
ANALOG IN (stereo mini jack):

Sensitivity 250 mV, 
impedance 47 kilohms

Outputs
CD DIGITAL OUT:

Optical Wavelength: 
660 nm

PHONES (stereo mini jack):

accepts headphones with 
an impedance of 8 ohms or 
more

SPEAKER:

accepts impedance of 
4 ohms

CD player section

System

Compact disc and digital 
audio system

Laser Diode Properties

Emission duration: 
continuous
Laser Output: Less than 
44.6 

µ

W

(This output is the value 
measurement at a distance 
of 200 mm from the 
objective lens surface on 
the Optical Pick-up Block 
with 7 mm aperture)

Frequency response

2 Hz – 20 kHz (±0.5 dB)

Wavelength

770 – 810 nm

Break off the 
cassette tab

Specifications

continued

*

* &

GI


Summary of Contents for CMT-CPZ1

Page 1: ... 2005 Sony Corporation 2 584 934 13 1 Micro HI FI Component System Operating Instructions CMT CPZ1 ...

Page 2: ...e recycling of electrical and electronic equipment By ensuring this product is disposed of correctly you will help prevent potential negative consequences for the environment and human health which could otherwise be caused by inappropriate waste handling of this product The recycling of materials will help to conserve natural resources For more detailed information about recycling of this product...

Page 3: ...g your favorite CD tracks on a tape 19 CD TAPE Synchro Recording Recording on a tape manually 20 Manual Recording Sound Adjustment Adjusting the sound 21 Timer Falling asleep to music 21 Sleep Timer Waking up to music 22 Play Timer Timer recording radio programs 23 Rec Timer Display Turning off the display 24 Power Saving Mode Viewing information about the disc in the display 24 Viewing the tuner ...

Page 4: ...en the total playing time of one CD album is estimated at 60 minutes and you are recording on a 700MB CD R CD RW at 48 kbps in ATRAC3plus format Create your own ATRAC CDs Install SonicStage on your computer SonicStage is software that takes music downloaded from audio CDs on your computer and creates original CDs It can be installed from the supplied CD ROM Create an ATRAC CD After selecting your ...

Page 5: ...uencies this system can play are shown below Variable Bit Rate VBR files can also be played This system conforms to Version 1 0 1 1 2 2 2 3 2 4 of the ID3 tag format ID3 tag is a format for adding certain information track title album name artist name etc to MP3 files Up to 124 characters of ID3 tag information can be displayed on this system An ATRAC CD on which audio data compressed in the MP3 f...

Page 6: ... of data using the Track At Once method Conventional CDs begin at a CD control area called the Lead in and end at an area called Lead out A Multi Session CD is a CD having multiple sessions with each segment from Lead in to Lead out regarded as a single session CD Extra This format records audio audio CD data on the tracks in session 1 and data on the tracks in session 2 Mixed CD This format recor...

Page 7: ...those discs there are some that do not conform to the CD standard and may not be playable by this product The structure of ATRAC CDs and MP3 CDs ATRAC CDs and MP3 CDs consist of files and groups A file is equivalent to a track of an audio CD A group is a bundle of files and is equivalent to an album For MP3 CDs this system recognizes an MP3 folder as a group so that ATRAC CDs and MP3 CDs can be op...

Page 8: ...ry folders To compress a source in an MP3 file we recommend setting the compression parameters to 44 1 kHz 128 kbps and Constant Bit Rate To record up to the maximum capacity set the writing software to halting of writing To record to the maximum capacity at one time up on media that has nothing recorded on it set the writing software to Disc at Once Cautions when playing a disc that is recorded i...

Page 9: ...et up the AM loop antenna then connect it Note To prevent noise pickup keep the antennas away from the speaker cords 3 Connect the mains lead to mains If the plug does not fit the wall socket detach the supplied plug adaptor only for models equipped with an adaptor To turn on the system press 1 Getting Started Hooking up the system 3 2 1 AM loop antenna Right speaker Left speaker FM lead antenna E...

Page 10: ...rn on the system 2 Press CLOCK TIMER SET 3 Press or repeatedly to set the hour 4 Press ENTER 5 Press or repeatedly to set the minute 6 Press ENTER The clock starts working To adjust the clock 1 Press CLOCK TIMER SET 2 Press or repeatedly to select CLOCK SET then press ENTER 3 Do the same procedures as step 3 to 6 above Note The clock is not displayed in Power Saving Mode page 24 When carrying this...

Page 11: ...playing a disc 1 Press CD or FUNCTION repeatedly to switch the function to CD 2 Press PLAY MODE repeatedly in stop mode until the mode you want appears in the display 3 Press N or CD NX on the unit CD Play Loading a disc When you play a disc insert it with the label side up Playing a disc Normal Play Shuffle Play Select To play No display Normal Play The tracks on the disc in original order Normal...

Page 12: ...ess FUNCTION repeatedly to switch the function to CD 2 Turn the jog dial in stop mode to select the desired track then press PUSH ENTER To search for tracks on the ATRAC CD or MP3 CD turn the jog dial to first select the desired group then press PUSH ENTER before performing step 2 Playback starts from the selected track Note Only the first 6 characters are displayed when performing the group or tr...

Page 13: ... remote 1 Press CD or FUNCTION repeatedly to switch the function to CD 2 Press PLAY MODE repeatedly in stop mode until PGM appears 3 Press or repeatedly until the desired track number appears When programming the tracks on the ATRAC CD or MP3 CD press or repeatedly to select the desired group then press or repeatedly until the desired track number appears 4 Press ENTER The track is programmed The ...

Page 14: ...r operations Note You cannot erase the program during playback Tips You can program the tracks during playback by using the jog dial The program you made remains after Program Play finishes To play the same program again press CD or FUNCTION repeatedly to switch the function to CD then press N or CD NX on the unit However the program is cleared when you eject the disc appears when the total progra...

Page 15: ...lashes Perform steps 6 and 7 while the preset number flashes 6 Press or or TUNING or on the unit repeatedly to select the desired preset number 7 Press ENTER 8 Repeat steps 4 through 7 to store other stations Tip Press x to stop scanning Manual tuning preset You can manually tune in and store the radio frequency of the desired stations 1 Press TUNER BAND or FUNCTION repeatedly to switch the functi...

Page 16: ... function CD power is factory set to on Use buttons on the unit for the operation 1 Press FUNCTION repeatedly to switch the function to CD 2 Press 1 to turn off the system 3 After STANDBY stops flashing press 1 while holding CD x CD POWER and OFF appear To set CD power on Repeat the procedure above and CD POWER and ON appear Notes When CD POWER and OFF are selected disc access time is increased Yo...

Page 17: ...unes in a station Automatic Tuning To record the radio programs use manual recording page 20 What is the Radio Data System Radio Data System RDS is a broadcasting service that allows radio stations to send additional information along with the regular program signal RDS is available only on FM stations Note RDS may not work properly if the station you are tuned in is not transmitting the RDS signa...

Page 18: ...sequence 5 times 4 Press N or TAPE nN on the unit The tape starts playing Press the button again to play the reverse side Other operations Note Do not eject the tape during playback or recording as this may cause irreparable damage to the tape and cassette holder Tape Play Loading a tape With the side you want to play record facing towards you Playing a tape To Do this Stop play Press x or TAPE x ...

Page 19: ...cord When you want to record a group from an ATRAC CD or MP3 CD be sure to press PLAY MODE repeatedly to select then press or repeatedly to select the desired group before proceeding 6 Press CD SYNCHRO SYNC REC and N or n appear The tape deck stands by for recording and the CD player pauses for playback 7 Press TAPE X Recording starts To stop recording Press TAPE x or CD x Tip If you stop the reco...

Page 20: ... 5 Press FUNCTION repeatedly to select the desired source to record CD To record from this system s CD player TUNER To record from this system s tuner MD To record from the optional component connected to the ANALOG IN jack 6 Press TAPE z REC REC and N light up and the tape deck stands by for recording 7 Press TAPE X then start playing the desired source to record Recording starts Other operations...

Page 21: ...tton other than EQ or Also if you do not perform any operations for a few seconds the display automatically returns to the original display You can set the system to turn off after a certain time so that you can fall asleep to music Press SLEEP Each time you press the button the minute display the turn off time changes cyclically as follows AUTO t 90MIN t 80MIN t t 10MIN t SLEEP OFF The system aut...

Page 22: ...utton the display changes cyclically as follows 8 Press ENTER The start time the stop time and the sound source appear in turn then the original display returns 9 Press 1 to turn off the system Other operations Notes You cannot activate the Play Timer and the Rec Timer at the same time If you use the Play Timer and the Sleep Timer at the same time the Sleep Timer has priority Do not operate the sy...

Page 23: ...o select recording side then press x or TAPE x on the unit If you select both sides recording or front side recording press N or TAPE nN on the unit repeatedly to light up the N indicator then press x or TAPE x on the unit If you record on the reverse side press N or TAPE nN on the unit repeatedly to light up the n indicator then press x or TAPE x on the unit 10Press 1 to turn off the system Other...

Page 24: ... can also check the information recorded on disc such as the titles Checking the remaining time and titles Press DISPLAY during Normal Play Each time you press the button the display changes cyclically as follows Current track number and elapsed playing time t Current track number and remaining time or 1 t Remaining time of the disc2 or 3 t Track title CD TEXT disc4 ATRAC CD and MP3 CD5 only t Gro...

Page 25: ...d Depending on the disc some CD TEXT information may not appear x Program Play mode The last track number of the program and the total playing time t Total track number of the program for eight seconds t Disc title1 or volume label2 t Clock display for eight seconds t Bass level for eight seconds t Treble level for eight seconds 1 For CD TEXT discs certain characters cannot be displayed Depending ...

Page 26: ... the system function is set to CD If the jack is covered with a cap remove it before use Notes There is no digital audio output from this jack during playback of ATRAC3plus MP3 tracks You cannot make a digital recording of a copy guarded disc using a digital component connected to this system Also playback may not be possible depending on the connected component Before connecting or disconnecting ...

Page 27: ...See Recording on a tape manually on page 20 1 Connect the digital optical cord not supplied 2 Start recording with the connected digital component MiniDisc player recorder etc Refer to the operating instructions provided with the connected component Note You can digitally record from the discs only However you cannot record from copy prohibited discs and ATRAC3plus MP3 tracks Listening to audio fr...

Page 28: ... timer cannot be set Set the clock again page 10 The timer does not function Check the timer setting and set the correct time pages 22 and 23 Cancel the Sleep Timer function page 21 Make sure the clock is correctly set page 10 The color irregularity on a TV screen persists Turn off the TV set once then turn it on after 15 to 30 minutes If the color irregularity still persists place the speakers fa...

Page 29: ...stem or placing them on separate stands When you listen to a track with bass sounds at high volume the speaker vibration may cause the sound to skip Play does not start from the first track Press PLAY MODE repeatedly until both PGM and SHUF disappear to return to Normal Play Tracks on the ATRAC CD or MP3 CD cannot be played back Recording was not performed according to the ISO9660 Level 1 or Level...

Page 30: ...ive wow or flutter or the sound drops out The capstans in the tape deck are dirty Clean them page 33 Noise increases or the high frequencies are erased The record playback heads are magnetized Demagnetize them page 33 The tape does not record No cassette is loaded Load a cassette The tab has been removed from the cassette Cover the broken tab with adhesive tape page 33 The tape has wound to the en...

Page 31: ...ou tried to program 25 or more tracks steps Tuner COMPLETE The preset operation ended normally TAPE NO TAB You cannot record the tape because the tab has been removed from the cassette NO TAPE There is no tape in the tape deck Timer PUSH SELECT You tried to set the clock or timer during timer operation SET CLOCK You tried to select the timer when the clock is not set SET TIMER You tried to select ...

Page 32: ...system further away from the TV set On operation If the system is brought directly from a cold to a warm location or is placed in a very damp room moisture may condense on the lens inside the CD player Should this occur the system will not operate properly Remove the disc and leave the system turned on for about an hour until the moisture evaporates When you move the system take out any disc If yo...

Page 33: ...rts that have contact with the tape after every 20 to 30 hours of use with a separately sold demagnetizing cassette For details refer to the instructions of the demagnetizing cassette Main unit Amplifier section European model DIN power output rated 60 60 watts 4 ohms at 1 kHz DIN Continuous RMS power output reference 75 75 watts 4 ohms at 1 kHz 10 THD Other models The following measured at AC 220...

Page 34: ... 13 cm dia cone type Tweeter 2 5 cm dia soft dome type Nominal impedance 4 ohms Dimensions w h d Approx 160 240 265 mm Mass Approx 3 2 kg net per speaker General Power requirements European model 230 V AC 50 60 Hz Other models 220 240 V AC 50 60 Hz Power consumption European model 60 watts 0 3 watts in Power Saving mode Other models 60 watts Dimensions w h d excl speakers Approx 175 240 295 mm Mas...

Page 35: ...ntrol ql 26 1 power 1 9 16 30 TAPE Z eject 4 18 TAPE nN play 5 18 19 23 TAPE x stop 6 18 19 23 30 TAPE X pause 7 18 19 TAPE z REC record 8 20 lm ML rewind fast forward go back go forward qd 12 18 21 23 select group qh 12 19 CD Z eject qj 12 CD NX play qk 11 CD x stop w 10 12 16 19 List of button locations and reference pages How to use this page Use this page to find the location of buttons and ot...

Page 36: ...Y ql 17 24 25 ENTER 9 10 13 15 22 23 EQ qs 21 FM MODE 4 17 FUNCTION 6 11 13 15 16 18 23 27 PLAY MODE qk 11 13 REPEAT 4 13 SLEEP w 21 TAPE qg 18 23 TUNER BAND 5 15 16 TUNER MEMORY qj 15 TUNING MODE qk 15 16 VOLUME q 22 26 1 power 1 9 22 m M rewind fast forward 7 12 18 N play 8 11 18 23 X pause 8 12 18 x stop 8 12 18 select group qa 12 go back go forward qf 10 12 21 22 tuning qf 15 ALPHABETICAL ORDE...

Reviews: