– 6 –
Handoffs
25.
Press the “K2” soft key on the front panel of the
HP8920B to execute the “Chng Chan” command.
26.
Enter the desired new voice channel and press the
“ENTER” key on the front panel of the HP8920B (ex.
“K2” + “5” + “1” + “0” + “ENTER”). The new voice
channel will appear on the HP8920B display screen.
27.
Repeat steps 25 and 26 to do handoffs to more than
one channel.
SINAD Measurements
28.
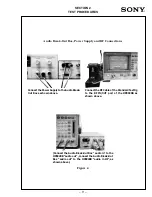
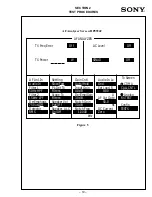
From the call processing flowchart screen, press the
“CANCEL” key on the front panel of the HP8920B.
Then press the Duplex key. The display screen on the
HP8920B will change but the call will remain in
process. See Figure 6.
29.
Select the “Amplitude” field and change the setting to
the receive power level to test SINAD. Remember to
account for cable and Test Jig loss.
30.
Select the “AF Anl In” field and change the setting to
“Audio In.” Select the "AF Gen" field and enter 8.0
kHz.
31.
Check to see if the “SINAD” field is on. Turn it on if it is
not.
32.
Measure the SINAD at the currently received power
level and make sure that it is at least 12 dB.
33.
Return “AF Anl IN” to “FM Demod.” Set power level
pack to –50dBm.
34.
Exit the “Duplex” screen and return to the call-
processing screen by pressing the “TESTS” + “K2”
keys on the front panel of the HP8920B.
35.
Repeat steps 29 through 35 to check the SINAD level
at other received power levels.
SAT Measurements
36.
From the call processing flowchart screen, press the
“CANCEL” key on the front panel of the HP8920B.
Then press Duplex. The display screen on the
HP8920B will change but the call will remain in
process. See Figure 6.
37.
The Duplex screen is set up to calculate SINAD
measurements. To change this to measure audio, select
the “SINAD” field and change setting to “AF Freq.”
38.
Check to see if the “AF Anl In” field is set to “FM
Demod.” Change the setting if it is not.
39.
Check to see if the “AF Freq” field is on. Turn it on if it is
not.
40.
Mute the microphone audio from the Handset by
depressing and holding the "Jog Dial", set "De-
Emphasis" to "OFF" and the "Detector" to RMS*SQRT2.
41.
You should see the SAT signal displayed on the screen,
as well as its deviation.
42.
To return to the call-processing screen, press the “PREV”
+ “K2” keys on the front panel of the HP8920B. This will
return you to the call processing screen and continue
the call.
43.
Unmute the Handset’s microphone audio by
depressing and holding the "Jog Dial".
44.
Press the "K4" key to stop testing.
Ending the Tests
45.
Press the “END” key on the Handset to terminate
the call.
46.
Press the “POWER” key to turn off the Handset.
SECTION 2
TEST PROCEDURES
Summary of Contents for CM-Bx200
Page 50: ... 28 ...


