background image

26

Troubleshooting

General

The power is not on.

• Connect the AC power cord to the AC IN

socket and a wall outlet securely.

• Make sure the batteries are inserted correctly.
• Replace all the batteries with new ones if

they are weak.

• You cannot turn on the player with the

remote when you operate the player on
batteries.

There is no audio.

• Unplug the headphones when listening

through speakers.

The power is turned off abruptly.

• Replace all the batteries with new ones.

Unusual sound is heard.
The sound is noisy, weak or has poor
quality.

• Replace all the batteries with new ones if

they are weak.

Various indications appear in the display
one after another.

• The player is in the demonstration mode.

c

Set the clock, or turn on and then press
DISPLAY for about 2 seconds to cancel
the demonstration mode.

Noise is heard.

• Someone is using a portable telephone or

other equipment that emits radio waves near
the player.

c

Move the portable telephone, etc., away
from the player.

Notes on CDs

• Before playing, clean the CD with a

cleaning cloth. Wipe the CD from the
center out.

• Do not use solvents such as benzine,

thinner, commercially available cleaners
or anti-static spray intended for vinyl LPs.

• Do not expose the CD to direct sunlight or

heat sources such as hot air ducts, nor
leave it in a car parked in direct sunlight
as there can be a considerable rise in
temperature inside the car.

• Do not stick paper or sticker on the CD,

nor scratch the surface of the CD.

• After playing, store the CD in its case.
If there is a scratch, dirt or fingerprints on
the CD, it may cause tracking error.

About CD-Rs/CD-RWs

This CD player can play CD-Rs/CD-RWs
recorded in the CD-DA format*, but
playback capability may vary depending on
the quality of the disc and the condition of
the recording device.

* CD-DA is the abbreviation for Compact Disc

Digital Audio. It is a recording standard used for
the Audio CDs.

Music discs encoded with
copyright protection
technologies

This product is designed to play back discs
that conform to the Compact Disc (CD)
standard. Recently, various music discs
encoded with copyright protection
technologies are marketed by some record
companies. Please be aware that among
those discs, there are some that do not
conform to the CD standard and may not be
playable by this product.

If you have any questions or problems
concerning your player, please consult your
nearest Sony dealer.

Summary of Contents for CFD-E90PS Operating Instructions (primary manual)

Page 1: ...CD Radio Cassette Corder Operating Instructions 3 263 561 11 1 2004 Sony Corporation CFD E90 ...

Page 2: ...n against harmful interference in a residential installation This equipment generates uses and can radiate radio frequency energy and if not installed and used in accordance with the instructions may cause harmful interference to radio communications However there is no guarantee that interference will not occur in a particular installation If this equipment does cause harmful interference to radi...

Page 3: ...14 The Radio Presetting radio stations 16 Playing preset radio stations 17 The Audio Emphasis Selecting the audio emphasis MEGA BASS 18 The Timer Setting the clock 19 Waking up to music 20 Falling asleep to music 21 Setting Up Choosing the power sources 23 Additional Information Precautions 25 Troubleshooting 26 Maintenance 29 Specifications 30 Index 31 About the demonstration mode If HELLO appear...

Page 4: ...own to open the CD compartment and place the CD on the CD compartment 2 Close the lid of the CD compartment 3 Press u The player turns on direct power on and plays all the tracks once Basic Operations 3 Playing a CD Display With the label side up 1 2 Playing time Track number ...

Page 5: ...e remote stop playback Press x pause playback Press u Press the button again to resume play after pause go to the next track Turn the jog dial clockwise On the remote press go back to the previous track Turn the jog dial counterclockwise On the remote press remove the CD Press ZPUSH OPEN CLOSE turn on off the player Press POWER The button has a tactile dot ...

Page 6: ...e display direct power on 2 Hold down TUNE or TUNE until the frequency digits begin to change in the display The player automatically scans the radio frequencies and stops when it finds a clear station If you can t tune in a station press the button repeatedly to change the frequency step by step Display Indicates an FM stereo broadcast 1 2 ...

Page 7: ...n the remote turn on off the radio POWER VOLUME has a tactile dot To improve broadcast reception Reorient the antenna for FM Reorient the player itself for AM for FM for AM Tip If the FM broadcast is noisy press MODE until Mono appears in the display and the radio will play in monaural POWER VOLUME MODE ...

Page 8: ...rd see page 23 1 Press xZ to open the tape compartment and insert a recorded tape Use TYPE I normal tape only Close the compartment 2 Press n The player turns on direct power on and starts playing With the side you want to play facing you Display 2 1 ...

Page 9: ...s adjust the volume VOLUME VOL on the remote stop playback xZ fast forward or rewind the tape m or M pause playback X Press the button again to resume play after pause eject the cassette xZ turn on off the player POWER VOLUME and n have a tactile dot xZ X m M POWER VOLUME ...

Page 10: ...ent and insert a blank tape Use TYPE I normal tape only 2 Select the program source you want to record To record from the CD player insert a CD see page 4 and press x on the CD section To record from the radio tune in the station you want see page 6 3 With the side you want to record on facing you Display 1 ...

Page 11: ...ressed z in step 3 press MODE to select the position of ISS Interference Suppress Switch that decreases the noise the most For the best results use the AC power as a power source To erase a recording proceed as follows 1 Insert the tape whose recording you want to erase 2 Press FUNCTION on the remote repeatedly until TAPE appears 3 Press z xZ X POWER MODE n To Press stop recording xZ pause recordi...

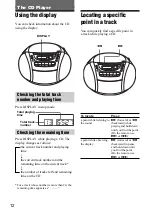
Page 12: ...ward or m the sound backward while playing and hold down until you find the point On the remote use or a point while observing M forward or m the display backward in pause and hold down until you find the point On the remote use or m M Checking the remaining time Press DISPLAY while playing a CD The display changes as follows tthe current track number and playing time r the current track number an...

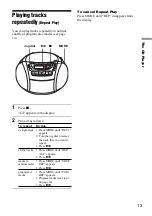
Page 13: ...e tracks tracks in random order programed tracks x MODE Jog dial u Do this 1 Press MODE until REP 1 appears 2 Turn the jog dial to select the track that you want to repeat 3 Press u 1 Press MODE until REP ALL appears 2 Press u 1 Press MODE until SHUF REP appears 2 Press u 1 Press MODE until PGM REP appears 2 Program tracks see step 3 on page 14 3 Press u To cancel Repeat Play Press MODE until REP ...

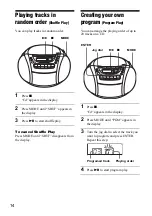
Page 14: ...your own program Program Play You can arrange the playing order of up to 20 tracks on a CD x MODE Jog dial u ENTER Playing tracks in random order Shuffle Play You can play tracks in random order 1 Press x Cd appears in the display 2 Press MODE until SHUF appears in the display 3 Press u to start shuffle play To cancel Shuffle Play Press MODE until SHUF disappears from the display x u MODE Programe...

Page 15: ...d order To change the current program Press x once if the CD is stopped and twice if the CD is playing The current program will be erased Then create a new program following the programing procedure Tips You can play the same program again since the program is saved until you open the CD compartment You can record your own program After you ve created the program insert a blank tape and press z to...

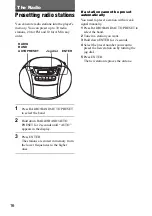
Page 16: ...e display 3 Press ENTER The stations are stored in memory from the lower frequencies to the higher ones ENTER RADIO BAND AUTO PRESET Jog dial If a station cannot be preset automatically You need to preset a station with a weak signal manually 1 Press RADIO BAND AUTO PRESET to select the band 2 Tune in a station you want 3 Hold down ENTER for 2 seconds 4 Select the preset number you want to preset ...

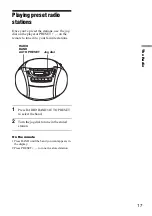
Page 17: ...r PRESET on the remote to tune in to your favorite stations 1 Press RADIO BAND AUTO PRESET to select the band 2 Turn the jog dial to tune in the stored station On the remote 1 Press BAND until the band you want appears in the display 2 Press PRESET to tune in a stored station Jog dial RADIO BAND AUTO PRESET ...

Page 18: ... the audio emphasis MEGA BASS You can adjust the audio emphasis of the sound you are listening to Reinforcing the bass sound Press MEGA BASS MEGA BASS appears in the display To return to normal sound press the button again MEGA BASS ...

Page 19: ... to set the current hour Then press ENTER The minute digits flash Set the minutes by turning the jog dial until the correct minute is displayed The Timer Setting the clock indication appears in the display until you set the clock 3 Press ENTER The clock starts from 00 seconds Tip The time display system 12 hour system AM 12 00 midnight PM 12 00 noon CLOCK SLEEP TIMER ENTER Jog dial ...

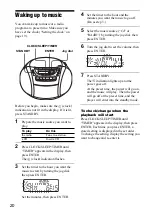
Page 20: ... time you press ENTER a stored setting is displayed in the set order To change the setting display the setting you want to change and re enter it Waking up to music You can wake up to music or a radio program at a preset time Make sure you have set the clock Setting the clock on page 19 Before you begin make sure the clock indication is not lit in the display If it is lit press STANDBY 1 Prepare t...

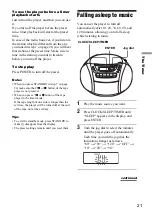
Page 21: ...r playback will start at the preset time In case of the radio however if you listen to the station which is different from the one you tuned in step 1 on page 20 you will hear that station at the preset time Make sure to tune in the station you want to listen to before you turn off the player To stop play Press POWER to turn off the power Notes When you press STANDBY in step 7 on page 20 make sure...

Page 22: ...til the tape reaches the end Tips You can fall asleep and wake up to different music Set the waking up timer first see page 20 turn on the power and then set the sleeping timer However you cannot store different radio stations You can set different volume for the waking up timer and the sleeping timer For instance you can sleep at lower volume and wake up at higher volume Falling asleep to music c...

Page 23: ...up batteries Insert three size AA R6 batteries not supplied into the battery compartment These batteries work to save the memory data AC IN Replacing batteries Take out the batteries as illustrated Note Before you replace the batteries be sure to take out the CD from the player 14 Battery compartment 2 to a wall outlet continued ...

Page 24: ...yer on batteries disconnect the AC power cord from the player Replacing batteries Replace the batteries when the OPR BATT indicator dims or when the player stops operating Replace all the batteries with new ones Notes Before you replace the batteries be sure to take out the CD from the player When you operate the player on the batteries you cannot turn on the player with remote Tip When you operat...

Page 25: ...a place subject to direct sunlight excessive dust or mechanical shock Do not place the player on an inclined or unstable place Do not place anything within 10 mm of the side of the cabinet The ventilation holes must be unobstructed for the player to operate properly and prolong the life of its components If the player is left in a car parked in the sun be sure to choose a location in the car where...

Page 26: ...nzine thinner commercially available cleaners or anti static spray intended for vinyl LPs Do not expose the CD to direct sunlight or heat sources such as hot air ducts nor leave it in a car parked in direct sunlight as there can be a considerable rise in temperature inside the car Do not stick paper or sticker on the CD nor scratch the surface of the CD After playing store the CD in its case If th...

Page 27: ...f you are using the remote while listening to an AM radio noise may be heard This is unavoidable The picture of your TV becomes unstable If you are listening to an FM program near the TV with an indoor antenna move the player away from the TV Tape Player The tape does not move when you press an operation button Close the tape compartment securely The REC z button does not function The tape does no...

Page 28: ...sure the remote sensor is not exposed to strong light such as direct sunlight or fluorescent lamp light Move closer to the player when using the remote After trying the above remedies if you still have problems unplug the AC power cord and remove all the batteries After all the indications in the display disappear plug the power cord and insert the batteries again If the problem persists please co...

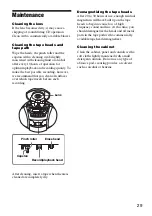
Page 29: ...owder or solvent such as alcohol or benzine Maintenance Cleaning the lens If the lens becomes dirty it may cause a skipping of sound during CD operation Clean with a commercially available blower Cleaning the tape heads and tape path Wipe the heads the pinch roller and the capstan with a cleaning swab slightly moistened with cleaning fluid or alcohol after every 10 hours of operation for optimum p...

Page 30: ...rding system 4 track 2 channel stereo Fast winding time Approx 110 sec with Sony cassette C 60 Frequency response TYPE I normal 50 15 000 Hz General Speaker Full range 8 cm 3 1 4 in dia 4 Ω cone type 2 Outputs Headphones jack stereo minijack For 16 68 Ω impedance headphones Power output 1 8 W 1 8 W at 4 Ω 10 harmonic distortion Power requirements For CD radio cassette corder 120 V AC 60 Hz 9 V DC ...

Page 31: ...ast reception 7 L Listening to the radio 6 Locating a specific track 12 M N O MEGA BASS 18 P Q Playing a CD 4 a tape 8 preset radio stations 17 tracks repeatedly 13 Power sources 23 Presetting radio stations 16 Program Play 14 R Radio stations playing 17 presetting 16 Recording on a tape 10 Repeat Play 13 S Selecting audio emphasis 18 tracks 5 Setting the clock 19 Setting up 23 Shuffle Play 14 T T...

Page 32: ...ttp www sony com productregistration Proper registration will enable us to send you periodic mailings about new products services and other important announcements Registering your product will also allow us to contact you in the unlikely event that the product needs adjustment or modification Thank you ...

Reviews: