Ov
er
v
ie
w
Location and Function of Parts
21
6
Switch 8 (Infrared signal output switch)
Set to ON to enable an infrared signal output, or
OFF to disable the output.
7
Switches 9, 10
These switches are not used. Set it to OFF.
Notes
• Set the switches before you turn on the power of the
camera.
• You cannot use a camera with its camera address set to
“0” together with cameras with their camera address
set to “1” to “7.”
• You cannot manually assign the same address to
multiple cameras and control the cameras
simultaneously from a single controller.
• When you set switches 9 and 10 to ON, signals
received at the
C
remote sensor are output from pin
7 of the
N
VISCA RS-232C IN connector. When you
set them to OFF, the signals are not output.
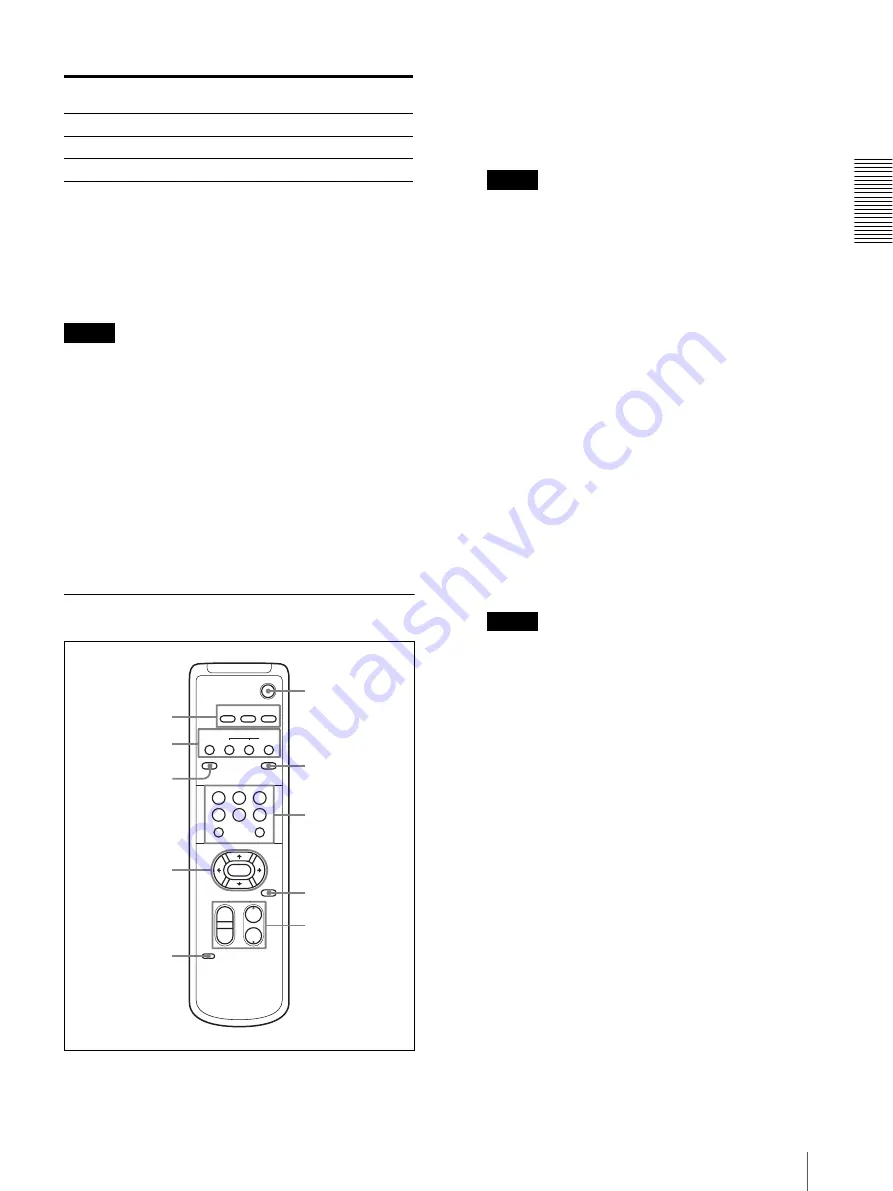
Remote Commander (supplied)
A
CAMERA SELECT buttons
Press the button corresponding to the camera you
want to operate with the Remote Commander.
The camera number can be set using the IR
SELECT switch on the rear of the camera.
Note
If two or more cameras are adjacent and have the
same camera number, they are operated
simultaneously with the same Remote Commander.
When you install the cameras close to each other,
set different camera numbers.
For the camera number setting, see “Operating
Multiple Cameras with the Remote Commander”
on page 44.
B
FOCUS buttons
Used for focus adjustment.
Press the AUTO button to adjust the focus
automatically. To adjust the focus manually, press
the MANUAL button, and adjust it with the FAR
and NEAR buttons.
C
DATA SCREEN button
Press this button to display the main menu. Press it
again to turn off the menu. If you press the button
when a lower-level menu is selected, the display
returns to the next menu one level higher.
Note
Pan/tilt and zoom operations are disabled when the
menu is displayed.
D
PAN-TILT buttons
Press the arrow buttons to perform panning and
tilting. Press the HOME button to face the camera
back to the front.
When the menu is displayed, use
V
or
v
to select
the menu items and
B
or
b
to change the set values.
E
L/R DIRECTION SET button
Hold down this button and press the REV button to
change the direction of the camera movement
opposite to that indicated by the arrow of the
B
/
b
buttons.
To reset the direction of the camera movement,
press the STD button while holding down this
button.
F
POWER switch
Press this button to turn on/off the camera when the
camera is connected to an AC outlet.
Camera
address
0
1
2
3
4
5
6
7
Switch 5
OFF ON
OFF ON
OFF ON
OFF ON
Switch 6
OFF OFF ON
ON
OFF OFF ON
ON
Switch 7
OFF OFF OFF OFF ON
ON
ON
ON
POWER
CAMERA SELECT
1
2
3
AUTO
POSITION
HOME
RM-EV100
RESET
PRESET
STD
REV
BACK LIGHT
MANUAL
FAR
FOCUS
NEAR
W
T
W
T
1
2
3
4
5
6
PAN-TILT
SLOW
FAST
ZOOM
L/R
DIRECTION SET
PAN-TILT
RESET
DATA SCREEN
6
7
8
9
q;
1
2
3
4
5


