background image

15 

GB

W

atching TV

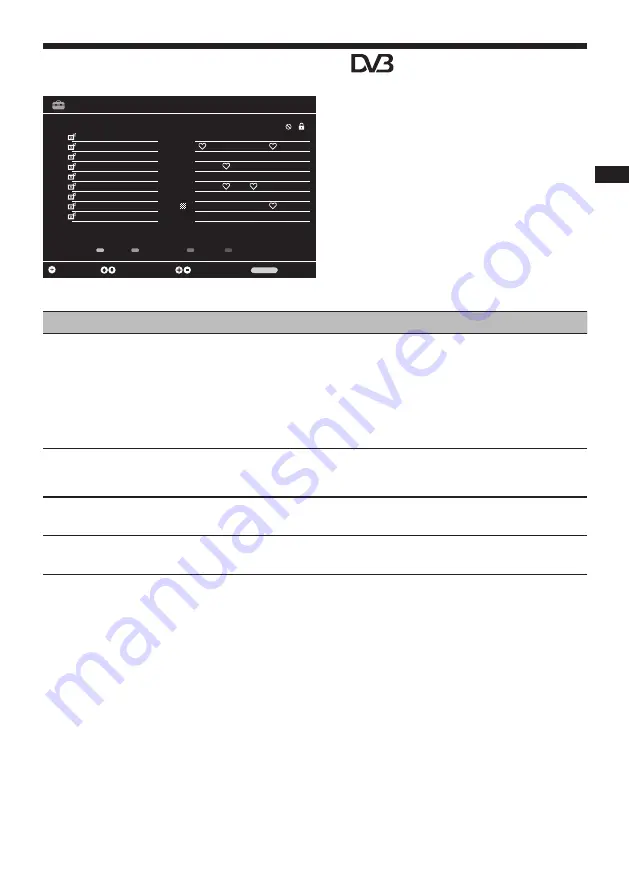
Using the Digital Favourite List 

You can create four different 
favourite channel lists.

1

  Perform the following operations 

to open the programme table. 
MENU 

p f


p

 Settings 

p


3


p


f p 

Channel Setup

p


3


p


f p 

Programme Table

p


3

.

2

  Perform the desired operation as 

shown in the following table or 
displayed on the screen.

1 BBC ONE
2 BBC TOW
3 ITV 1
4 five
5 Channel 4

7 BBC FOUR
8 ITV 2
9 NRK2

6 BBC THREE

11:00   Basil Brush
11:30   Secret Agent
12:15   Trisha
13:00   Deal or no Deal
13:25   International Blows
14:00   Carry On Up The Khyber
14:50   ER
15:10   Sally Jessy
15:40   Countdown

Service Type DTV

Wed 27 Feb 11:21

Basil Brush(Now)

27 Feb 2009 


11:00    11:30

Previous Day

Next Day

Reminder List

Reminder

Tune

Select

Information

Exit

MENU

001 

BBC ONE

002 

BBC TOW

003 

ITV 1

004 

five

005 

Channel 4

007 

BBC FOUR

008 

TV 3

009 

NRK2

006 

BBC THREE

Programme Table

Network

Move

Delete

Service Type

Prog

Service Name

CA     FAV1     FAV2     FAV3     FAV4         

Service Type

Network

All Networks

ALL TYPE

Tune

Select

Page Up/Down

Back

RETURN

To

Do this

Add or remove channels from a favourite 
list

1  

Press 

F

/

f

 to select the channel you want to add to the favourite list.

2  

Press 

G

/

g

 to select the favorite list to which the selected channel will 

be added, then press 

.

3  

T

 symbol appears under the relevant favorite list for the channel 

added. 

4  

To remove a channel from the favorite list, select the relevant channel 
from the favorite list and press 

T

 symbol will disappear.

5  

Press RETURN 

O

 to finish setting up.

Select a favourite list

1  

Press 

T

 to select a favorite list.

2  

In Favourite List menu, press 

F

/

f

 to select one of the lists from FAV1 

to FAV4, then press 

.

Watch a channel

1  

Open the desired favourite list.

2  

Press 

F

/

f

 to select a channel, then press 

.

Turn off the Favourite List

Press RETURN 

O

.

 

This function may not be available in some 

countries/regions.

Summary of Contents for BRAVIA 4-193-041-12

Page 1: ...KDL 19BX200 KDL 22BX200 LCD Digital Colour TV Operating Instructions Start up Guide Instruction Manual Additional Information 4 193 041 12 ...

Page 2: ...nd convenience Should the fuse in the plug supplied need to be replaced a 5 AMP fuse approved by ASTA or BSI to BS 1362 i e marked with or must be used When an alternative type of plug is used it should be fitted with a 5 AMP FUSE otherwise the circuit should be protected by a 5 AMP FUSE at the distribution board If the plug supplied with this equipment has a detachable fuse cover be sure to attac...

Page 3: ...ng Optional Equipment Connecting optional equipment 16 Viewing pictures from connected equipment 18 Playing Back Photo Music via USB 18 Using Control for HDMI 19 Using MENU functions Navigating through menus 20 TV Settings Menu 21 Additional Information Installing the Accessories Wall Mount Bracket 30 Specifications 31 Troubleshooting 33 Before operating the TV Please read Safety Information page ...

Page 4: ...of batteries Please consult your local authority Handle the remote with care Do not drop or step on it or spill liquid of any kind onto it Do not place the remote in a location near a heat source a place subject to direct sunlight or a damp room 2 Attaching the stand Follow these steps to attach the stand to the TV 1 Open the carton box and take out the stand 2 Place the TV set on the stand 3 Seat...

Page 5: ...er e g DVD recorder with HDMI Connecting a satellite receiver recorder e g DVD recorder with SCART Coaxial cable Coaxial cable Scart cable VCR DVD Recorder Coaxial cable Coaxial cable HDMI cable VCR DVD Recorder Start up guide 4 Initial settings ...

Page 6: ...s F f to select Auto Tuning then press 5 Press G g to select the country Press F f to select Scan Type Then press G g to select ATV Analogue TV DTV Digital TV DTV or ATV Time Zone will change automatically according to the country selection Press to start auto tuning Auto Tuning Country Selection Scan Type Time Zone Select Back ATV DTV London GMT U K RETURN Select Analogue TV or Digital TV tuning ...

Page 7: ...nd or twist the mains lead excessively The core conductors may be exposed or broken Do not modify the mains lead Do not put anything heavy on the mains lead Do not pull on the mains lead itself when disconnecting the mains lead Air circulation is blocked Wall Wall Do not connect too many appliances to the same mains socket Do not use a poor fitting mains socket Prohibited Usage Do not install use ...

Page 8: ...occur This product has been tested and found to be compliant with the limits set out in the EMC Directive for using connection cables not longer than 3 meters Batteries Observe the correct polarity when inserting batteries Do not use different types of batteries together or mix old and new batteries Dispose of batteries in an environmentally friendly way Certain regions may regulate disposal of ba...

Page 9: ...Mode Displays current channel number and date information In Teletext Mode Reveals hidden information e g answers to a question page 13 5 F f G g 3 6 ZOOM In TV Mode Enlarges the picture in 3 steps by focusing on the center In Teletext Mode Enlarges the teletext page in 2 steps 7 MENU page 20 8 T Favourite list Displays the favourite list that you have specified page 15 9 V Subtitle Changes the su...

Page 10: ...o select the page qh O RETURN Returns to the previous screen of any displayed menu qj L GUIDE A B In Digital Mode EPG Digital Electronic Programme Guide page 14 qk Buttons for optional equipment Operates the equipment connected to the TV page 18 ql N Picture format Selects the picture format page 13 w M Input select Text hold In TV Mode Displays the source list page 18 In Teletext Mode Stop the se...

Page 11: ...ect the TV completely pull the plug from the mains 5 Power Standby Indicator and Remote control sensor Lights up in green when the TV is turned on Lights up in red when the TV is in standby mode Receives IR signals from the remote Do not put anything over the sensor as its function may be affected Make sure that the TV is completely turned off before unplugging the mains lead Unplugging the mains ...

Page 12: ...ccession To select a digital channel using the Digital Electronic Programme Guide EPG see page 14 In digital mode An information banner appears briefly The following icons may be indicated on the banner Interactive service is available MHEG Digital Text Radio service Scrambled Subscription service Multiple audio languages available V Subtitles available Subtitles available for the hearing impaired...

Page 13: ...text p No Teletext Exit the Teletext service Press number buttons or c C to select a page Press M to hold a page Press U m to reveal hidden information on a page If there are subpages under a page and if you do not want to wait for auto scrolling press G button for previous pages and g button for following pages Press ZOOM twice to enlarge the text on a page in two steps first press will enlarge t...

Page 14: ...ogramme information line will be activated 2 Press red button to display the previous day s information and press green button to display the next day s information 3 Press F f to select the programme information titles then press U Y for details To set a reminder for a programme 1 Press F f to select the channel for which a reminder will be set then press g Programme information line will be acti...

Page 15: ...is Add or remove channels from a favourite list 1 Press F f to select the channel you want to add to the favourite list 2 Press G g to select the favorite list to which the selected channel will be added then press 3 3 T symbol appears under the relevant favorite list for the channel added 4 To remove a channel from the favorite list select the relevant channel from the favorite list and press 3 T...

Page 16: ...ptional equipment to your TV Connection cables are not supplied DVD Player Recorder Video game console Decoder VCR Headphone Digital camera USB device CAM card PC DVD player Component output DVD Player PC HDMI output Blu ray DVD player Digital video camera Video game console Digital video camera ...

Page 17: ... D sub 15 ref 1 793 504 11 available in Sony Service Center or an equivalent Y Pb Pr input only supports the following video inputs 480i 480p 576i 576p 720p 1080i 1080p A i I J AV1 SCART cable You can connect a decoder When you connect a decoder scrambled broadcast signals are transmitted to the decoder where they are decoded and send to the television You can connect a recorder e g DVD recorder d...

Page 18: ...en press 3 to confirm File or folder list appears on the screen 4 Press F f to select a file or folder then press 3 to confirm Press red button to select all files Press green button to deselect all selected files When you select a folder select a file press 3 to highlight the file then press u blue button Playback starts If you want to playback multiple photo or music files in the folder press 3 ...

Page 19: ...st and then zoomed out Rotating a photo This function allows you to rotate the photos for 90 1 Press G g to rotate a photo for 90 while it is being played Using Control for HDMI Control for HDMI function allows the equipment to control each other through the HDMI CEC Consumer Electronics Control feature defined by HDMI You can connect together the Sony HDMI compatible devices such as a TV and a DV...

Page 20: ...2 Press F f to select an option then press 3 Symbol for the option Description Photo You can access the photo files stored in USB equipment page 18 Music You can access the music files stored in USB equipment page 18 Settings You can adjust advances settings page 21 MENU Exit MENU Music Settings Photo Photo 3 Follow the instructions on the screen 4 Press MENU to exit The options you can adjust var...

Page 21: ... picture quality by increasing picture contrast Movie For viewing film based content Most suitable option for viewing in a theatre like environment Sports Provides the best picture quality for viewing sports based content User Stores your individual picture settings Brightness Brightens or darkens the picture Contrast Increases or decreases picture contrast Colour Increases or decreases colour int...

Page 22: ... the current scene Low Medium High Modifies the effect of the perfect clear Off Turns off the perfect clear feature Dynamic Contrast Sends a brighter or darker image to the screen according to the brightness level of the picture and creates a wider effect in terms of contrast Low Medium High Modifies the effect of the dynamic contrast Off Turns off the dynamic contrast feature Dynamic Backlight Ad...

Page 23: ...adcasts select Dual I for sound channel 1 Dual II for sound channel 2 Surround Gives depth to the sound of the programme you are watching Sound Mode Adjusts the sound effect depending on the features of the programme you are watching Music Creates sound effects that make you feel like in a concert hall Clear Voice Creates effects that emphasize the conversation sounds Flat Enhances clarity detail ...

Page 24: ...to which the tuned channel will be stored 2 Press F f to select System then press G g to make your selection BG For Western Europe countries regions I For England DK For Eastern Europe countries regions L For France 3 Press F f to select Channel then press 3 to select S for cable channels or C for terrestrial channels 4 Tune the channels as follows If you do not know the channel number frequency P...

Page 25: ...enience with the selected service type Move Changes the position of a stored channel 1 Press F f to select the channel you want to move 2 Press green button 3 Press the number buttons to enter the new position then press 3 Channel will be moved to its new position 4 Press RETURN O to finish setting up Delete Deletes a stored channel 1 Press F f to select the channel you want to delete 2 Press yell...

Page 26: ...dance with the entry mode are configured by this function Horizontal Position Moves the screen to the left or to the right Vertical Position Moves the screen up or down Size This is the pixel clock frequency You can narrow down or enlarge the display by selecting a desired value Phase Using G g you can ensure that the colours and shapes are exactly consolidated on the PC image Auto Adjust Mode Aut...

Page 27: ...e after 5 minutes if it does not receive any signal from any of the sources Time Zone Allows you to manually select the time zone you are in if it is not the same as the default time zone setting for your country region Options Language Settings Allows you to make all language settings Language Settings Selects the language in which the menus are displayed Audio Languages Selects the language used...

Page 28: ...te through USB input HDMI Set up This function allows the TV to communicate with equipment connected to HDMI socket through Control for HDMI This menu appears under Preference menu when the input source is set to HDMI Control for HDMI HDMI allows to set the TV so that it will communicate with an HDMI control compatible equipment When it is set as On following menu operations can be performed Auto ...

Page 29: ...N code 9999 is always accepted Block Programme Allows you to prevent watching the desired programmes Enter the correct PIN code to watch the blocked programmes 1 Press 3 2 Press F f to select the channel you want to block 3 Press green button Repeat the above procedure to block other channels 4 Press RETURN O to finish setting up Parental Guidance Sets an age restriction for programmes To watch a ...

Page 30: ...tion to safety during the installation periodic maintenance and examination of this product Your TV can be installed using a Wall mount bracket VESA compliant with 75x75mm fixings Wall mount bracket is not supplied with TV set Steps 1 Place on the Table as shown below protection screen with Protection bag when securing the Wall Mount 2 Detach Stand from TV set refer page 6 3 Unscrew and Disassembl...

Page 31: ... Supported formats 1080p 1080i 720p 576p 576i 480p 480i Y 1 Vp p 75 ohm 0 3V negative sync Pb Cb 0 7 Vp p 75 ohm Pr Cr 0 7 Vp p 75 ohm o Y Pb Pr IN Audio input mini jack HDMI IN Supported formats 1080 24p 1080p 1080i 720p 576p 576i 480p 480i Audio Two channel linear PCM 32 44 1 and 48 kHz 16 20 and 24 bit Dolby Digital 32 44 1 and 48 kHz Max bit rate 640 kHz PC input see page 32 I PC PC input D su...

Page 32: ...ct to change without notice 1 4 hours a day and 365 days a year PC Input Signal Reference Chart for PC and HDMI IN Resolution Horizontal frequency kHz Vertical frequency Hz Standard Signals Horizontal Pixel Vertical Line VGA 640 480 31 5 60 VESA 640 480 37 5 75 VESA 720 400 31 5 70 VESA SVGA 800 600 37 9 60 VESA 800 600 46 9 75 VESA XGA 1024 768 48 4 60 VESA 1024 768 56 5 70 VESA 1024 768 60 0 75 ...

Page 33: ...ing a signal from the Y Pb Pr Component sockets Check the connection of the Y Pb Pr Component sockets and check if each sockets are firmly seated in their respective sockets Sound No sound but good picture Press 2 or Mute Channels The desired channel cannot be selected Switch between digital and analogue mode and select the desired digital analogue channel Some channels are blank Scrambled Subscri...

Page 34: ...r TV equipment Your new TV has a digital tuner built in which means it is ready to receive the Freeview signal by simply plugging it into your aerial socket check if you can get digital TV through your aerial now or whether you ll have to wait until switchover at www digitaluk co uk When the TV switchover happens in your area there are at least two occasions when you will need to re tune your TV i...

Page 35: ... Auto Tuning then press 3 5 Press F f select Scan Type and press G g select DTV then press 3 6 Follow the on secren instructions If you are missing any channels it may be that they are not available in your area or that your aerial needs upgrading If you have any questions please contact Sony on 08705 111 999 or call Digital UK on 0845 6 50 50 50 or visit www digitaluk co uk ...

Page 36: ...Useful information for Sony products http www sony europe com myproduct http www sony net 2010 Sony Corporation 4 193 041 12 4193041 HRE 801G 01 ...

Reviews: