2-2 (E)
BDX-D1000
8.
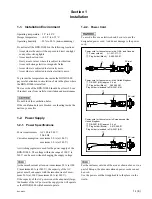
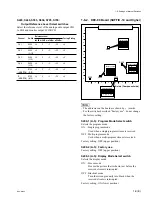
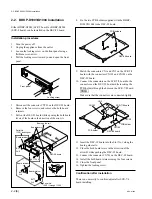
Fix the two PCB holders supplied with the BDKP-
D1003/D1004 to the DEC-99 board.
9.
Match the connectors CN1 and CN3 on the SCR-7/8
board with the connectors CN102 and CN103 on the
DEC-99 board.
10. Connect the connectors on the SCR-7/8 board to the
connectors on the DEC-99 board while inserting the
PCB holders through the holes on the SCR-7/8 board.
n
Make sure that the connectors are connected tightly.
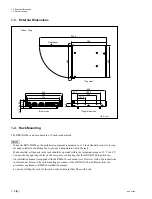
11. Insert the DEC-99 board into the Slot No.1 along the
board guide rails.
12. Close the both board levers in the direction of the
arrow B while pushing the DEC-99 board.
13. Connect the connector CN701 on the DEC-99 board.
14. Install the both board retainers using the four screws.
15. Close the front panel.
16. Tighten the locking screw.
Confirmation after installation
There is no necessity to confirm/adjust after SCR-7/8
board installing.
2-2. BDKP-D1003/D1004 Installation
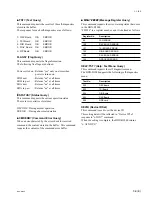
Either BDKP-D1003 (SCR-7 board) or BDKP-D1004
(SCR-8 board) can be installed on the DEC-99 board.
Installation procedures
1.
Turn the power off.
2.
Unplug the appliance from the outlet.
3.
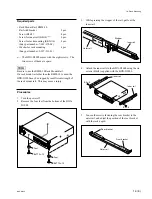
Loosen the locking screw on the front panel using a
flatblade screwdriver.
4.
Pull the locking screw toward you and open the front
panel.
5.
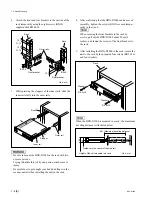
Disconnect the connector CN701 on the DEC-99 board.
6.
Remove the four screws, and remove the both board
retainers.
7.
Pull out the DEC-99 board while opening the both board
levers of the board in the direction of the arrow A.
Front panel
Locking screw
DEC-99 board
PCB holders
DEC-99 board
SCR-7/8 board
CN102
CN1
CN3
CN103
PCB holder
PCB holder
2-2. BDKP-D1003/D1004 Installation
BVTT
3
x
6
BVTT 3
x
6
Board levers
DEC-99 board
CN701
Board retainer
Board guide rail
Install
Remove
B
A
BVTT
3
x
6
BVTT
3
x
6
Board retainer
Board retainer
Serial No.
10001 through 11000
Serial No.
11001 and Higher

