WF-1000XM3
11
Sony CONFIDENTIAL
For Authorized Servicer
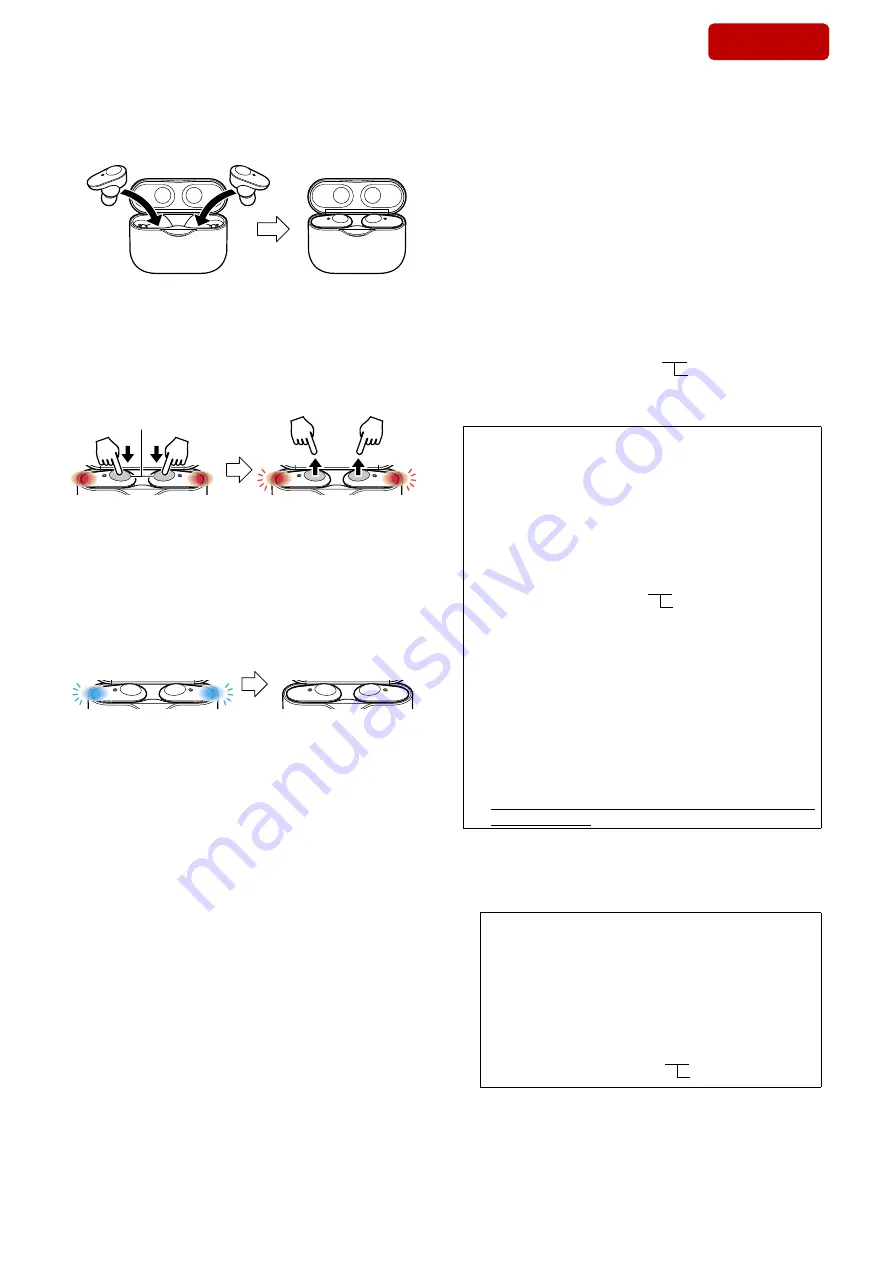
6. After writing the Bluetooth information, attach the left and right
headset to the charging case.
L
R
7. Touch and hold the touch sensor control panel on the left and
right headset simultaneously, and the indicator changes from red
lighting to red
fl
ashing, then release the your
fi
nger while red
fl
ashing state.
Note 7:
It takes about 10 seconds to touch and release the touch sensor con-
trol panel.
Red lighting: Touch and hold
L
R
Touch sensor
control panel
Red flashing: Release your finger
L
R
8. The left and right headset indicator automatically changes from
red
fl
ashing to 4 times of blue
fl
ashing, and when the indicator
is turn off, the pairing information with the PC is deleted and
initialization is complete.
Note 8:
When this operation is performed, it might not be able to connect to
iPhone or PC.
In that case, delete the registration of this unit on iPhone or PC,
register the device again.
L
R
Turn off
Blue flashing (4 times)
L
R
9. Check the operation of this unit.
10. Select the device (WF-1000XM3) displayed on the PC, right
click and select “Remove device” from the displayed menu and
delete the device (WF-1000XM3).
Note 9:
When another WF-1000XM3 is connected to the PC by Bluetooth
connection, a new device (WF-1000XM3) will be added.
If there are plural devices (WF-1000XM3), you may errone-
ously reference and write the Bluetooth address of another WF-
1000XM3. Therefore, delete the existing device before adding a
new device.
11. Complete the replacement work on the charging case.
BLUETOOTH INFORMATION WRITING METHOD
When the charging case is replaced, it is necessary to perform writ-
ing of Bluetooth information.
Write the Bluetooth information according to the procedure below.
Preparation:
• Windows PC with the Bluetooth function
• NFC compatible smartphone that installed the
fi
le manager ap-
plication (ASTRO File Manager, File Expert, etc.)
• USB cable for the smartphone
• NFC Tag Data Writing Application
(Application name: mdr-nfc-tag-writer_2.0.1.apk)
Note 1:
“2.0.1” in the
fi
le name indicates the version of NFC Tag Data Writ-
ing Application. Always use the latest version of the NFC Tag Data
Writing Application.
Example: mdr-nfc-tag-writer_2.0.1.apk
version
Note 2:
Con
fi
rm the method of obtaining the NFC Tag Data Writing Ap-
plication and its latest version with the each service headquarters.
Notes on the use of the NFC Tag Data Writing Applica-
tion
• The NFC Tag Data Writing Application may be updated ir-
regularly.
Always use the latest version of the NFC Tag Data Writing
Application.
The version of NFC Tag Data Writing Application is repre-
sented by the
fi
le name of NFC Tag Data Writing Applica-
tion.
Example: mdr-nfc-tag-writer_2.0.1.apk
version
• Be sure to uninstall older versions of the NFC Tag Data
Writing Application before installing the latest version.
• The NFC Tag Data Writing Application is also used in mod-
els other than the headphone category, and there are multiple
types. If multiple NFC Tag Data Writing Applications are
installed on a smartphone, do not launch more than one at
the same time.
• The NFC Tag Data Writing Application varies depending on
your model.
Be sure to use the speci
fi
ed NFC Tag Data Writing Applica-
tion.
Use of not speci
fi
ed NFC Tag Data Writing Application is
strictly prohibited.
1. Installing the NFC Tag Data Writing Application
Install the NFC Tag Data Writing Application on the smartphone
for writing of Bluetooth information.
If the NFC Tag Data Writing Application is already installed,
con
fi
rm the following.
• Be absolutely sure that the NFC Tag Data Writing Ap-
plication supports your model.
• Con
fi
rm that the NFC Tag Data Writing Application is
the latest version.
The version of NFC Tag Data Writing Application is rep-
resented by the
fi
le name.
Example: mdr-nfc-tag-writer_2.0.1.apk
version
SYS SET
2020/04/03 06:12:21 (GMT+09:00)


