background image

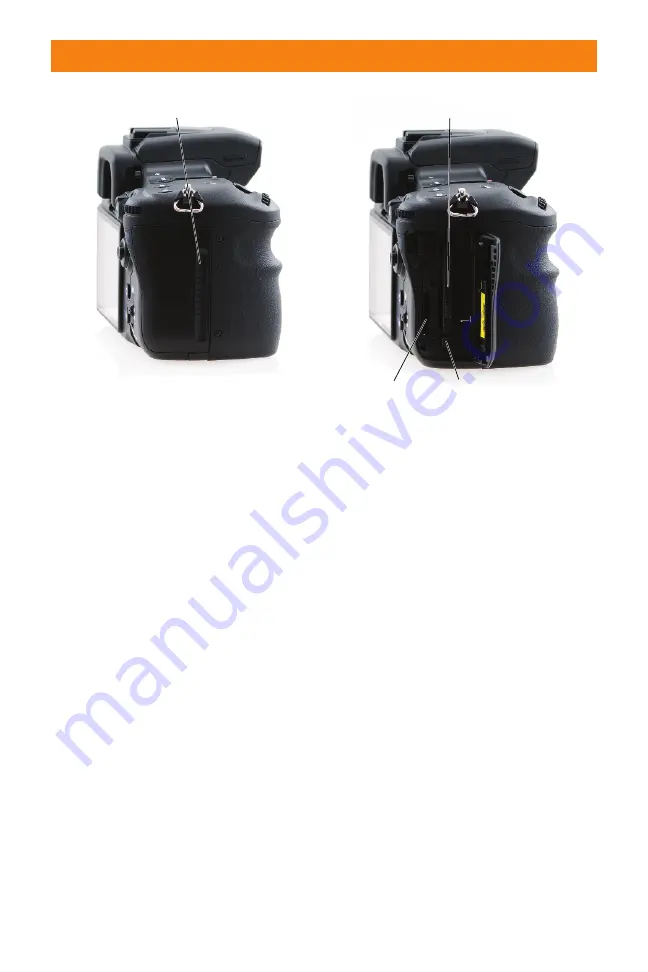
Memory Stick Duo slot. The Sony
Alpha A700 can use Memory Stick
Duo to save the images, and this
slot is where it is inserted into the
camera. The Memory Stick Duo 
is pushed into the camera until
you hear it click. To remove the
Memory Stick Duo, press down 
on the memory stick to release it.

CompactFlash slot. The Sony
Alpha A700 can use CompactFlash
or Microdrive media, and this is
where it is inserted into the cam-
era. The CompactFlash card or
Microdrive needs to be inserted
with the label towards the back 
of the camera. Push on the
CompactFlash card until it is firmly
seated.

CompactFlash card eject button.
To eject a CompactFlash card or
Microdrive, press down on this but-
ton until the card can be removed
from the slot.

Remote Commander

The Remote Commander is a great acces-
sory for your Sony Alpha A700, and the best
part is that it doesn’t cost anything extra.
The Remote Commander can be used in
two different ways. The first is when it is
used to remotely trigger the camera’s shut-
ter, and the second is during playback of the
images on a television screen.

To use the remote to take photos, set the
Drive mode on the camera to Remote
Commander. This is done by pressing the
Drive mode button located on the top of the
camera and then using the multi-selector to
choose the Remote Commander mode. The
Remote Commander has two buttons that
trigger the shutter release. The first is the
Shutter button, located on the top left of 
the remote. When this button is pressed, the
shutter on the camera is immediately
released. The second button on the remote
is the 2-second button. When it is pressed,
there is a 2-second delay before the shutter
on the camera is released.

20

Part I

Using the Sony Alpha A700

Me

m

or

y

 car

d


cover

Co

mp

actFlash

slot

Co

mp

actFlash car

d

eject button

Me

m

or

y

 Stick

Duo slot

1.6

The right-side view of the camera

06_270318 ch01.qxp  4/18/08  11:50 AM  Page 20

Summary of Contents for A700

Page 1: ...ndous power to get great shots However it also has many buttons switches levers and dials to control all these great features This chapter guides you through what and where all the controls are Camera Controls Holding the camera as you would when shooting you should notice that the layout of the buttons and the controls seems to be just right And with the amazing amount of customiza tion that is p...

Page 2: ...he battery The grip is comfortable and secure for horizontal and vertical shooting Grip sensor The A700 comes with the Eye Start Auto Focusing system that starts focusing as your eye reaches the viewfinder This auto matic focusing system can also be triggered when the camera is hanging around your neck by the proximity of the viewfinder to your body To stop this from happening there is a second se...

Page 3: ...cept all Sony camera lenses and a variety of older Minolta A type lenses Lens contacts These contacts communicate between the camera lens and the camera body Strap mounting point One of the two mounting points for the cam era strap Auto focus illuminator Self timer lamp The auto focus illumi nator helps the camera s auto focus system work in low light or with low contrast subjects When the Shutter...

Page 4: ... Balance menu on the LCD ISO button This button opens the ISO menu on the LCD The Drive mode the White Balance menu and the ISO menu are covered in detail in Chapter 2 Exposure button This button opens the Exposure Compensation menu on the LCD Shutter button When pressed the shutter moves out of the way and the photo is taken Front control dial The Front con trol dial controls the shutter speed wh...

Page 5: ...hes between the detailed display and the enlarged display in the Recording mode The bright ness of the LCD can be adjusted by pressing the Display button for a few seconds Trash button When you are reviewing images on the LCD pressing this button opens the delete image dialogue There is a choice to delete the image or to cancel which returns the display to reviewing images mode It is also Chapter ...

Page 6: ...ze image quality D Range Optimizer Flash mode and Memory Super SteadyShot This turns the Super SteadyShot vibration reduc tion on or off Multi selector The multi selector lets you select and execute a vari ety of different functions The multi selector works like a minia ture joystick it can be moved left right up and down It is used to navigate through the Quick Navigation screen and the A700 s me...

Page 7: ...ee sep arate parts the view through the lens the focus sensors and an information display below the image Diopter adjustment dial This adjustment dial lets you compen sate for farsightedness and near sightedness Adjust the dial while looking through the viewfinder until the image is sharp If you are farsighted rotate the dial down if you are nearsighted rotate the dial upward Eyepiece sensor This ...

Page 8: ... To attach the sync cord open the cover of the sync terminal and plug in the sync cord When the A700 is connected to a flash using the flash sync terminal and the Super SteadyShot vibration reduction is turned on the fastest shutter speed that can be used is 1 200 of a second When the SuperSteady shot is turned off the fastest shut ter speed that can be used is 1 250 of a second 18 Part I Using th...

Page 9: ... the A700 to be con nected to a regular television Mini HDMI socket Using an HDMI cable that has a mini HDMI connector on one end for the camera and a connecter suitable for your television on the other the A700 can be used with a high definition television On the right side The right side of the camera houses the memory of the camera This is the place where the memory card goes Memory card cover ...

Page 10: ...the best part is that it doesn t cost anything extra The Remote Commander can be used in two different ways The first is when it is used to remotely trigger the camera s shut ter and the second is during playback of the images on a television screen To use the remote to take photos set the Drive mode on the camera to Remote Commander This is done by pressing the Drive mode button located on the to...

Page 11: ...es between playing back the images and showing the camera settings screen Menu When in Playback mode this opens the camera menus and they can be set using the naviga tion buttons Slide show The Slide show button starts a slide show of the images Pressing it a second time stops the slide show Scale up down These two but tons let you zoom in and out of the photo The navigation buttons let you move a...

Page 12: ...y in the middle of the viewfinder It is the focus indicator for the Spot auto focus setting When the focus has locked on the indicator turns red for a moment indicating that the setting is in use Spot metering area The circle around the Spot AF area defines the Spot metering area This is the total area of the scene used in Spot exposure metering 16 9 shooting area guidelines These crop guidelines ...

Page 13: ...elieves to be the correct exposure The small bar over the scale shows the current exposure setting in regard to what the camera believes is the correct setting The EV scale also indicates when the bracketing is active by showing either three or five bars above the scale AE lock When the AEL button is pressed the exposure value cur rently determined by the camera becomes the standard value The AE l...

Page 14: ...off This can be adjusted using the info disp time setting located in the Setup menu 1 Chapter 2 has more details on changing menu settings The Recording Information display has two different modes a Detailed mode and an Enlarged mode which are cycled through by pressing the Display button The Enlarged mode shows some but not all of the infor mation in the Detailed mode In the Enlarged mode the inf...

Page 15: ...ive mode indicator Flash mode Flash compensation indicator Creative Style Focus mode indicator Battery Power Remaining indicator D Range Optimizer setting ISO setting White Balance indicator Register number Shots remaining counter Mode dial display Shutter speed Aperture Exposure AE lock indicator Auto focus area indicator Adjustable item display Image Size setting Displays what buttons can be use...

Page 16: ... the left it indicates underexposure which causes the photo to be too dark Flash compensation indicator If any flash compensation is set a small arrow appears under the EV Scale showing the amount of compensation EV scale The EV or Exposure Value scale shows what the cam era believes is the correct expo sure which is set at 0 The scale also shows three steps of overex posure and three steps of und...

Page 17: ...y self explanatory It shows the amount of shots that can still be saved on the memory card using the current settings Note that the bottom area of the display changes depending on what is on the main area of the screen The bottom area can have any of the following multi selector directions Menu button Menu return Delete button Enlarge button Custom but ton Function button Playback button Front and...

Page 18: ... of the current image appears here ISO sensitivity The actual ISO of the current image appears here even if the photo was taken using AUTO ISO Date of recording The date and time that the image was taken is shown here File number total number of images This shows the sequence number of the selected image and the total images taken Image with thumbnail strip view Pressing the Display button when in...

Page 19: ...e from top to bottom Luminance Red Green and Blue Each shows the luminance distribution from darkest to lightest across the bottom of the graphs with the amount of pixels being affected in the heights of the graphs The overall luminance of the scene is shown in the top graph and each of the color graphs shows the luminance for that color The more information that appears on the left of the chart t...

Page 20: ...and time that the image was taken is shown here File number total number of images This shows the sequence number of the selected image and the total images taken Index view The Index view is opened by pressing the AE lock Index button The view changes to an index screen showing nine images three columns of three images Navigating through the images can be done with the multi selector and pressing...

Page 21: ...le quality setting When a photograph is taken the image is saved to the memory card The file format is the type of file and the format of the infor mation that is written to the memory card The Sony Alpha A700 has seven different file format settings RAW The information in this for mat is the RAW data that the cam era sensor captures cRAW The cRAW mode is a com pressed RAW mode This file for mat s...

Page 22: ... quality by pressing the multi selector center button the file quality can then be changed File size setting 32 Part I Using the Sony Alpha A700 Exposure step Custom button Creative Style D RangeOptimizer Quality Aspect ratio 0 3 EV Enter Select MENU Creative Style Standard Advanced Auto RAW JPEG 3 2 Image size 1 2 3 4 L 12M Standard Fine Extra fine cRAW JPEG cRAW RAW RAW JPEG 1 16 The File Qualit...

Page 23: ...Images on the Camera At any time you can press the Playback but ton to view on the LCD the most recently taken image Once an image is on the screen you have many options for viewing and deciding an image s fate Navigate through the images using the multi selector or the Front or Rear control dials Press the Display button to switch among the three view modes Each time you press the Disp button the...

Page 24: ...vi ous view Use the histogram to help you determine if you have a good exposure Zoom in on any photo using the AM MF button To help identify this button s dual purpose there is a blue magnifying icon next to the button When in the Zoom mode the Front control dial scrolls from one photo to the next and the Rear control dial changes the per centage of the zoom Pressing the multi selector moves the z...

Page 25: ... has been pressed a confirmation screen asks if the image should be deleted or if you want to cancel this action After an image has been deleted there is no way to get the image back Taking this action is something to seriously consider before executing Although the 3 inch LCD is great for doing quick reviews it isn t ideal for doing critical reviews The A700 LCD just can t compare to a computer o...

Page 26: ...ature and increases the red tone and decreasing turns the image paler Shade This is for when the subject is in the shade on a bright sunny day This setting can be fine tuned by 3 stops where adding increases the red tone and decreasing reduces the red tone Cloudy This setting is best used for shooting outdoors under a cloudy sky This setting can be fine tuned by 3 stops where adding increases the ...

Page 27: ...covered in greater detail in Chapter 4 Custom white balance Using a Custom white balance is great for scenes with multiple types of light The A700 lets you store three Custom white balance settings each one accessible from the White Balance menu Setting a Custom white balance is covered in Chapter 2 The white balance can be changed with software after the photo has been taken This used to only be ...

Page 28: ...tly Center weighted metering The entire scene is metered but the center of the scene is given greater emphasis over the outer areas 38 Part I Using the Sony Alpha A700 1 26 The same image taken with the white balance set to Tungsten makes the colors look unnatural with a strong blue cast 1 27 The Metering mode lever makes it easy to switch among Metering modes 1 28 The Multi segment mode uses all ...

Page 29: ...background in acceptable focus Macro Macro mode sets the shut ter speed as high as possible and tries to keep the aperture at f 5 6 if possible Macro mode also sets the D Range Optimizer to Advanced Auto Sports Action Sports photography is all about stopping the action and this setting tries to use the fastest shutter speed possible It also sets the Drive mode to Continuous High Speed Advance and ...

Page 30: ...proper exposure based on the Metering mode The aperture is set by using either the Front or Rear control dial Shutter Priority In Shutter Priority mode you set the shutter speed and the camera sets the aperture to achieve proper exposure based on the Metering mode The shutter speed is set by using either the Front or Rear control dial Manual Exposure In this mode you set both the aperture and the ...

Page 31: ...cond mode can be cancelled by pressing the Drive mode button before the photograph is taken Continuous Bracketing There are six different Continuous Bracketing modes available on the A700 Holding the Shutter button down takes three or five shots in rapid succession 0 3ev3 This setting lets you take three photos continuously with the exposure shifted by 03 of a stop The order of the images is corre...

Page 32: ...ion of colors The three images are recorded in the following order low mid high The D Range Optimization DRO bracketing Drive mode has two choices The Lo3 choice lowers the DRO brack eting when taking the photo and the Hi3 choice amplifies the DRO bracketing These settings can be applied in the Drive mode menu DRO is covered later in this chapter Remote Control In this mode the A700 is triggered e...

Page 33: ...llow brown tone This gives the image an old world look closely associated with the photo graphs of the Old West The Creative Styles cannot be used with any of the Scene Exposure modes If you press the Custom button when in any of the Scene Exposure modes the LCD displays an Invalid Operation screen and you have to press the multi selector center button to continue D Range Optimization Dynamic Rang...

Page 34: ... the DRO is turned off it does not correct any brightness or contrast Standard In the Standard mode the DRO adjusts the brightness and the contrast of the entire image Advanced Auto The contrast and color reproduction of the scene is optimized by areas of color in the scene Advanced Level Five levels of optimization are available They all optimize the color reproduction and contrast of the scene b...

Reviews: