


4-6.
Main Frame
4-6-1.
HIF-62 Board
Preparation
1.
Remove the rear panel assembly. (Refer to
“4-4-1. Removal and Installation of Rear Panel Assembly”
)
Procedure
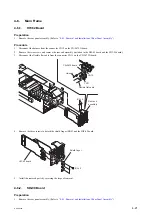
1.
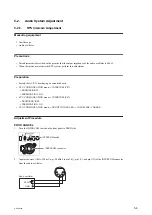
Disconnect the harness from the connector CN12 on the CN-2675G board.
2.
Remove the two screws, and remove the rear sub assembly (included in the HIF-62 board and the SDI-99 board).
3.
Disconnect the flexible flat cable from the connector CN11 on the CN-2675G board.
Harness
CN-2675 board
Flexible flat cable
Rear sub
assembly
B3 x 5
CN11
CN12
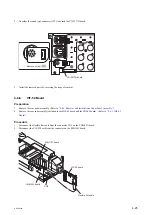
4.
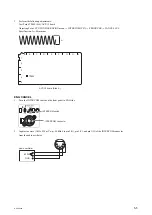
Remove the three screws to detach the shield finger (BNC) and the HIF-62 board.
Shield finger
HIF-62 board
B3 x 5
5.
Install the removed parts by reversing the steps of removal.
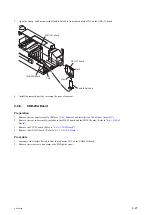
4-6-2.
SDI-99 Board
Preparation
1.
Remove the rear panel assembly. (Refer to
“4-4-1. Removal and Installation of Rear Panel Assembly”
)
HDCU2500
4-21
Summary of Contents for 10001
Page 6: ......
Page 12: ......
Page 14: ......
Page 25: ...1 5 Outside Dimensions HD CAMERA CONTROL UNIT 1 5 200 1 3 7 1 4 7 2 1 9 Unit mm HDCU2500 1 11 ...
Page 118: ......
Page 148: ......
Page 162: ......
Page 264: ......
Page 369: ... B SIDE SUFFIX 11 EN 159B EN 159A HDCU2500 9 13 ...
Page 374: ...PS 778D00 B SIDE SUFFIX 11 HDCU2500 9 18 ...
Page 392: ...HDCU2500 SY HDCU2500 CE J E 9 968 889 01 Sony Corporation Printed in Japan 2012 1 08 2012 ...