background image

4

This is the Internet version of the quick guide. © Print only for private use. 

Getting started


Use this guide to quickly get your P910i up and 
running with the minimum amount of effort. See 
the P910i User’s Guide for more detailed 
instructions.

Preparation

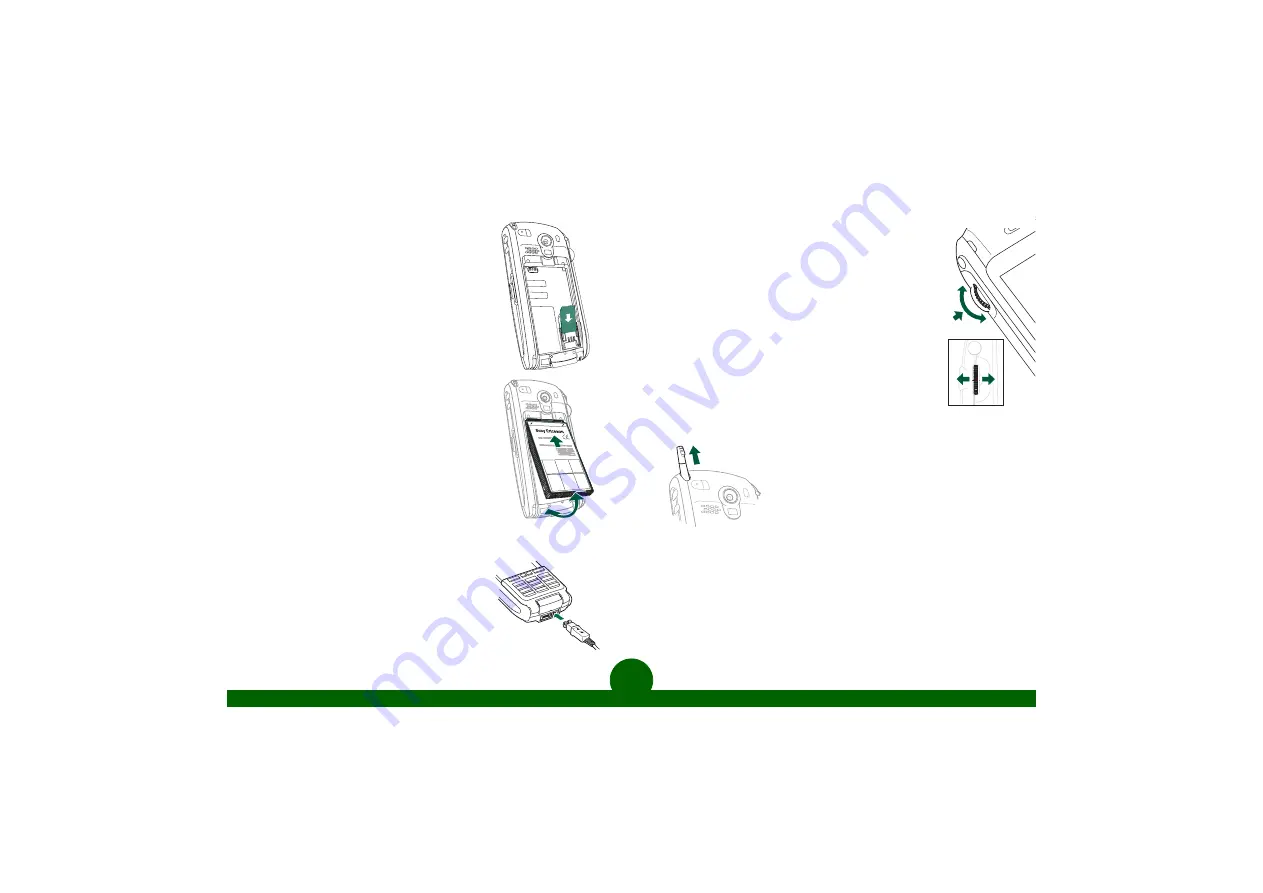
1. Remove the battery compartment cover and 

insert your SIM card, as shown.

2. Insert the battery and replace the cover.
3. Connect the charger to the base of the P910i. 

The plug flash symbol must face upwards. 
You should keep the charger connected until 
the battery has had its first full charge.

4. Press the On/Off button (

Q

); the Power


menu 

appears.

5. With the flip closed, press the 

OK 

key on the 

keypad to power on the P910i.

6. If the ‘Enter PIN’ box appears, enter the PIN 

provided with the SIM card.

The first time you use your P910i, a setup wizard 
runs to enter the basic settings.

Services

Some of the functions available on the P910i are 
dependent on availability from your network operator 
and service provider. Contact your service provider to 
check your subscription.

Jog Dial

The Jog Dial (

O

) speeds up operation of the P910i 

in many situations. It moves in five different 
directions as shown on the right. The following 
operations will demonstrate the use of the Jog Dial:
1. Rotate the Jog Dial up and down to highlight 

icons on the screen (flip closed).

2. With the calendar selected, push the Jog Dial 

inwards. The Calendar opens – rotate to step 
through the items.

3. Press it backwards to close the Calendar.

The stylus

The stylus (

H

) is used to operate the touch-

sensitive screen. To prevent the screen 
becoming scratched, you should only use the 
stylus that is provided with the P910i. The screen 
is only sensitive when the flip is open. Pull the 
stylus upwards to remove it.

Up

Down

Inward

Forward

Backward

Summary of Contents for P910i

Page 1: ...EN LZT 162 04 R1A 1 This is the Internet version of the quick guide Print only for private use P910i Quick Guide This is the Internet version of the quick guide Print only for private use...

Page 2: ...Green red indicator light for network and battery E CommuniCorder activation and shutter release button F Internet activation button G Memory Stick Duo Slot H Stylus J External antenna connector K Com...

Page 3: ...e is more information than will fit on the screen The Status Bar 11 shows useful information Tap on an icon to access more details and to change settings Tap to show or hide the keyboard during inform...

Page 4: ...P910i a setup wizard runs to enter the basic settings Services Some of the functions available on the P910i are dependent on availability from your network operator and service provider Contact your...

Page 5: ...gle SIM entry 1 From Contacts select SIM in the folders menu to the right in the menu bar 2 Tap the SIM entry to open it 3 Select Edit and then Copy to Contacts Making a call With the flip closed Ente...

Page 6: ...ith the picture or video clip already added in a new message Play music You can listen to music and audio clips with your P910i Simply select Music player from the list of applications and choose the...

Page 7: ...d and graphics EMS Multimedia messages MMS containing any combination of text graphics animations photographs sound and ring tones Email messages with optional attachments You may also send message it...

Page 8: ...ion in this document may change without notice due to typographical errors inaccurate information or improvements to programs and or equipment Such changes will be incorporated into new editions of th...

Reviews: