Company Internal
Rev
23
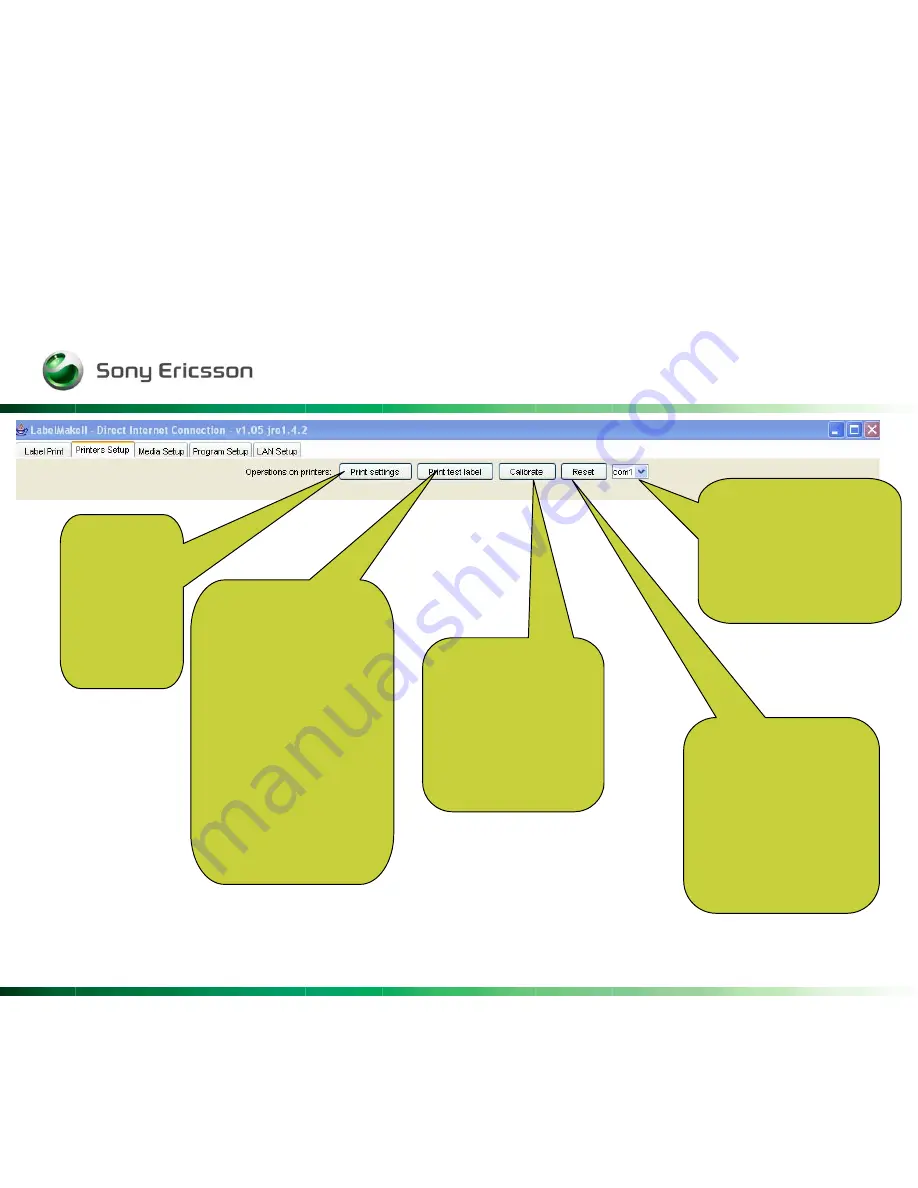
com1:
This field allows the
client to select the
appropriate com port to
which
the printer is connected.
Print settings:
Clicking this
button causes
the printer to
print a list of
its current
parameter
settings.
Print test label:
Clicking this button
causes the printer to
print a test label.
This is useful for
checking the printer
connection and setup. If
the test label
does not appear, then
check the label top
position, left position,
and darkness
settings.
Calibrate:
Clicking this button
causes the printer to
calibrate the length of
the label. It does not
calibrate the media
and ribbon sensors.
Reset:
Clicking this button
causes the printer to
power off and back on
again. This power cycle
resets any parameters
that have not been
permanently saved in
the printer menu.
Summary of Contents for Label Make II
Page 1: ...Company Internal Rev 1 Label Make II Install guideline Client handbook...
Page 3: ...Company Internal Rev 3...
Page 4: ...Company Internal Rev 4 Click Install...
Page 5: ...Company Internal Rev 5 Click on download...
Page 6: ...Company Internal Rev 6 Choose Open...
Page 7: ...Company Internal Rev 7 Accept the terms and click Next...
Page 8: ...Company Internal Rev 8 Choose Typical and click Next...
Page 9: ...Company Internal Rev 9 This part may take several minutes So please be patient...
Page 10: ...Company Internal Rev 10 Click Finish To exit the wizard Click Home...
Page 12: ...Company Internal Rev 12 Click Start to continue...
Page 13: ...Company Internal Rev 13...
Page 19: ...Company Internal Rev 19 Choose your label and some fields will appear...
Page 26: ...Company Internal Rev 26...
Page 27: ...Company Internal Rev 27 You could rename the print buttons by using the Rename buttons...
Page 28: ...Company Internal Rev 28 And you could of course set it to default again by using Reset buttons...
Page 35: ...Company Internal Rev 35...


