background image

Operating Manual | 6 Concluding a work order 
SONASCREEN 


71 / 89 


Revision: 1.0 | 2022-03-04 


2. 

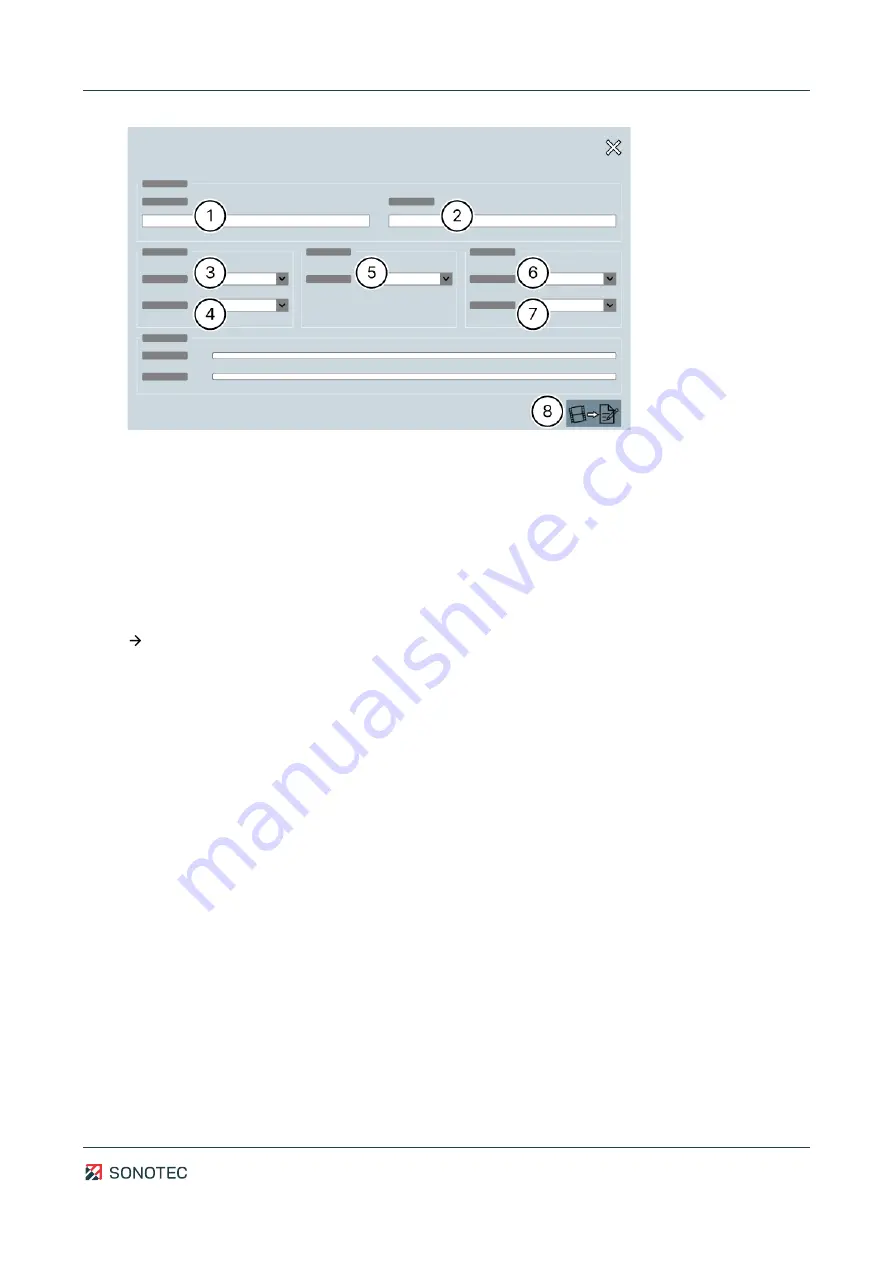
Tap the 

File path

 (1) icon and select the saving location. 

3. 

Tap the 

File name

 (2) icon and enter the particular file name. 

4. 

In the 

Output

 (3) field, select the required output type (audio or video). 

5. 

In the 

Speed

 (4) field, select the playback speed for the output. 

6. 

In the 

Quality

 (5) field, select the video output quality. 

7. 

In the 

Format

 (6) field, select the container format of the audio output. 

8. 

In the 

Gain

 (7) field, select the audio output gain. 

9. 

Tap the "Start export" (8) icon. 

 The data are exported with the set options. 

6.4


Managing measurements 

Description 

Using the integrated data management functions, the measurements and/or directories 

saved on the device may be: 


copied to a USB storage medium for further evaluation or 


deleted from the device. 

Opening data management 

1. 

Open the "Configuration" screen. 

Summary of Contents for SONASCREEN

Page 1: ...Operating Manual SONASCREEN Acoustic camera for preventive maintenance Translation of the German Original Revision 1 0 2022 03 04...

Page 2: ...nections interfaces device elements 12 3 5 Status display and device buttons 13 3 6 Device labeling 14 3 7 User interface 15 3 7 1 Start 15 3 7 2 Configuration 16 3 7 3 Measurement 18 3 7 4 Password p...

Page 3: ...56 6 Concluding a work order 60 6 1 Opening saved measurements 60 6 2 Evaluating measurement results 61 6 2 1 Playing back a measurement 61 6 2 2 Adding a marker in the spectrogram 63 6 2 3 Customizin...

Page 4: ...rs and guarantee trouble free operation Up to dateness Every effort has been made to ensure that the information contained in this document is complete and correct at the time of release This document...

Page 5: ...ger which if ignored may lead to death or serious injury WARNING Warns of possible immediate danger which if ignored may lead to lasting damage to health and or property including financial losses due...

Page 6: ...ith the product are also aware of these instructions Generally applicable safety regulations such as accident prevention and environmental protection regulations etc must also be observed 2 2 Basic ha...

Page 7: ...otection This may include for example Handling of hazardous materials Wearing the required and mandatory personal protective clothing and safety equipment Observing of and complying with all national...

Page 8: ...well as connected equipment within your field of vision Use the devices torchlight functionality to illuminate the test site Tests on electrical equipment During detection of ultrasonic signals on el...

Page 9: ...a before updating the software or resetting the device to factory settings Cyber security measures Based on analysis of vulnerabilities according to IEC 62443 4 1 and IEC 62443 4 2 no cyber security m...

Page 10: ...NOTEC GmbH accepts no liability for damage caused by prohibited use of the product Prohibited are in particular Use of the device in potentially explosive environments Use of the device in wet rooms U...

Page 11: ...2 03 04 Designation Article number Audio cable for Peltor earmuffs noise protection headphones 400 01 0139 Pelican hard shell case for SONASCREEN 400 01 0234 USB flash drive for SONASCREEN 026 00 0100...

Page 12: ...12 89 Revision 1 0 2022 03 04 3 4 Connections interfaces device elements Structure Figure 1 Measurement and operating side with connections interfaces and device elements Description No Connection in...

Page 13: ...s 4 Connection for tripod adapter plate 5 Connection for charger power supply 6 Touch screen 7 Earphone connection jack socket 3 5 mm 8 Ethernet interface RJ45 socket 9 USB interface USB type A 3 5 St...

Page 14: ...on the status LEDs state of charge Keeping pressed 3 s turning the device on or off 4 Function keys May be customized with predefined functions within the software settings 3 6 Device labeling Identi...

Page 15: ...tart screen Description No Type Description function 1 Measurement Opens the Measurement screen 2 Configuration Opens the Configuration screen 3 Support information and update Opens a screen with the...

Page 16: ...n The Configuration screen is organized in two sections Swipe or tap the arrow symbols to switch between the sections Section 1 Figure 5 Configuration screen section 1 No Type Description function 1 R...

Page 17: ...5 Profile management Opens a screen for user profile management 6 Saving options Opens a screen with the following options Setting a saving location for recorded measurements Activation deactivation o...

Page 18: ...n 5 Long term measurement Opens a screen for activation deactivation and settings of long term measurements 3 7 3 Measurement Structure Figure 7 Measurement screen Description No Type Description func...

Page 19: ...rements or to analyze recorded saved measurements The available tools differ depending on the current application Measurement recording Leakage measurement Measurement analysis Icon Designation Descri...

Page 20: ...t application Measurement recording Leakage measurement Measurement analysis Icon Designation Description function Availability Start measurement Starts the recording of a measurement Optionally the m...

Page 21: ...rement recording Measurement analysis Open measurement Opens a screen for opening a saved measurement Measurement recording Measurement analysis Save measurement Opens a screen for saving a recorded m...

Page 22: ...ens a dialog window with hints on the procedure when the password has been forgotten 3 8 Computer software Description For the device two software applications are available that may be installed on W...

Page 23: ...nds are possible The computer software offers the same appearance and the same functions as the device software For using the computer software the device must be connected to the computer via an Ethe...

Page 24: ...e and assessable measurement data and to perform well structured measurements 4 1 Turning on the device Description To record measurement data or analyze measurements the device needs to be turned on...

Page 25: ...d or the tester s requirements if necessary 4 2 1 Setting user interface language and keyboard layout Description The user interface language and the layout of the virtual keyboard may be customized t...

Page 26: ...vision 1 0 2022 03 04 5 In the Virtual keyboard field select the layout for the on screen keyboard Further information For setting the user interface language and the keyboard layout please also see t...

Page 27: ...he camera capture This configuration also influences the measurement data s memory size ATTENTION Mind the correct configuration of date and time The date and time configured in the device will be use...

Page 28: ...guidelines or measurement requirements All values will be saved automatically directly after selection 4 In the field Change date time enter the current values 5 Tap the Accept icon All entered value...

Page 29: ...series may be defined Each measurement series will have its own name This name is used as saving location directory and within the file name of each measurement of a measurement series Procedure 1 Op...

Page 30: ...surement series field activate deactivate saving measurements in a measurement series If Measurement series is activated a name for the measurement series must be entered Further information For setti...

Page 31: ...with predefined functions Generally the following functions are available Start Stop Measurement Led On Off Sound Un Mute Sound Volume Up Sound Volume Down Set Marker Next Marker Previous Marker Next...

Page 32: ...order SONASCREEN 32 89 Revision 1 0 2022 03 04 4 Select the preferred function for each function key Further information For customization of the function keys please also see the description of the f...

Page 33: ...different themes to display the user interface in a light or dark design Procedure 1 Open the Configuration screen 2 In the Configuration screen switch to section 2 3 Tap the Themes icon 4 Select the...

Page 34: ...vice may be protected by password If password protection has been set the device must be unlocked by password after each startup Setting up password protection 1 Open the Configuration screen 2 In the...

Page 35: ...1 Open the Configuration screen 2 In the Configuration screen switch to section 2 3 Tap the Password protection icon 4 Deactivate the use password option 5 Enter the current password 6 Tap the on scre...

Page 36: ...04 A dialog windows with hints for recovering the password and the following details for identity verification opens Mac Address Date Further information For using password protection please also see...

Page 37: ...rrent measurement that is to be saved Data to store Determination of data that are to be saved automatically Measurement the measurement data of the set recording time will be saved Screenshot a scree...

Page 38: ...save 6 In the Trigger method picklist select the beampicture option 7 Close all screens to switch to the Start screen The trigger settings will be used starting with the next measurement Spectrum trig...

Page 39: ...rement the measurement data of the set recording time will be saved Screenshot a screenshot of the current beam picture will be created and saved Measurement Screenshot the measurement data of the mea...

Page 40: ...rrently loaded measurement will be displayed in the Spectrum screen 8 Tap the particular position within the spectrum The frequency and level values of the selected position will be shown in the entry...

Page 41: ...may be unhidden or hidden within the spectrum 3 Level Shows the level value of the selected position within the spectrum in dB A different level value may be entered by tapping the entry field 4 Freq...

Page 42: ...Operating Manual 4 Preparing a work order SONASCREEN 42 89 Revision 1 0 2022 03 04 No Type Description function 9 Previous grid point Switches to the grid point before the selected grid point...

Page 43: ...ructions on performing measurements with the available recording methods 5 1 Starting a measurement Description Measurements that are started with the recording method Measurement recording may be use...

Page 44: ...the following measurement ranges opens up to 24 kHz up to 100 kHz 3 Tap the required recording mode The measurement starts with the measurement range of the selected recording mode The beam picture t...

Page 45: ...ot be customized Procedure ATTENTION Faulty measurement results with connected power supply Performing measurements with connected power supply may lead to faulty measurement results Before starting a...

Page 46: ...within a range from 10 cm to 2000 cm For sound sources at a distance of more than 20 m the maximum value 2000 cm must always be set Procedure 1 In the Measurement screen tap the Distance icon 2 Set t...

Page 47: ...ase in the Auto scaling mode Otherwise the dynamic threshold value is interpreted as maximum level Subtracting the set dynamic range leads to the threshold below which the signal is not visible within...

Page 48: ...e of the slider will move the cutoff frequencies simultaneously while keeping the relative difference between lower and upper cutoff Octave In the picklist a particular frequency may be selected as mi...

Page 49: ...ime the more storage space is needed per measurement The device s internal storage offers 32 GB This memory size is sufficient for approximately 400 measurements with a duration of 10 seconds or 80 me...

Page 50: ...her measurements the following adjustments are available Icon Description function Availability Audio output activated Measurement recording Measurement analysis Audio output deactivated Measurement r...

Page 51: ...asurement screen tap the Take a screenshot icon The current layout of the display view is saved as screenshot in the working directory Saving progress is displayed in the title bar Further information...

Page 52: ...Saving a measurement Description All measurement data cached after ending a measurement may be saved in a measurement data file in the device Each saved measurement data file may be opened again at a...

Page 53: ...h a recording time of one second Procedure 1 Tap the Save for report icon 5 8 Managing user profiles Description User profiles may be used to save configurations and measurement settings Thus settings...

Page 54: ...ap the new Profile button The new profile window opens 2 Enter a name and description for the user profile 3 Tap the OK button The user profile is saved with the currently used configurations and meas...

Page 55: ...3 Tap the Yes button The user profile is deleted Restoring defaults When restoring defaults all currently loaded configurations and measurement settings will be deleted from the device s internal sto...

Page 56: ...ing measurement data will be recorded and saved for a configurable time interval Averaged beam picture averaged values of the individual beam pictures Acoustic peak hold image maxima of the individual...

Page 57: ...te the activate checkbox 5 Enter the particular value for the time interval in the Interval field The value must be between 10 and 900 Recording a long term measurement 1 Start a measurement with the...

Page 58: ...hat the peak hold image is displayed Tapping this icon switches to the averaged image Standard display options Apart from the additional display options for long term measurements further standard dis...

Page 59: ...Operating Manual 5 Performing measurements SONASCREEN 59 89 Revision 1 0 2022 03 04 Customizing the display...

Page 60: ...r further applications e g videos reports or editing on the personal computer 6 1 Opening saved measurements Description The measurements saved in the currently selected working directory may be opene...

Page 61: ...asurement results Measurement results may be evaluated either directly after ending a measurement or subsequently as saved measurement 6 2 1 Playing back a measurement Description Measurements can be...

Page 62: ...egular speed 2 Tap the icon of the particular playback mode The measurement is played back with the selected speed Using timeline navigation Using the timeline navigation each single image of a comple...

Page 63: ...ected single image is displayed in the header 1 of the timeline navigation 6 2 2 Adding a marker in the spectrogram Description Markers may be used to indicate acoustic events within a measurement Mar...

Page 64: ...ded at the current playback position Navigating between markers If measurements contain markers it is possible to navigate between markers It is also possible to delete existing markers 1 Tap the Mark...

Page 65: ...ption The display view and its individual areas may be customized to enhance evaluations during measurement recording and or provide more accurate analyses of completed or saved measurements Changing...

Page 66: ...g Manual 6 Concluding a work order SONASCREEN 66 89 Revision 1 0 2022 03 04 Order View Image 1 Combined view with zoomed in beam picture 2 Beam picture as full screen 3 Spectrogram and spectrum as ful...

Page 67: ...nction Opens a slider to set video camera brightness Video camera brightness may only be adjusted during measurement recording Activates deactivates crosshairs in the center of the beam picture Opens...

Page 68: ...esentation 1 Tap the spectrum and keep pressing for about 2 seconds A context menu with the following display options will open Option Description function Hiding or unhiding the global spectrum red c...

Page 69: ...files are created in WEBM file format For this the whole measurement or a selectable segment of a measurement will be exported Completed or saved measurements may be exported as video file In the exp...

Page 70: ...d of the export file 5 Optional Tap the Set end 2 icon The end is marked with a green line in the spectrogram 6 Optional Tap the Delete markings 3 icon to set a new beginning and end Exporting a measu...

Page 71: ...6 In the Quality 5 field select the video output quality 7 In the Format 6 field select the container format of the audio output 8 In the Gain 7 field select the audio output gain 9 Tap the Start exp...

Page 72: ...management icon Selecting measurements With the data management function all measurements and or directories saved in the device may be selected for further procedure Single measurements or directorie...

Page 73: ...n 1 0 2022 03 04 All measurements and directories 1 Tap the Select objects icon Repeated tapping of the icon changes the function in the following order Icon Description function Select all measuremen...

Page 74: ...ter via a USB storage medium 1 Connect a USB storage medium to the device 2 Open Data management 3 Select the particular measurements and or directories in the left side column device internal storage...

Page 75: ...tallation file is available in the mysonaphone com web portal after registration 2 Extract the ZIP file to the preferred saving location on the personal computer 3 In the software s directory double c...

Page 76: ...Config Installer exe file Installation with administrator rights The LeakReport Config Installer exe file may only be executed with administrator rights The Installation Wizard opens 6 In the Installa...

Page 77: ...d off either by the software or the On off button Automatic turn off If the turned on device has not been in use for approximately 5 minutes it will automatically turn off Before automatic turn off a...

Page 78: ...ading the update file 1 Sign in to the mysonaphone com web portal with your personal login details After successful sign in your personalized portal start page opens 2 On the personalized start page s...

Page 79: ...Operating Manual 7 Maintaining the system SONASCREEN 79 89 Revision 1 0 2022 03 04 5 In the Data management screen mark the update file in the right side column USB storage medium 6 Tap the Copy icon...

Page 80: ...e on the device 1 Connect the device to the power supply with the power supply unit Mind the battery s state of charge For updating the device software the battery s state of charge must be at least 2...

Page 81: ...pletion of the update process a notification window opens 8 In the notification window tap the Restart button 7 2 Resetting the device Description If the device software cannot be executed you need to...

Page 82: ...l Reset Replaces the installed device software Data saved on the device will remain 7 3 Cleaning and maintenance 7 3 1 Cleaning Guidelines Do not open the product The product contains no parts to be c...

Page 83: ...ning After cleaning the device make sure that cables connectors and fittings are free of cleaning agents and cables wires connectors and electrical components are dry 7 3 2 Maintenance Guidelines Do n...

Page 84: ...set all parameters and connections of the device software have been reset The information that leakage measurements are possible with the device is stored in the device s hardware After full reset the...

Page 85: ...7 A 90 W max Battery Lithium Ion battery 48 Wh Runtime approx 3 5 h continuous operation Charging time 1 5 h typical Connections and interfaces Data export Socket USB 2 0 Type A Headphones Jack socke...

Page 86: ...kHz Sound pressure level 120 dB max Resolution 24 bit Sensor system optical Camera digital Resolution 320 240 pixels at 50 fps or 640 480 pixels at 16 fps Aperture angle 70 Software Device software Li...

Page 87: ...ndicates the legal duty to dispose of electronic devices as stipulated They must undergo specified recycling processes e g with respect to batteries or circuit boards which enable safe environmentally...

Page 88: ...a negligible amount Responsibility of the user operator It lies within the responsibility of the users to ensure that the product has been installed and set up properly and is used in a manner that d...

Page 89: ...y form particularly for reprint for photographic mechanical or electronic reproduction or in the form of saving in data processing systems or data networks is forbidden without written approval by SON...

Reviews: