


Chapter 2 – xMac mini Server Description
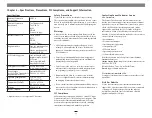
1 – USB 3.0 Port
This port connects to the Mac mini through a cable
attached to the front panel
4 – Power Input Socket
Connect the included AC power cable here
5 – HDMI Port
This port connects to the Mac mini through a cable
attached to the back panel
6 – USB 3.0 Ports
These ports connect to the Mac mini through cables
attached to the back panel
7 – Top Panel Thumbscrews
Loosen these captive screws to enable the removal of the
top cover, tighten the screws to secure the top cover
2 – Power Indicator Opening
This hole allows the Mac mini’s power indicator to shine
through
8 – Gigabit Ethernet Port
This RJ-45 port connects to the Mac mini through a cable
attached to the back panel
9 – External Cable Passthrough
This opening allows the connection of the included
Thunderbolt cable from the computer to the left
Thunderbolt port on the xMac mini Server’s back panel,
and the connection of other cables to the Mac mini’s ports
or user-installed PCIe cards
10 – BNC Connector Mounting Holes
These holes accommodate the installation of BNC
connectors like those used for HD/SDI output for the RED
ROCKET transcoding card
3 – Power Switch
This button activates the Mac mini’s power switch; xMac
mini’s PCIe slots’ power supply turns on and off along
with the computer
11 – Thunderbolt Ports
The left port is connected to the Mac mini’s Thunderbolt
port, the other may be used to connect another
Thunderbolt device
2


