background image


- 48 - 

 
Follow  the  manufactures  instructions  when  using  disinfectants.  Keep  to  the 
prescribed dose and contact time! 
 

Use cold water to prepare disinfection solvents! 


8.3  Use and Maintenance of the Rechargeable Battery 

The  internal  battery  is  a  Lithium-Ion  (Li  ION)  rechargeable  battery.  The  battery  offers  a  long  life 
(approximately 500 charges), is not susceptible to memory effects and is ecologically friendly. 
 
It  takes  approximately  2.5  h  to  charge  a  completely  discharged  battery.  The  battery  is  fully  charged 
when the yellow Charging LED on the SOMNOtouch

TM


 turns off. 


8.4  Functional Testing of the integrated Pulse Oximeter 

Functional testers for pulse oximeters cannot be used for verification of the accuracy of the integrated 
pulse oximeter or it’s sensors. 
 
For functional testing, use a NONIN compatible functional tester.


9  Service 


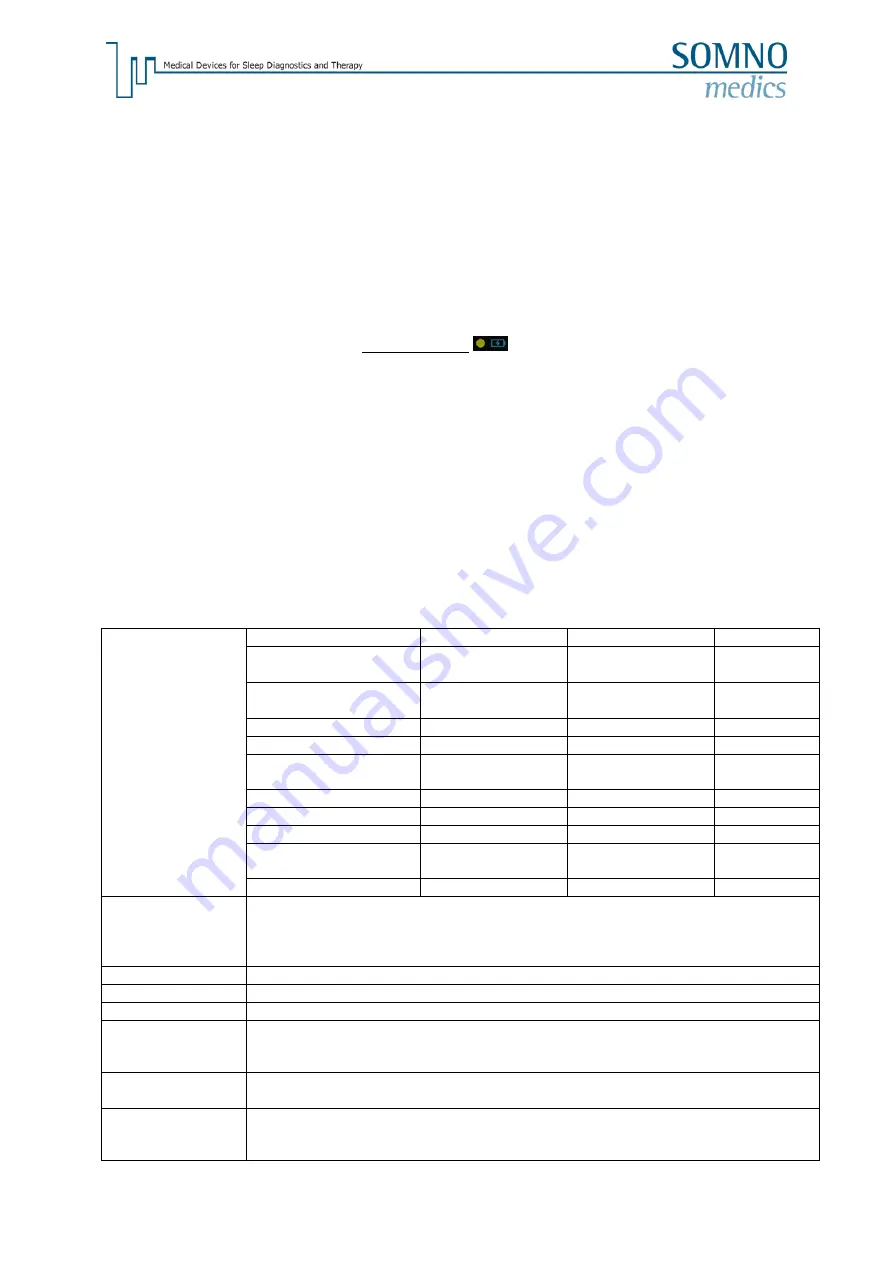
9.1  Technical specification 

11 Channels 

Name 

Measuring Range 

Frequency Range 

Accuracy 

3x Acceleration Sensor 
(x,y &z direction) 

± 6 g 


± 10 % 

Body Position 


Right, left, supine, 
prone, upright 


Pulse Rate 

30 - 240 bpm 


± 3 bpm 

Marker Button 


SpO

2


70 - 100 % 
< 70 % 


± 3 %  
monoton 

Abdominal Effort 


0.1 - 15Hz ± 20 % 

± 20 % 

Thoracic Effort 


0.1 - 15Hz ± 20 % 

± 20 % 

CPAP Pressure 

0 - 30 mbar 

DC - 8Hz ± 20% 

± 2 % 

Nasal/Oral Flow // Snore  ± 2 mbar 

0.007 Hz - 1 kHz ± 
20 % 

± 5 % 

Plethysmogram 


Data Processing 

12 Bit ADC 
Different Sampling Rates Adjustable (1/60s - 512/s) 
Different Storage Rates Adjustable (1/60s - 512/s) 
Internal Data Storage 512 MB  

Internal battery 

Rechargeable Li ION battery (630 mAh) 

Dimensions 

84 x 55 x 18 mm 

Weight 

64 g including battery 

Operating 
conditions 

Temperature: 5 °C - 40 °C 
Humidity: 15 % - 90 %, non-condensing 
Air pressure: 700 hPa - 1060 hPa 

Storage 
conditions 

Temperature: -25 °C - 70 °C 
Humidity: up to 90 %, non-condensing 

Radiation 

The SpO2 sensor emits optical radiation of the following wave length: 
Infrared: 880 nm                 
Visible spectrum: 660 nm 

Summary of Contents for SOMNOtouch RESP eco

Page 1: ...medics America Inc 815 Ponce de Leon Blvd Suite P 209 Coral Gables FL 33134 Toll free 866 361 9937 info somnomedics diagnostics com www somnomedics diagnostics com INSTRUCTION MANUAL SOMNOtouchTM RESP...

Page 2: ...Ponce de Leon Blvd Suite P 209 Coral Gables FL 33134 Toll free 866 361 9937 info somnomedics diagnostics com www somnomedics diagnostics com Rev 0 14 08 2019 All proper names marked with TM are copyr...

Page 3: ...finiert 5 5 Open a Recorded Measurement 19 5 6 Analysis 20 5 6 1 Define the Begin and the End of the measurement 20 5 6 2 Define TIB Time in Bed 21 5 7 Enter the Findings and the Diagnosis 21 5 8 Open...

Page 4: ...Edit Mode 45 6 3 7 2 Quick Edit Mode 46 6 3 7 3 Select Edit Mode 46 6 3 7 4 Repeat Mode 46 6 4 Reports 46 7 Troubleshooting 47 8 Maintenance of the SOMNOtouch 47 8 1 Maintenance rate 47 8 2 Cleaning...

Page 5: ...nts can be performed in professional healthcare facilities or at the Patients home When used at the Patients home the Patient should be carefully instructed on how to use and care for the system Pleas...

Page 6: ...ns and Classifications on the Type Label of SOMNOtouch RESP eco Read the instruction manual very carefully before you start working with the SOMNOtouch Protection Class BF The CE icon and the correlat...

Page 7: ...should always be kept on hand The SOMNOtouch is NOT designed to be used in a Life Support situation surgical rooms intensive care units or in emergency vehicles The SOMNOtouch must be applied only und...

Page 8: ...Conditions It is very important to protect the SOMNOtouch from temperatures below 0 C and above 50 C Furthermore the SOMNOtouch may not be worn during swimming and showering Operate the device in an...

Page 9: ...curs where the band is in contact please discontinue use immediately and consult your physician 4 Installing the DOMINO light Software Please note the System Requirements for running DOMINO light Soft...

Page 10: ...lation folder and click the Next button Accept the selection New Installation by clicking the Next button Start the installation process by clicking Next The installation progress will be displayed by...

Page 11: ...not be necessary exception Windows XP If Run DOMINO light is chosen the software will start immediately after clicking the Finish button For the driver installation a window of the device installation...

Page 12: ...installation you will be asked to choose one of the following installation types New analysis channels and features of the software are updated The settings of analysis and analysis templates remain...

Page 13: ...nning during the change of Summer Winter time will have a time shift 5 1 Initialising the SOMNOtouch RESP eco For Initialisation and Transfer the device needs to be connected via USB cable to the comp...

Page 14: ...ta in the optional Patient Database It is also possible to use an existing Patients Data from the Database using the button DB Select the Patient from the selection window and confirm with the button...

Page 15: ...he PC first If you start the device directly an automatic patient ID is generated This ID you can change later during transfer of the data to the PC There you can set name surname and other patient da...

Page 16: ...touchTM The upper side of the sensor is marked by the embossing of a finger as shown in the following image Create a strain relief for the sensor cable with adhesive tape Then connect the sensor to th...

Page 17: ...ansfer from SOMNOtouch to computer Once there is a measurement on the SOMNOtouch RESP eco it is possible to transfer it to the computer via the virtual Docking Station or the DOMINO light panel Please...

Page 18: ...n Select the options required and click the OK Button 2 The recording can be continued after the data transfer is complete if you transfer a recording before its programmed end 3 Before transferring t...

Page 19: ...d parameters in the Global Preferences The software shows the last displayed recording Easily open the last displayed recording by double clicking on the link 5 Processing status Recorded measurement...

Page 20: ...in left click on Define Start Set End Marker Right click in the Raw Data area where you wish the Recording to End left click on Define End All data before the Start Marker and all data after the End M...

Page 21: ...marker in the recording Go to Tools Edit markers and click on the symbol right beside the requested marker to delete the marker If you do not set a marker the complete recording will be defined as TI...

Page 22: ...ts on marker s Respiratory Report Obstructive Number Index Number of Obstructive Apnoea index per h of TIB Mixed Number Index Number of Mixed Apnoea Central Number Index Number of Central Apnoea Undef...

Page 23: ...tefact in of TIB Sleep Time Fraction Percentage of time in a Single Body Position Prone Supine Left Right and Upright Total Events Index Total number of events in the respective Position index per h T...

Page 24: ...of minimum SpO2 value during a SpO2 Event Sum all Desaturations Duration of all Desaturations in total Artefact min Duration of Artefact in SpO2 Raw Data channel Snore Report Snore Index Number of Sno...

Page 25: ...ax e mail or telephone to obtain this Please refer to Fig 6 2 for instructions on how to obtain and enter the Registration Code fig 6 1 DOMINO light Panel DOMINO light panel icons Initialisation Prepa...

Page 26: ...rs The default folder can be chosen from the Recordings Directory using the symbol Other symbols Add folder Edit folder Delete folder Preferences will be saved to a file The following preferences can...

Page 27: ...l Order can all be configured The Channel Order can be changed by using the Drag Drop function Fig 6 3 Menu Channels Select individual colours for each channel Displays the current channel across the...

Page 28: ...during an epoch the epoch will be rated as Wake Fig 6 5 Activity Threshold 2 Number epoch before after This function reduces the number of short periods that are scored as Wake because of e g changing...

Page 29: ...ty the arousals will be correlated to these events Using the drag drop function the order within the list can be changed and by these means the priority of classification is altered Fixed Duration s I...

Page 30: ...both thresholds the period will be counted as median activity 6 2 3 4 Flow Analysis If the Flow signal gets lost during a recording e g due to shifting of the cannula the Flow Source can be changed e...

Page 31: ...ent it will be scored as a Central Apnoea 8 Mixed A central part s A Apnoea Where no central apnoea is detected but an Apnoea and an effort event overlap for at least 4 seconds a mixed apnoea will be...

Page 32: ...rate method of measuring the flow signal is to use two sensors nasal cannula and thermistor as recommended by the AASM guideline Simple screenings which to do not have to satisfy the recommendations o...

Page 33: ...t Analysis This analysis is used to quantify effort signals Thorax Abdomen and to determine central obstructive or mixed respiratory events Fig 6 14 Effort Analysis The channels Effort 1 and Effort 2...

Page 34: ...ed 7 Body Position Correlation s A desaturation will be defined separately and will be defined as a desaturation caused by a Body Position change whenever it occurs after a body position change within...

Page 35: ...Auto Size This option will scale the amplitude of the curve automatically Marker It is possible to set reference lines that will be displayed in the Analysis Channels Minimum Maximum Enter minimum ma...

Page 36: ...mode allows editing with the mouse In this Menu you may set the channel on which an event should be marked Please note Make sure you activate the Quick Edit Mode menu Mode QuickEdit or key F12 Fig 6...

Page 37: ...left or right 200 x 122 Aligned full page width 660 x 122 It is possible to define own area definitions in the Analysis window The detected events within the defined areas will be shown itemised in th...

Page 38: ...These Buttons inserted or removed a Page Break at the selected position Select the item you wish to appear on a new page and then click on To remove the Page Break click on Graphics Selection You can...

Page 39: ...3 2 Functions of the Pop up Window To open pop up windows use the right mouse button and click on either the Analysis or Raw Data Window 6 3 2 1 Functions of the Analysis Pop up Window Fig 6 27 Pop up...

Page 40: ...obal Artefact artefact on all channels or as an artefact on a specific channel This function is only available in the Edit Mode menu Mode Edit mode 6 Remove artefact will delete the Artefact in the ma...

Page 41: ...Window Raw Data 1 Select channel offers a comfortable method to manually select analysis channels to be displayed Fig 6 29 Selecting Channels for Raw Data Display Select all channels Delete all channe...

Page 42: ...ndow 10 Save Sample will save the marked area for addition to the reports see chapter 6 3 5 6 3 3 Inserting Markers Fig 6 30 Set Markers Click on the desired position in the Raw Data where a Marker is...

Page 43: ...Data channel 6 3 5 Creating and Editing Samples It is possible to select and save Interesting Events from both the Raw Data and the Analysis Data These Samples will be saved and can be added to the R...

Page 44: ...le Click on an event to jump directly to the corresponding position in the raw data window Displays the event list at the right side of the DOMINO light window 6 3 7 Edit Modes It is possible to edit...

Page 45: ...ey or Key Combination to score the event An event box will appear and frame your marked event An information box can be turned on View Show info window which will show the Parameters associated with t...

Page 46: ...nt to be marked without using the keyboard Drag the cursor over the event to be marked and release the mouse button Now you get a list with all the events you can define on the channel you marked Clic...

Page 47: ...e longer than the programmed time of the whole analysis 8 Maintenance of the SOMNOtouch 8 1 Maintenance rate Return the SOMNOtouch to SOMNOmedics after 3 years of usage for inspection The inspection i...

Page 48: ...le functional tester 9 Service 9 1 Technical specification 11 Channels Name Measuring Range Frequency Range Accuracy 3x Acceleration Sensor x y z direction 6 g 10 Body Position Right left supine prone...

Page 49: ...struction manual and all safety instructions are followed The Warranty claim only refers to the SOMNOtouch unit and covers a warranty period of 24 months 9 7 Disposal of Parts and the SOMNOtouchTM Dev...

Page 50: ...n environment Emissions test Compliance Electromagnetic environment guidance RF emissions CISPR 11 Group 1 The equipment uses RF energy only for its internal function Therefore its RF emissions are ve...

Page 51: ...obile RF communications equipment should be used no closer to any part of the equipment including cables than the recommended separation distance calculated from the equation applicable to the frequen...

Page 52: ...ads to remove adhesive residues 100 pcs SEN039 E CPAP Adapter incl Silicone tube SEN924 Body Mount for RIP belts TOS810 Effort belt Size S TOS805 Effort belt Size M TOS806 Effort belt Size XXL TOS808...

Page 53: ...Send us a message by fax at any time 49 0 9 31 35 90 94 49 Send us your query by email any time service somnomedics de Get free access to current software updates via service login on our website www...

Page 54: ...54 9 11 Notes...

Reviews: