background image

12


Chapter Four: How to Use the Printer and 
the Check Work before/after Use


In this Chapter, you will learn how to use the printer, including check work before and after use.


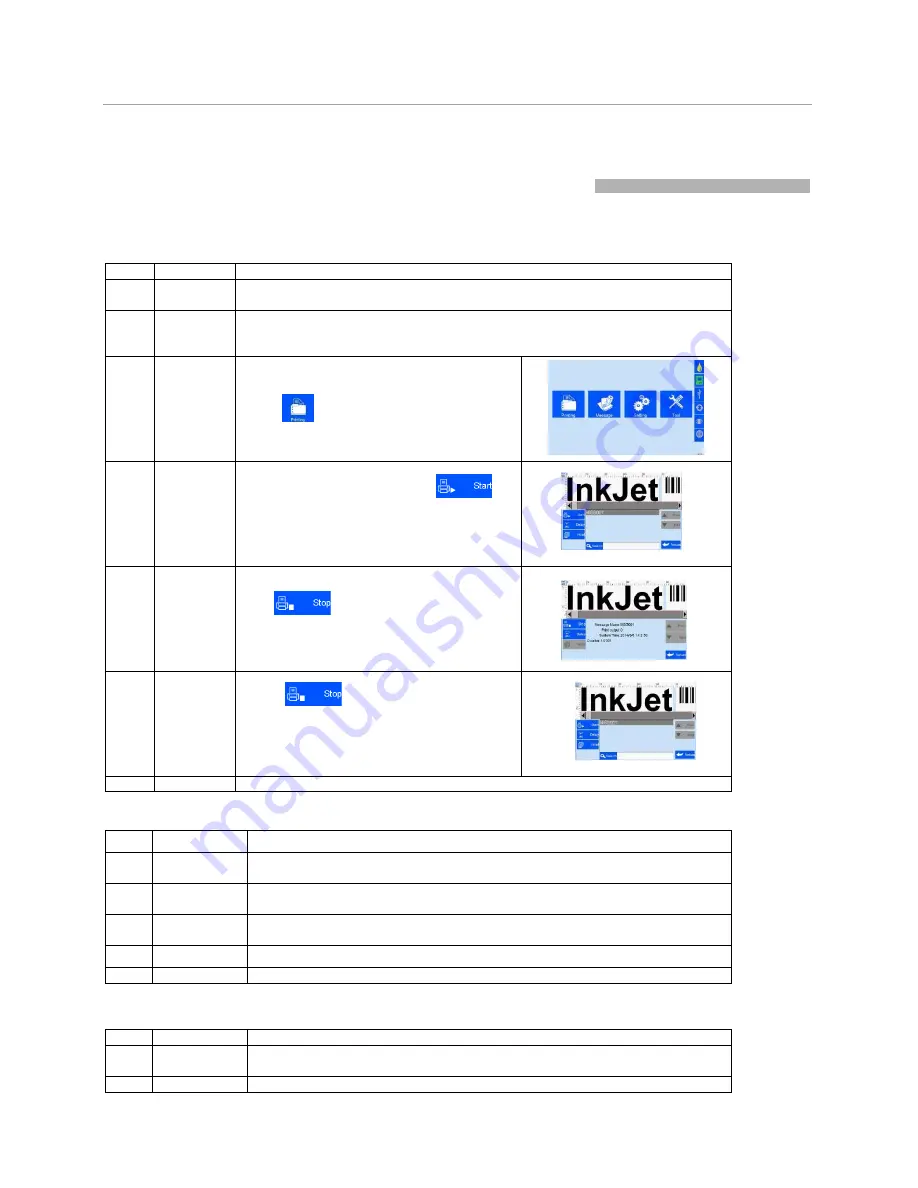
4.1 How to Use the Printer


Sq # 

Procedure 

Instructions 

cartridge 

Installation 

Insert cartridge into the printer stall by an angle of 15 degree, close cartridge clip to 
secure. (See Section 2.3 Cartridge Installation). 


Turn on 

printer 

Load  battery  to  compartment  on  printer  handle,  secure  with  lock  catch  (see 
Section  2.2.2  Battery  Installation  and  Removal).  Switch  on  power,  printer  enters 
initialization startup. 


After   initialization   startup,   

“main   interface 


Main 

appears (see Section 5.1) 


Interface - 


Printing 

Manage

m ent 

Click 

to enter 

“Printing  Managemen 

(see Section 5.2). 


Select 

data - Start 

printing 


Select a file on data list, click 
Start printing. 


to 


Printing 

report 

When printing starts, the button change to the 

icon  

      for stop printing,  

meanwhile a printing report appears. 


Stop 

printing 

Click    

   to  stop  printing, printing 

report exits, and the button returns to 

“Sta 

printing

” status. 


Switch off 

Exit printing, and switch off power. 


4.2 Check Work before Use


Sq # 

Item 

Check Work 

Battery 

charging 

Is the battery fully charged? 

Positioning 

wheels 

Do the wheels slide well? 

Encoder 

Is the encoder well connected to positioning wheels? Make sure the  connection 
is not loose. 

Cartridge 

Is the cartridge wiped clean? Has the cartridge been installed to printer? 

Printer status 

Check status bar, is the equipment status normal? 

4.3 Check Work after Use


Sq # 

Item 

Check Work 

Printer 

Power Status 

Is the printer power switched off for power saving? 

cartridge 

Is the cartridge removed from printer and wiped clean and printhead capped? 

Summary of Contents for Elfin IC

Page 1: ...Edition C20150526A Handheld High Resolution Inkjet Printer User Manual Sojet Electronics Xiamen Co Ltd ...

Page 2: ... ink to direct sunlight or high temperature 35 above The heat of direct sunlight or high temperature will affect ink s storage life and print quality If you get ink spill on the eyes or skin during use clean your eyes or skin by clean water Ink leakage inside printer can result in burnout damage to the machine Switch off the machine and unplug it from power outlet when there s ink leakage inside p...

Page 3: ...nter 12 4 2 Check Work before Use 12 4 3 Check Work after Use 12 5 1 Main Interface 13 5 2 Printing Management 14 5 2 1 Find Preview Data 14 5 2 2 Start Printing Printing Report 14 5 2 3 Printing Delay 14 5 2 4 Print Initial Values 15 5 2 5 Stop Printing 15 5 3 Data Management 16 5 3 1 File New Edit Data 16 5 3 2 Add Text Object 17 5 3 3 Add Production Date 17 Chapter One Important Precautions for...

Page 4: ...24 5 4 5 Special Features 25 5 4 6 Screen Touch Correction 25 5 5 Tools Management 26 5 5 1 Image Management 26 5 5 2 System Upgrade 26 5 5 3 System Backup 27 5 5 4 System Record 27 5 5 5 About Equipment 27 5 5 6 System Reset 28 5 6 Edit Input Method Options 29 5 7 Status Bar 30 6 1 Printer Care and Maintenance 31 6 2 Cartridge Care and Maintenance 31 7 1 Troubleshooting for Ink Cartridge 32 7 2 T...

Page 5: ...w edit data for printing and how to adjust printer settings Care and Maintenance Care and maintenance for printer and cartridge Troubleshooting Common failures occurred and solutions Appendix 1 Terms and Definitions Definitions for terms used in thisdocument Please read this user manual carefully before first use of the printer for full understanding and attention of important information so that ...

Page 6: ...do not disintegrate or modify original batteries Otherwise danger or machine failure may occur Note Our Company shall not be liable for any accident or printer failure caused by your use of non original batteries disintegrated or altered batteries 1 2 Important Operation Precautions 1 2 1 Do not poke or impact the touch screen sharply 1 2 2 Make sure that the positioning wheels roll on contact wit...

Page 7: ... the machine parts by looking at the packing picture and parts list 2 1 Parts List Once you have unpacked your machine check to make sure that you have all the parts shown here Item Part Name Q ty Photo Note 1 Handheld printer 1 2 USB disk 1 3 Battery 2 4 Charger 1 5 2 5mm position wheel 6 6 5 0mm position wheel 6 7 Protective band 1 Packing Picture Outer box ...

Page 8: ...lly charged Battery charging finished remove battery from charger Red indicator light Battery is on charge 2 2 2 Battery Installation and Removal Battery installation Put the battery into compartment in the handle of the printer listen for a click indicating the battery has snapped to place Battery removal press the two lock catches on battery remove battery from printer ...

Page 9: ...widest ink application high requirement on the substrate s evenness Height 2 5mm standard Good printing quality wider ink application no special requirement on the substrate s evenness Height 5 0mm standard Normal printing quality not applicable for 3 series inks applicable for rough printing surface 1 Take off the two screws besides the reflector 2 Take off the position wheel and the silica gel a...

Page 10: ...hree Inkjet Printer Introduction 3 1 Printer 5 touch screen Encoder Band hole Power switch Handle Battery DB15 port Ethernet port Positioning Wheels USB port Cartridge clip Printhead Print switch Battery lock catch ...

Page 11: ...SB2 0 Port 3 DB15 Port Interface 5inch full color large LCD touch screen with resolution 800 480 Ink management 1 Automatically recognizes ink types and identifies optimum printing parameters for each ink type 2 Guarantees the using of genuine original HP ink 3 Automatic measuring system for the usage of ink Product Certification CE FCC Environment requirement 1 Working environment 10 55 10 85RH 2...

Page 12: ... data Start printing Select a file on data list click Start printing to 5 Printing report When printing starts the button change to the icon for stop printing meanwhile a printing report appears 6 Stop printing Click to stop printing printing report exits and the button returns to Sta printing status 7 Switch off Exit printing and switch off power 4 2 Check Work before Use Sq Item Check Work 1 Bat...

Page 13: ...1 Printing Management To find and preview data start stop printing set printing delay value and set printing initial values see Section 5 2 Data Managemen To Find Preview create new Edit Copy Delete data see Section5 3 System Management To manage system setting editing options printing options user authority and screen correction setting see Section 5 4 Tools Management To manage image logo system...

Page 14: ...ata Preview data by locating or selecting a file of data to display on preview interface data located selected will be displayed in sequence on preview interface and can be viewed scaled up and down by times of 1 and 2 Note Drag the scroll bar horizontally to view the data when it exceeds the screen horizontally 5 2 2 Start Printing Printing Report Click button to start printing When printing star...

Page 15: ...ct another data file 5 2 4 Print Initial Values Click the interface of initial values setting and repeated index value checking appears System switch DEC 10 decimal 0 9 H36 36 hexadecimal 0 Z The Generic Binary is editable See5 4 2 System switch Counter synchronizing Counter Synchronizing when multi counter included in the same file click then all counters current value will be synchronized to cou...

Page 16: ...he files C Delete delete the file s in the group D Search User can search the needed file add File list Up Down Delete File list E Group Name Maximum 15 characters in the group unique and cannot be null Group name 5 3 1New Edit Data Clip or on data management interface to enter data edit interface A New text counter shifts production data expiration data image logo barcode dynamic text dynamic log...

Page 17: ... Are you sure you want to save the message Cancel Yes No If you click the machine will remain on editing interface Note MSG001 is default data in system The system allows maximum 500 files of data including default MSG001 The system does not save empty or error messages ...

Page 18: ... effect Figure 10 Note Please refer to this Section Section 5 3 2 regarding how to add objects as production date expiration date image counter shift code dynamical text dynamical logo but the content of production date expiration date counter shift code dynamical text dynamical logo cannot be revised or adjusted directly when you add and the font height content and font effect of image dynamical ...

Page 19: ...lick to add object counter Click to for option ofcommon counter box number lot number A Click for common countersetting minimum value maximum value stepping value repetition number see Figure 15 Commo n counter Box No Lot No Stepping value Repetition number Figure 15 B Click and option ofbox number and lot number setting minimum value maximum value stepping value for box number and lot number see ...

Page 20: ...the responding shifts number Such as interval value 8H means 3 shifts per day B Start time set the time for the first shift Note in 24 hour time system C Shifts set shifts numbers While interval value is 0 shifts can input freely from 2 48 D Click to view the detailed information E Shift can set the shit name time F Shift name maximum 5 characters G Shift time can set different time shifts will ch...

Page 21: ...ure 19 20 Note Setting options may differ depending on different barcode types Text display Texthide error correction level white space level Text display Text height Figure 19 Error correctio n level White space level Figure 20 C click enter barcodes setting interface User can create edit and delete data sources in the barcode content The data sources includi ng 9 objects text production date exp...

Page 22: ... one while printing one S1PN scan one while printing multiples print to next scan data SNPN scan multiples while printing multiples can repeat set the print times SGPN Fix scan numbers and print numbers can repeat set print times and scan numbers 5 3 10 Add dynamical LOGO Click to add dynamical LOGO See the picture beside Note pls refer to 5 3 9 of addingdynamical text set the data transmissionpat...

Page 23: ...ing 2 4 5 user management device SN No cannot be changed 5 3 12 Add String Clip to add string Clip to enter the string setting interface The system default can add 5 different strings One data allows maximum 20 string objects each string of character maximum number is 75 Note when add one same string object other same strings will be modified automatically while modify one of string ...

Page 24: ...ialog box appearsto prompt if you sure that you want to delete Note data in printing process cannot be deleted Click in File Management interface it will import all files saved in U disk under defined route User will be prompted if same name already existed Before import insert the U disk firstly Select a file and click in File Management interface the same message will be copied and saved asthe s...

Page 25: ...fault 5 minutes 4 options for changeover 5minutes 3 minutes 1minute OFF 2 If screen saver is optioned OFF screen enters standby status if inactive for 1hour 3 Screen becomes active when there s alarm or error D unit Switch between mm and inch language in delivery country as default language E Daylight saving time Three modes for setting OFF European summer time US summer time F Calendar Type two m...

Page 26: ...ansition time setting see Appendix 1 Terms and Definitions 4 5 Pre zero in date time Special time setting 1 Date transition time setting system default normal zero o clock as date transition time to next date users can set different time as date transition time 2 Pre zero in date time four options OFF empty preposition empty postposition centered without zero e g 2012 05 09 2012 _5 _2 2012 5_ 2_ 2...

Page 27: ...cimal 0 Z It can t modify or delet the default system New system Modify system Deletsystem System setting New and edit the system 1 Can import the system name by yourself but only allow three letters and figures 2 System content can import Arabic numerals 0 9 26 uppercase letters A Z or lowercase letters a z Systemname System content ...

Page 28: ...ght right to left mirror sides of left to right and right to left see figures as follows Left to right Right to left Mirror side of left to right Mirror side of right to left 2 channel switch Left channel Right channel Dual channel see the figures as follows Left channel Right channel Dual channel 3 Printing Recovery when the set is printer will resume printing automatically when the power continu...

Page 29: ... encoder DPI setting interface User cannot programme line speedsetting when external encoder is connected 5 4 4 User Management Click on system management interface to enter user management see Figure 37 A Device name can be defined the maximum is 15 characters B User permission management switch system default OFF A login dialogue box requests user name and password for access to operation of the...

Page 30: ... see Figure 39 Note Enable special features by registration code Enable Special Features Registration code Figure 39 C Press entering UVsetting interface see Figure 40 Note Can set the UV delay distance Adjustable scope 0 3000mm UV LED Setting UV Delay Distance Figure 40 5 4 6 Screen Touch Correction Click on system management interface to enter screen touch correction see Figure 41 Note Please co...

Page 31: ...pgrade System automatically searches for software upgrade documents in designated folder and displays the upgrade documents by list User can select anyone in the list for upgrade Document route USB Disk InkJet Upgrade Application B Language upgrade System is loaded with multiple languages upon delivery User can add onemore language if needed Document route USB Disk InkJet Upgrade Language C Font u...

Page 32: ...up document route USB Disk InkJet Backup export Backup document route USB Disk InkJet Backup 5 5 4 System Record Click to enter system record viewing interface All operation activities including operator operation and operation time will be shown System record information includes 1 The printing activities printing start and stop initialvalues The printing activities initial values settingdiary 3 ...

Page 33: ...ows Item Item Parameter 1 Language English 2 System time Manufacture time 3 Screen saver time 5 minutes 4 Unit Metric mm 5 Daylight saving time OFF 6 Customer year OFF 7 Date transition time setting OFF 8 Pre zero in date time OFF 9 Pre zero in counter OFF 10 Counter alarm OFF 11 Counter reset OFF 12 Pre purge OFF 13 Clean printhead Standby 14 Printing direction Left to right 15 Channel switch Lef...

Page 34: ...50 Figure 50 B Lowercase click to change between uppercase and lowercase see Figure 51 Figure 51 C Numeric and common symbols Click to change between numeric or common symbols input see Figure 52 Figure 52 D More symbols click on numeric common symbols keypad for more symbols see Figure 53 Figure 53 Input changeover key Numeric common symbols and alphabetic input changeoverkey Remove key clear all...

Page 35: ...y icon USB disk mouse or keyboard Encoder information Displays encoder or photocell connection status as unconnected gray and normally connected green When encoder is connected click encoder signal test interface appears Photocell information When photocell is connected click photocell signal test interface appears Ethernet information The printer connection to computer is realized by Ethernet por...

Page 36: ...31 Clean Printhead Status Invalid grey while printing going on this function is invalid Valid green can active this function ...

Page 37: ...nk cartridge care and maintenance for instructions Note Standard battery cannot be substituted 6 2 Ink Cartridge Care and Maintenance Maintain correct methods for use and storage of the cartridge will keep the cartridge work with best print quality and extend cartridge life Please always follow instructions in Ink Cartridge Care and Maintenance The warranty will not cover damage or failure caused ...

Page 38: ...f there s any spring loaded connectors depressed in Driver board Check if there s contamination on cartridge contact plate 2 Cartridge not in good contact with printer Remove the cartridge and re insert 2 The print is complete at first and then becomes incomplete Ink starvation or air bubbles blocking nozzles A Check status bar if there s alarm of low ink B Send back to our company for test 3 The ...

Page 39: ...the printing delay value is normal 4 Cartridge not installed Install a cartridge 5 Cartridge installed but used up or damaged Check cartridge status according to Section 5 7 is ink used up or cartridge dealer code wrong If ink used up or cartridge dealer code wrong replace a new cartridge 6 Photocell not works Check if photocell switch is normally connected check according to Section 5 7 to see if...

Page 40: ...orded as 09 07 07 59 after that is 10 07 8 00 If the date transition time is 12 01 then the time of last printing out before that is recorded as 10 07 12 00 after that is 11 07 6 Pre purge Ink becomes dry on nozzle plate during use The dried ink will make the print not clear for half of first character To prevent this phenomenon user can turn this function ON When Pre purge function is turned ON p...

Page 41: ......

Reviews: