background image

PRINT REGISTRATION & IMPRESSION ADJUSTMENT

(Multi Color)

The following set of instructions are to assist you in setting up the press for a multi color label.

The same guidelines will remain for the first station as in printing with one color. The second print
station should be set up at this time.

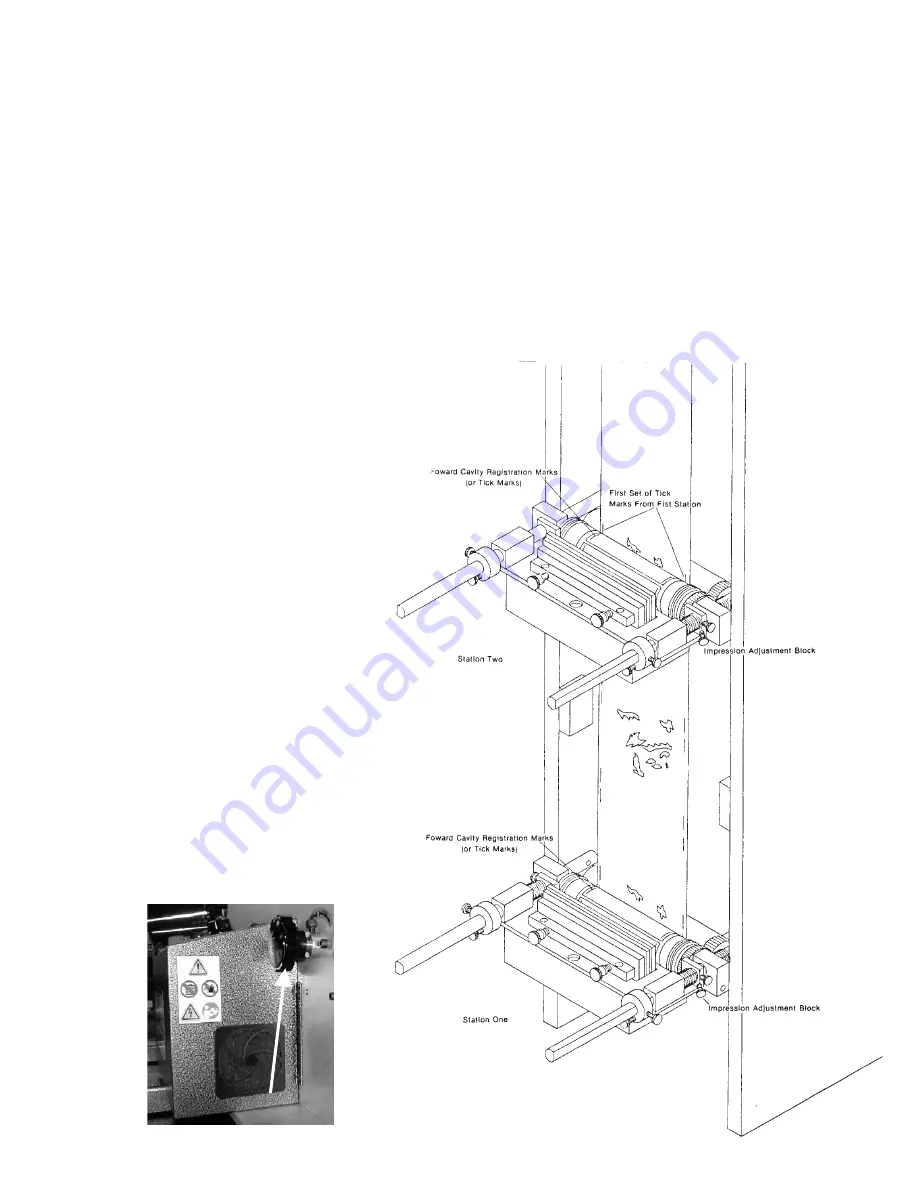
1. Run the machine forward and mark, with a pen, the beginning cavity by the first set of tick

marks. Run this marked label forward to the second station anvil shaft. Position the forward cavity
registration marks (tick marks) on the second printing plate, in line with the tick marks left on the
web by the first printing plate. (See Illustration)

Push in the print cylinder on the corresponding tooth until the gears mesh. Push in the ink

fountain and tighten the fountain adjustment collar set screw.

2. Run the machine slowly and

again move the ink fountain inward
to achieve print. Once this is done,
o b s e r ve

w h e r e

t h e

s e c o n d

impression is register ing in
comparison with station number
one.

If you are close to proper

registration, you can advance or
retard the impression by using the
registration knob for that station.
(see below). If registration cannot
be achieved by use of the advance
or retard, you will have to move the
print cylinder to the proper tooth
manually.

NOTE:

Before attempting any

adjustment, the machine should be
shut off.

After moving the print plate, check

the impression again.

You now

should be able to register using the
registration knobs.

Once this is

done you can now set your die cut
and remove waste.

Repeat the

above procedure from each plate.

REGISTRATION KNOB

12

Summary of Contents for 4400

Page 1: ...SOHN MODEL 4400 OPERATORS MANUAL P O BOX 427 ELKHART LAKE WI 53020 USA PH 920 876 3361 FAX 920 876 2952 E MAIL sohn WEB www sohnmanufacturing com sohnmanufacturing com MANUFACTURING INC ...

Page 2: ...bvious operator danger points However due to the variances in OSHA Codes which allows OSHA Inspectors to determine OSHA violations in accordance to their interpretation of OSHA Codes Sohn does not warrant the machine to meet all OSHA requirements which can vary in accordance to the location and OSHA Inspectors It is agreed that in accepting this proposal the meeting of final OSHA requirements for ...

Page 3: ... DRIVE B ELECTRIC SHOCK HAZARD GENERAL WARNING C HAND ABRASION F PINCH POINT HAND IN ROLLERS E ENTANGLEMENT HAZARD HAND IN GEARS D HAND ENTANGLEMENT G CUT SEVER HAZARD J NO ACCESS FOR UNAUTHORIZED PERSONNEL H HAIR ENTANGLEMENT I DO NOT REMOVE GUARD K WEAR EYE PROTECTION L READ MANUAL M READ SERVICE MANUAL N ARM ENTANGLEMENT 2 O NOT A LIFT POINT ...

Page 4: ...RUCTION MANUAL BEFORE OPERATING THE MACHINE Follow all wiring codes and recommended electrical connections Learn the machine s application and limitations as well as the specific hazards peculiar to it OBTAIN ADVICE from your supervisor instructor or another qualified person if you are not familiar with the operation of this machine 2 DO NOT OPERATE MACHINEWITHOUT GUARDS IN PLACE 3 KEEP WORK AREA ...

Page 5: ...ghqualityprinteddie cutlabelswithcapabilitiesof1 4colors Our Model 4400 Label Printer brings the capabilities of a commercial printer inside your own facility Our unit will eliminate costly inventory long lead times expensive set up charges and high quantity minimum order requirements The Model 4400 will produce premium single or multi colored labels when you need them Printing the exact number of...

Page 6: ...tions to stop machine operation when the prescribed roll length footage has been processed It s preset number would normally be set to the length of a full roll of material Red Button Count Reset P Button Used only during initial programming of the counter Left Arrow This button selects one of the digits for presetting Each press of the button will advance to the next digit Up Arrow Pressing this ...

Page 7: ...D D E G D E G WEB DIRECTION WEB DIRECTION 5 ...

Page 8: ...F N D D E E F N E D 6 O ...

Page 9: ...on the nip tie bar until the lock pin engages see Fig 4 This will keep the nip roller away from the anvil shaft Thread the label stock between the anvil shaft and the nip on the first station Continue pulling stock upward past the anvil shaft on each print station Pull the stock over the top of the die anvil shafts and down toward the rewind spindle Place a core which measures the same width as yo...

Page 10: ...Pitch Bearing Anvil Bearer Shaft Bearing Die Bearer Die Bearer Assembly Complete Flange Nut Pressure Knob Pressure Bar Adjusting Screw Set Screw Bearing Block Assembly Oil Wiper Assembly Operator Side Oil Wiper Assembly Gear Side 1 1 2 1 2 1 4 2 2 2 2 2 1 1 DIE STATION ASSEMBLY 8 1 2 3 4 5 6 8 9 10 11 13 12 7 ...

Page 11: ...r die cut 2 Run the machine and allow it to make several die cuts into the printed impression Check to make sure you are cutting properly by peeling a die cut label from the liner If the label does not come off the liner cleanly additional pressure may be necessary Run the machine forward until a printed impression is on the die anvil Position the die cavity over the image as close as possible by ...

Page 12: ... may be placed between stations four may be used Four blower heads are located in a storage rack on the back of the machine Remove blower head from storage rack and place between print stations Align the pins on the head with the holes in the blower mount blocks With blower head in place run machine before turning on blower switch aux 1 Only use as many blower heads as your application requires Us...

Page 13: ...MODEL 4400 PRINT STATION 11 ...

Page 14: ...th until the gears mesh Push in the ink fountain and tighten the fountain adjustment collar set screw 2 Run the machine slowly and again move the ink fountain inward to achieve print Once this is done observe where the second impression is registering in comparison with station number one If you are close to proper registration you can advance or retard the impression by using the registration kno...

Page 15: ...de will sit in these notches when the cover is replaced 3 Put the cover on Use 5 32 HexWrench to tighten cover screws 4 Put small amount of pressure on doctor blade screws The ink fountain is the heart of your printing machine Use a regular cleaning schedule and keep the fountain away from lint and dust Extreme gear wear and bad printing can often be traced to a dirty fountain Inspect the doctor b...

Page 16: ... fountains A fountain which is not cleaned properly will not perform the way it was designed to In order to clean the ink fountain it must be partially disassembled This can be done quickly and easily by following the cleaning and assembly instructions PART NO DESCRIPTION QTY PRICE EA 1 2 3 4 5 6 7 8 9 10 11 12 13 14 15 Dipstick Reverse Dr Blade Assembly Reverse Dr Blade Screw Brass Knurled Revers...

Page 17: ...g type of ink C Ink has lost its viscosity A Turn down slightly on doctor blade adjustments until correct amount of ink is obtained B See Page 5 C If ink is too thick add thinner Do not overfill fountain If ink is too washed out add more ink D Use Sohn recommended paper 10 Paper sticks to printing plate and wraps around shaft A Ink has built up on printing plate and dried from standing B ink has l...

Page 18: ...SOHN MODEL 4400 MANUFACTURING INC P O BOX 427 ELKHART LAKE WI 53020 USA PH 920 876 3361 FAX 920 876 2952 E MAIL sohn WEB www sohnmanufacturing com sohnmanufacturing com ...

Reviews: