background image

14

iv) Before felling is started, consider the natural lean of the 

tree, the location of larger branches and the wind direction 

to help you judge which way the tree will fall.

v) 

Remove dirt, stones, loose bark, nails, staples and wire 

from the tree.

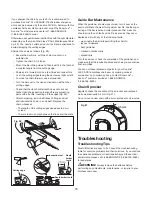
•  Notching undercut

Make the notch 1/3 the diameter of the tree, perpendicular to 

the direction of the fall as illustrated (Fig. 14).

Make the lower horizontal notching cut first. This will help to 

avoid pinching either the saw chain or the guide bar when the 

second notch is made.

•  Felling back cut
i) 

Make the felling back cut at least 2 in. (50 mm) higher than 

the horizontal notching cut as illustrated (Fig. 14). Keep 

the felling back cut parallel to the horizontal notching cut. 

Strategically position the felling back cut so that enough 

wood is left to act as a hinge. The hinge wood keeps the 

tree from twisting and falling in the wrong direction. Do not 

cut through the hinge.

ii) 

As the felling gets close to the hinge, the tree should begin 

to fall. If there is any chance that the tree may not fall in 

the desired direction or it may rock back and bind the saw 

chain, stop cutting before the felling back cut is complete 

and use wedges of wood, plastic or aluminium to open the 

cut and drop the tree along the desired line of fall.

iii) 

When the tree begins to fall, remove the chain saw from 

the cut, stop the motor, put the chain saw down, then use 

the retreat path planned. Be alert for overhead limbs falling 

and watch your footing.

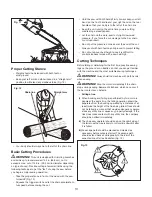
•  Limbing

Limbing is the process in which branches are removed from a 

fallen tree. When limbing, leave larger lower limbs to support 

the log off the ground. Remove the small limbs in one cut as 

illustrated (Fig. 15). Branches under tension should be cut from 

the bottom up to avoid binding the chain saw.

m

WARNING! 

Pay special attention to where the branches 

are lying on the ground and recognize the following risks:  

1). the branches may be under tension; 2). the direction in which 

the branch will fall may differ from that anticipated; 3). the tree 

may be unstable after the branch has been cut.

•  Bucking a log

m

WARNING! 

Do not buck logs that are larger than the 

maximum cutting thickness. 

Bucking is the process in which a log is cut into lengths. It is 

important to make sure your footing is firm and your weight is 

evenly distributed on both feet. When possible, the log should 

be raised and supported by the use of limbs, logs, or chocks. 

Follow these simple directions for easy cutting:

•  When the log is supported along its entire length as 

illustrated (Fig. 16A), cut from the top (overbuck).

•  When the log is supported on one end (Fig. 

16

B), cut 1/3 

the diameter from the underside (underbuck). Then make 

the finishing cut by overbucking to meet the first cut.

2 inch (50 mm)

2 inch (50 mm)

Fig. 14

1

2

1

Fig. 15

1

Fig. 16A

Summary of Contents for SUNJOE 24V-X2-CS16

Page 1: ...ing the machine while fastened to fixed supports Improper use of the machine will invalidate the warranty relieve the manufacturer from all liabilities The user will consequently be liable for all and...

Page 2: ...binding of moving parts breakage of parts and any other condition that may affect the power tool s operation If damaged have the power tool repaired before use Many accidents are caused by poorly main...

Page 3: ...control of the saw which could result in serious personal injury Do not rely exclusively upon the safety devices built into your saw As a chain saw user you should take several steps to keep your cut...

Page 4: ...acks Battery packs may explode causing personal injury or damage Toxic fumes and materials are created when battery packs are burned Do not crush drop or damage battery packs Do not use the battery pa...

Page 5: ...r partially charged battery pack will result in overcharging and cell damage Do not leave batteries in the charger for days on end 8 Never use or charge batteries if you suspect that it has been more...

Page 6: ...acting the guide bar tip with any object Tip contact may cause the guide bar to move suddenly upward and backwards which may cause serious injury to the user WEAR EYE AND HEARING PROTECTION For protec...

Page 7: ...in 39 4 cm Recommended 14 5 in 36 8 cm Weight chain saw alone 9 5 lbs 4 3 kg Weight With batteries installed 11 5 lbs 5 2 kg Initial no load voltage when fully charged peaks at 48 volts nominal voltag...

Page 8: ...on Battery Charge Level Indicator The battery packs are equipped with a push button for checking the charge level Simply press the push button to read off the battery charge level from the LEDs of the...

Page 9: ...e damage to the batteries Preparing To Work Checking the Machine mWARNING Before performing any checks adjustments repairs or maintenance on the machine make sure the batteries are not inserted in the...

Page 10: ...pan of the chain and bar IMPORTANT Before each use the oil level should be checked and topped up to 1 cm from the rim of the filler To fill the oil tank remove the oil tank cap and add the recommended...

Page 11: ...ng the unit for a long period of time 3 months or longer be sure the chain is lightly lubricated this will prevent rust on the chain and bar sprocket 1 Prior to each cutting session run through the da...

Page 12: ...IMPORTANT Always remember that an incorrectly used chain saw may disturb others and have a serious impact on the environment To respect people and the environment Avoid using the machine in environmen...

Page 13: ...ways cut with both feet on solid ground to prevent falling Do not cut above chest height since it is difficult to control kickback forces with a saw held high Cutting Techniques Before felling or deli...

Page 14: ...he tree begins to fall remove the chain saw from the cut stop the motor put the chain saw down then use the retreat path planned Be alert for overhead limbs falling and watch your footing Limbing Limb...

Page 15: ...afety and that of others Correct maintenance is essential to maintain the original efficiency and safety of the machine over time Keep all nuts bolts and screws tight to be sure the equipment is in sa...

Page 16: ...ain from the mounting surface Fig 18 3 Remove the old chain from the bar 4 Lay out the new saw chain in a loop and straighten any kinks THE SHARP SIDE OF THE TEETH MUST FACE AWAY FROM YOU IN THE DIREC...

Page 17: ...ng approximately 0 050 in 1 25 mm out of the bar groove Fig 25 Be aware that a chain tensioned while warm may be too tight upon cooling Check the cold tension before next use The chain must be re tens...

Page 18: ...or less There is too much play between the links and the rivets Guide Bar Maintenance When the guide bar shows signs of wear turn it over on the saw to distribute the wear for maximum bar life Feathe...

Page 19: ...xpose the plastic parts of the unit to brake fluids gasoline petroleum based products penetrating oils or the like These products are often highly corrosive and may cause permanent damage weaken or de...

Page 20: ...compliance could void the user s authority to operate the equipment Class B device NOTE This equipment has been tested and found to comply with the limits for a Class B digital device pursuant to part...

Page 21: ...4 24V iON 2 0 Ah Lithium Ion Battery Battery Charge Time Max 24VCHRG AC 1 hr 20 min 24VCHRG QC 55 min 24VCHRG DPC 55 min Battery Runtime Max 15 min 24VBAT LTE 24V iON 2 5 Ah Lithium Ion Battery Batter...

Page 22: ...866 766 9563 Model Accessories Item 7 8 Sun Joe 16 inch replacement bar 24V CS16 BAR Sun Joe 16 inch replacement chain SWJ 16CHAIN Bar and chain oil SWJ OIL Sold online at sunjoe com or you can purch...

Page 23: ...the owner s manual Snow Joe Sun Joe will not be responsible for the cost of any unauthorized warranty repairs This warranty does not cover any cost or expense incurred by the purchaser in providing su...

Page 24: ...sunjoe com...
Reviews: