


Lit. No. 70440, Rev. 00
14
April 1, 2016
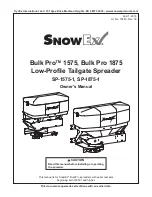
Material
Width
Material
Flow
VIBRATE
LIGHT
STROBE
PREWET
MIN
MAX
ON/OFF
MIN
MAX
BLAST
Material Width
Control Knob
(Spinner Speed)
Indicator Lights
(8 per Knob)
Material Flow
Control Knob
(Feed Rate)
Status/Error Code
Display (Red)
Accessory
Control Buttons
BLAST Button
(Maximum Application)
ON/OFF Button
& Emergency Stop
POWERING THE CONTROL
Power is not applied to the control until the vehicle
ignition is turned to ACC or ON. Once the control
has power it performs a light check and displays the
software version on the status display. The control
then checks for a connected spreader. If no spreader
is detected, the control does the following:
• nC
(no connection) appears on the red status
display for
fi
ve seconds;
• A single beep;
• Control enters standby mode with no lights
illuminated.
OPERATING THE SPREADER – CAB CONTROL
WARNING
Never operate equipment when under the
in
fl
uence of alcohol, drugs, or medications that
might alter your judgment and/or reaction time.
WARNING
Never allow children to operate or climb on
equipment.
WARNING
Never exceed 45 mph (72 km/h) when loaded
spreader is attached to vehicle. Braking
distances may be increased and handling
characteristics may be impaired at speeds
above 45 mph (72 km/h).
WARNING
Before starting the spreader, the driver shall
verify that all bystanders are a minimum of
25 feet away from operating spreader.
If any button is pressed on the control, it will wake and
check again for spreader connection. If no spreader is
detected, it will act as described above. If a spreader
is detected, it will transition to Ready Mode.
STARTING AND STOPPING SPREADER
To start the spreader
, press the ON/OFF button. The
control backlights are illuminated when the vehicle
ignition is ON and the spreader is connected. When
the spreader is ON, the ON/OFF button and inner arc
around each control knob will also illuminate.
To stop the spreader
, press the ON/OFF button
again.
The ON/OFF button also operates as an emergency
stop when required.
NOTE: The truck ignition must be ON to start
the spreader.
NOTE: If truck ignition is turned OFF while
spreader is running, the motors will stop.


