background image

6

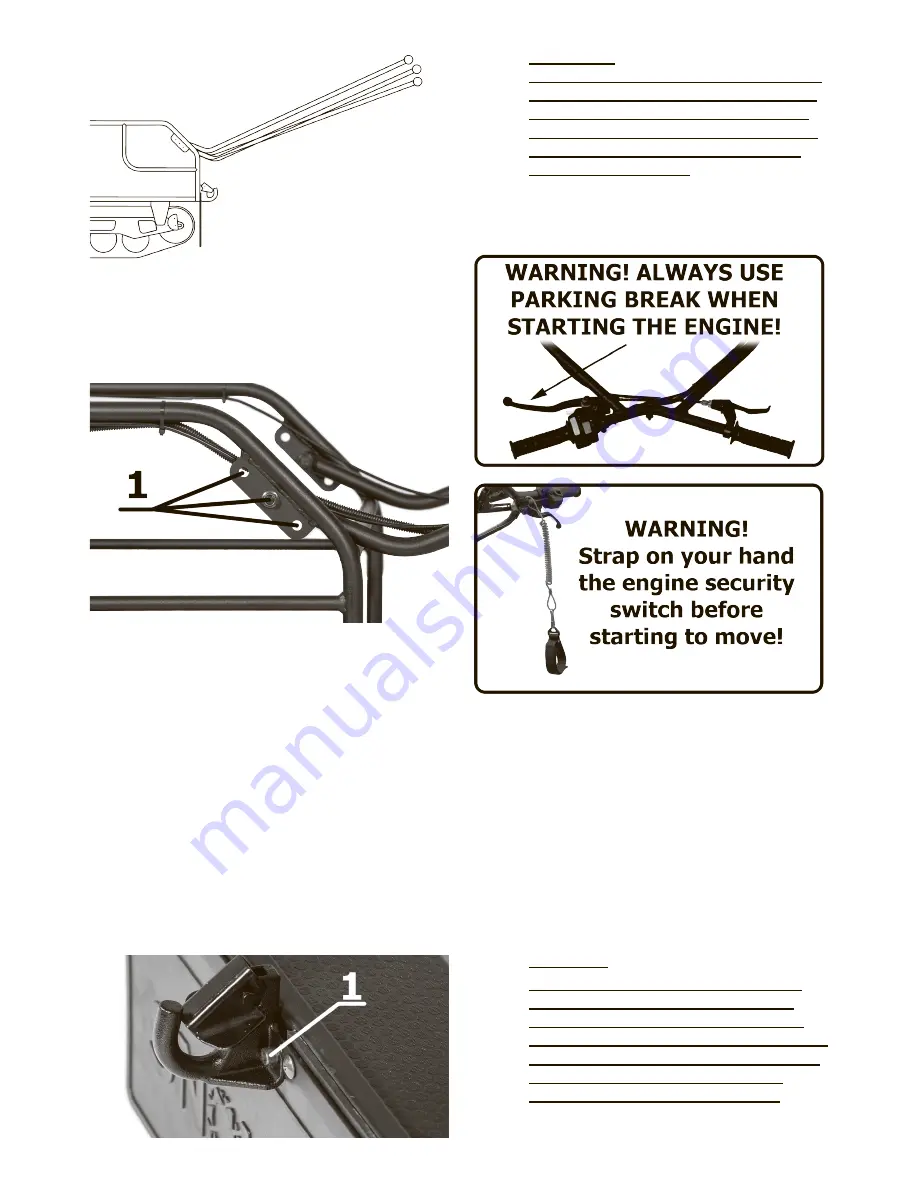
8.3  Handle bar height adjustment

To adjust the height of the steering handle you  must rearrange 

fixture in one of the three holes 1. In order to raise the wheel 

higher, move the mounting holes in the bottom. In order to 

lower the lower wheel, move the steering wheel to the upper 

hole. Please NOTE, both the handlebar mounting must be on 

the same level.

8.4  Preparations, necessary to maintain 

before every star up

1.  Move the steering handles from the transporting position 

into the operating position

2.  Sleds are mounted to the motor using hitch.

3.  Check the chain tension – the chain should be neither loose, 

nor tight.

4.  Check the throttle and brake cable (lubricate if needed).

5.  Check the parking brakes.

6. 

Move the parking brake into the fixed position.

7.  Set up the engine according to the instruction manual of the 

engine.

8.  Start the engine according to the instruction manual of the 

engine.

9.  Strap the engine security switch on your hand before 

starting to move. Check how the kill switch is installed. Kill 

switch which is not installed completely may lead to incorrect 

work of the engine.  

10. 

Release the parking brake from the fixed position before 

moving.

11. Check the hooking device and its fastners 1.


!

WARNING! 

When operating Snowdog at positive 

temperatures (above 0C or 32F) it is 

necessary to remove the protective 

cover. Failure to do so will cause the 

engine to overheat and will not be 

covered by warranty

9  Operating the SNOWDOG

Be sure to study the information regarding engine first and then 

start the engine as described in paragraph 14 of the manual. 

Let the engine warm up for 1-2 min.

9.1  Driving

SNOWDOG is operated by a driver in a standing position. 

Throttle arm on the right side of the steering handles controls 

take-off and speed change. SNOWDOG starts moving when the 

throttle arm is approximately in ¼ position. When starting to 

move on a crumbly snow, accelerate slowly in order to avoid 

slipping. To make a turn, steer the handles in the direction 

opposite to the turn. To stop the SNOWDOG, release the 

throttle back - never apply the parking brake to stop the 

SNOWDOG while driving.

9.2  Stopping the engine

To stop the engine, throttle back to minimal RPMs and flip the 

engine stop button to “OFF” position. 


Y

CAUTION!


Y

The first 20 hours of operating the 

SNOWDOG are needed for engine 

and transmission to adjust. During 

this period you should use SNOWDOG 

with lowest possible load. Prolonged 

lugging may cause transmission 

overload and SNOWDOG failure.


Summary of Contents for COMPACT B10ZE WL

Page 1: ...or people who are not capable of safe operating due to different reasons 3 It is prohibited to operate the SNOWDOG under the influence of alcohol and or drugs 4 It s prohibited to use SNOWDOG without...

Page 2: ...WDOG COMPACT B7ZE L SNOWDOG COMPACT B10ZE WL SNOWDOG COMPACT B13 ME WR SNOWDOG STANDARD B10ZE WL SNOWDOG STANDARD B13 ME WR SNOWDOG STANDARD B13 MER WR 1 Overall dimensions in transporting and operati...

Page 3: ...ng pulley CVT 13 The battery 14 Wheel trolley of suspension 15 Side plate chassis 16 Track tensioner 6 Basic controls 1 Parking control arm with lock 2 Light switch button 3 Throttle control trigger 4...

Page 4: ...sided WARNING label 4 7 Packaging SNOWDOG delivery set contents 1 SNOWDOG 1 pc 2 Support bracket 1 pc 3 Battery 1 pc 4 Eye bolt 1 pc Owner s documentation 5 Owner s Manual 1 pc 6 Warranty services ag...

Page 5: ...F 5 C it is necessary to remove the cover and operate the macine without a cover 8 2 Battery installation It is necessary to install and connect the battery before startup of Snowdog You will need a b...

Page 6: ...position before moving 11 Check the hooking device and its fastners 1 WARNING When operating Snowdog at positive temperatures above 0C or 32F it is necessary to remove the protective cover Failure to...

Page 7: ...ces on the track such as gasoline solvents acids etc 10 Storage SNOWDOG should be stored in a dry ventilated room or outdoors under a canopy with a waterproof cover In case of a short term storage up...

Page 8: ...ts allow it to warm up for 2 5 minutes After warming up the engine remove the choke lever Read more in the engine manual Y Y CAUTION When starting the engine with an electric starter do not hold the s...

Page 9: ...order to avoid getting burned 17 2 Replacement CVT belt 1 Turn off the engine 2 lock the parking brake To replace the CVT belt pull the belt off the large pulley and then from the CVT as per picture...

Page 10: ...n rapid chain stretching and will lead to fast sprocket wear An excessively loose chain can fall off during operation Loose chain needs to be tightened While operating the chain stretches and the dist...

Page 11: ...d be 0 2 0 4in 5 10mm If the braking force on the lever is not sufficient for example when brake pads worn out or tensile steel cable you need to adjust the brake lever stroke To do this loosen the lo...

Page 12: ...until touching the movable brake pads on the brake disc Hold the bolt 6 tighten the locknut 5 Check the brake disk rotation Allowed to graze on the disc brake pads is not obstructing its rotation Che...

Page 13: ...lace back the oil drain hole bolt and washer Tighten up the oil drain hole bolt with a torque 15 ft lb 21 V V NOTE In this model in the observation window on the gearbox can not show you the what s th...

Page 14: ...14 17 10 Snowdog s general electric circuit scheme For engines detailed electric circuit please contact Briggs Stratton dealers...

Page 15: ...15...

Page 16: ...es to design without prior notice and without any obligations If a difference is found between this Manual and your Snowdog please contact your Snowdog dealer for the latest information The service li...

Reviews:

Related manuals for COMPACT B10ZE WL