31
MOWER BELT REPLACEMENT
38” & 42” Decks:
1. Park the rider on a smooth, level surface such as a
concrete floor. Disengage the PTO, lock the motion
control levers into their neutral locked positions, turn
off the engine, and remove the ignition key.
2. Raise the mower deck to its highest cutting position.
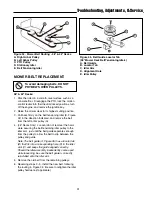
3. Pull back firmly on the belt tensioning idler (E, Figure
34) in the direction indicated, and remove the belt
from the left arbor pulley (A).
4. (38” Decks Only) Loosen (do not remove) the hard-
ware securing the belt tensioning idler pulley to the
idler arm, just until the belt guide separates enough
from the pulley to allow the belt to slip between the
pulley and guide.
Note: The belt guide (A, Figure 35) has a locator tab
(B) that fits into a corresponding hole (D) in the idler
arm (C) and keeps the guide aligned correctly.
Should the idler assembly inadvertently come apart
while loosening, be sure the belt guide is correctly
reinstalled onto the idler arm.
5. Remove the old belt from the remaining pulleys.
6. Reversing steps 3 - 5, install the new belt, following
the routing in Figure 34. Be sure to retighten the idler
pulley hardware (if applicable).
Troubleshooting, Adjustments, & Service
To avoid damaging belts, DO NOT
PRY BELTS OVER PULLEYS.
Figure 34. Mower Belt Routing - 38” & 42” Decks
A. Right Arbor Pulley
B. Left Arbor Pulley
C. PTO Pulley
D. Stationary Idler
E. Belt Tensioning Idler
B
A
C
E
Figure 35. Belt Guide Locator Tab
(38” Mower Deck Belt Tensioning Idlers)
A. Belt Guide
B. Locator Tab
C. Idler Arm
D. Alignment Hole
E. Idler Pulley
E
D
D
C
A
B


