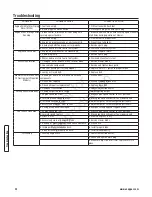
Snapper 7800596 Operator'S Manual Download Page 22

PROBLEM

PROBABLE CAUSE

CORRECTIVE ACTION

Engine Will Not Start Using 

Recoil Starter

1. Fuel tank empty.

1. Fill fuel tank with fresh fuel.

2. Spark plug wire disconnected.

2. Place spark plug wire onto spark plug.

Engine Stalls or Stops After 

Running

1. Blade control is released or is not being held 

securely against handle.

1. Blade control should be held securely against handle 

at all times during operation of mower.

2. Fuel tank empty.

2. Fill with fuel to proper level.

3. Engine air pre-cleaner and or air cleaner dirty.

3. Clean free of all debris.

4. Spark plug defective or gap set improperly.

4. Service spark plug.

5. Water, debris or stale fuel in fuel system.

5. Drain and clean fuel system.

Engine Loses Power

1. Engine air pre-cleaner or air cleaner dirty.

1. Clean or replace filters.

2. Spark plug faulty.

2. Service spark plug.

3. Water, debris or stale fuel in fuel system.

3. Drain and clean fuel system.

Excessive Vibration

1. Damaged, out of balance or bent mower blade.

1. Service mower blade.

2. Loose blade components.

2. Service and tighten loose parts.

3. Loose or missing air lift (if equipped).

3. Replace air lifts.  Tighten to proper torque.

4. Lumpy or frayed belt.

4. Replace belt.

Mower Will Not Move Loss 

Of Traction (Self-Propelled 

Models)

1. Build-up of debris on or around wheel drive      

components.

1. Clean debris.

2. Driven disc slipping.

2. Clean or replace driven disc.

3. Drive belt requires replacement.

3. Replace drive belt.

4. Damaged transmission.

4. Contact authorized dealer.

Cutting Grass Improperly 1. Cutting height too low or high.

1. Adjust cutting height.

2. Engine speed too slow.

2. Move engine speed control to ‘Fast’ position.

3. Forward ground speed too fast.

3. Move ground speed control to a slower speed.

4. Terraced cut, side to side.

4. Adjust height of cut with height adjust levers.

5. Excessive deck pitch, front to rear.

5. Adjust height of cut with height adjust levers.

6. Cutting blade dull or damaged.

6. Sharpen cutting edges or replace blade.

Poor Grass Discharge

1. Engine speed too fast.

1. Move engine speed control to ‘Fast’ position.

2. Forward speed too fast.

2. Move ground speed control to a slower speed.

3. Grass is wet.

3. Mow when grass is dry.

4. Excessively worn or damaged blade.

4. Service mower blade.

5. Build up of grass clippings and debris under deck. 5. Clean deck.
6. Improper blade installed on deck.

6. Install proper blade.

7. Blade installed improperly on deck.

7. Install blade properly.

Oil Leaking

1. Leaking engine case.

1. Contact authorized dealer.
2. Check and tighten drain plug.
3. Make sure dip stick or oil filler cap is securely in 

place.

Troubleshooting

www.snapper.com

22

Troubleshooting

Not 

for  

Reproduction

Summary of Contents for 7800596

Page 1: ...kely be lower due to operating limitations and environmental factors Please refer to Engine Power Rating Information for further details Manual No 7103934 Rev 10 20 2009 21 STEEL DECK WALK MOWERS SERI...

Page 2: ...re reference PRODUCT REGISTRATION IMPORTANT KEEP THIS INFORMATION FOR YOUR PERSONAL RECORDS Complete the following information on your Snapper purchase Date of Purchase________________________________...

Page 3: ...lt 13 Check Transmission Belt 13 Service Periodic 13 Engine 13 Air Filter 13 Engine Oil 13 Storage Procedure 13 Mower Blade Replacement 14 Blade Sharpening 14 Wheel Drive Control Adjustment 15 Driven...

Page 4: ...reparation 1 Read understand and follow instructions and warnings in this manual and on the mower engine and attachments Know the controls and the proper use of the mower before starting 2 Only mature...

Page 5: ...clearing grass Operation Continued From Previous Column 13 DO NOT operate mower without the entire grass catcher or guards in place discharge guard rear guard or other safety devices in place and wor...

Page 6: ...our Snapper dealer if you have questions Features and Controls A Oil Fill Cap and Dipstick B Fuel Filler Cap C Recycling Cover D Rear Height Adjustment Latch 2 E Front Height Adjustment Latch 2 F Blad...

Page 7: ...n Make sure the cap B Figure 2 is tightened after fueling Refer to the Engine Owners Manual for fuel specifications 6 Clean the exterior surfaces of the cutting deck and engine of any accumulation of...

Page 8: ...ntrol 2 Stop the engine and blade by releasing the blade control Handle Height Adjustment The height of the mower handle can be adjusted as follows 1 Loosen the lower nuts A Figure 5 on each lower han...

Page 9: ...improve recycling performance Note The recycling cover should remain on the machine at all times unless alternate discharge operations are desired such as side discharging or bagging Removing the Rec...

Page 10: ...tud where the front of the recycling cover was originally secured The slot C on top of the adapter slips under the restraining nut on top of the deck under the right front corner of the engine The slo...

Page 11: ...ce with engine and blade running STOP engine and blade Disconnect spark plug wire and secure away from spark plug Engine and components are HOT Avoid serious burns allow sufficient time for all compon...

Page 12: ...Figure 14 Roll the machine forward or backward while looking down into the plug hole 2 If liquid grease is not visible on the input gear the small gear below the plug hole add an amount to cover the...

Page 13: ...uctions Storage Procedure Refer to the Engine Owner s Manual for directions regarding engine storage preparations Prepare the mower for end of season storage as follows 1 Drain the fuel from the fuel...

Page 14: ...e crankcase will saturate the air filter and cause the engine to be hard to start or not start at all If contamina tion does occur the air filter will have to be replaced 3 Remove the blade B Figure 1...

Page 15: ...extend or shorten the spring length 3 Rehook the upper spring to the cable eye and check clearance Repeat the procedure if required Note The vinyl spring cover B should be kept over the spring at all...

Page 16: ...mponents with a clean cloth Drive Spring Repair Replacement If the drive spring A Figure 23 is loose reconnect If the spring is broken replace with a new spring Note Use a pair of needle nose pliers t...

Page 17: ...ion then back to the fast position Recheck the 1 8 measurement described previously Readjust as needed Tighten the nut when finished 7 Reinstall the driven disc spring to the driven disc assembly Driv...

Page 18: ...uires replacement replace the bearing as follows 1 Remove the driven disc assembly Refer to the Section entitled Driven Disc Replacement 2 Remove both snap rings A Figure 29 that secure the rubber dri...

Page 19: ...e disc powers the poly v belt which engages the transmission that powers the rear wheels Should these belts become worn they could cause slippage which would impair mower performance The condition of...

Page 20: ...of the drive disc 10 Reinstall the drive disc and retaining hardware IMPORTANT 1 The square shoulder of the drive disc bolt must fit into the square hole of the bushing 2 The square end of bushing mu...

Page 21: ...Periodic Grease Check Page 12 X Drive Disc Check for Wear Damage and Replacement Page 15 18 X Change oil every 25 hours when operating under heavy load or high temperatures Clean more often under dus...

Page 22: ...ropelled Models 1 Build up of debris on or around wheel drive components 1 Clean debris 2 Driven disc slipping 2 Clean or replace driven disc 3 Drive belt requires replacement 3 Replace drive belt 4 D...

Page 23: ...PER will not be responsible for any installation cost incurred The battery warranty only covers original equipment batteries and does not cover damage to the battery or machine caused by neglect or ab...

Page 24: ...www snapper com 24 Notes N o t f o r R e p r o d u c t i o n...

Page 25: ...25 N o t f o r R e p r o d u c t i o n...

Page 26: ...www snapper com 26 Notes N o t f o r R e p r o d u c t i o n...

Page 27: ...27 Notes N o t f o r R e p r o d u c t i o n...

Page 28: ...the equipment the gas engine will not develop the rated gross power when used in a given piece of power equipment actual on site or net power This difference is due to a variety of factors including...

Reviews: