


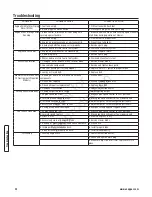


21
Maintenance
ITEM
SERVICE
PERFORMED
REF.
EACH
USE
5
HRS
25
HRS
50
HRS
100
HRS
EACH
SEASON
Engine Oil
Check Oil Level
Page 7
X
Initial Oil Change
Page 12
X
Periodic Oil Change
Page 13
X*
Air Pre-Cleaner
Clean Sponge Element
Engine Manual
X**
Air Cleaner
Clean or Replace
Engine Manual
X**
Spark Plug
Replace
Engine Manual
X
Engine Cooling
System
Clean Shroud & Fins
Engine Manual
X**
Drive Belts
Check for Wear and
Tension
Page 13, 19
X
X
X
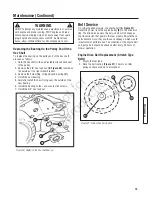
Mower Blade
Check for wear, Damage
& Replacement
Page 14
X
Mower Deck
Clean Debris
Accumulation
Page 7
X
Transmission
Grease
Check Grease Level
Page 12
X
X
Periodic Grease Check
Page 12
X
Drive Disc
Check for Wear Damage
and Replacement
Page 15-18
X
* Change oil every 25 hours when operating under heavy load or high temperatures.
** Clean more often under dusty conditions or when air debris is present.
Maintenance/Replacement Parts
Engine Speed Control
7074460
Blade Control Cable
7034608
Clutch Pull Cable
7034604
Cutter Blade (Air Lift Compatible)
7019795
Cutter Blade (Mulching)
7017168
Cutter Blade (Not Air Lift Compatible)
7026691
Cutter Blade (Ninja - Quad Edge)
7026407
Wheel Drive Pulley to Transmission Pulley Belt
7012354
Engine to Drive Disc Belt
7046784
Cantilever Drive Tire Assembly
7073528
Rubber Drive Tire
7041855
Parts Manual for 21” Steel Deck Walk Behind Mower Series 20
7006477
Service Schedule
Not
for
Reproduction