background image

Thank you

for purchasing Snapper Pro commercial mowing equipment. Please take a few minutes to read this limited warranty information. It con-

tains all the information you will need to have your Snapper Pro mower repaired in the unlikely event that a breakdown covered by this limited warranty
should occur.

Owner's Responsibilities

- As a condition to our obligations under this limited warranty, you shall have read the operator's manual and you shall have

completed and submitted to Snapper Pro, within 20 days from the date of purchase, the Snapper Pro Product Registration. You must properly service
and maintain your Snapper Pro product as described in the operator's manual. Such routine maintenance, whether performed by a dealer or by you, is
at your expense. The Snapper Pro equipment, including any defective part covered by this limited warranty, must be returned to an authorized Snapper
Pro dealer within the warranty period for warranty service. This limited warranty extends only to equipment operated under normal conditions and in
accordance with Snapper Pro' instructions.

Warranty Start Date

- The limited warranty coverage begins on the day you buy your new Snapper Pro commercial mowing equipment. An authorized

Snapper Pro dealer will assist you in filling out a Snapper Pro Product Registration with specific information for the model you purchase and your per-
sonal information, which must be returned to Snapper Pro.

Limited Warranty

- The limited warranty, set forth below, is a written guarantee by Snapper Pro, during the warranty period, to repair or replace parts

which have a substantial defect in materials or workmanship. The warranty is "limited" because it is for a specified period of time, applies to the origi-
nal purchaser only, and is subject to other restrictions.

SNAPPER PRO LIMITED WARRANTY

Snapper Pro warrants, in accordance with the provisions below, to the original purchaser only, for the periods described below that the commercial
mower shall be free from substantial defects in material or workmanship under normal use and service. If you wish to file a claim under this limited
warranty, you must provide prompt notice of your claim to an authorized Snapper Pro dealer during the warranty period. Snapper Pro' obligation under
this limited warranty is, at Snapper Pro' option, to repair or replace any part or parts of the mower, which, in the judgment of Snapper Pro, are found to
be defective and covered by this limited warranty. An authorized Snapper Pro dealer will repair or replace the defective part or parts, at the dealer's
place of business, at no charge for the labor or parts. This limited warranty applies only to mowers sold in the United States and Canada and is sub-
ject to the following limitations.

Covered Parts

Warranty Period

All Mowers

2-years (24 months) from date of retail purchase by the original
purchaser for parts & labor (90 days for rental mowers)
(Except as noted below*)

*Belts, Tires, Brake Pads

90 days from date of retail purchase by the original purchaser

And Hoses, Battery, Blades

*Attachments

1 year from date of retail purchase by the original purchaser

*Engine

If the engine manufacturer provides any warranty on the mower's engine, Snapper Pro will assign that 
warranty to the original purchaser of the mower if such assignment is reasonably practicable. Please refer to 
the engine manufacturer's warranty statement, if any, that is included in the owner's packet. We are not 
authoized to handle warranty adjustments or repairs on engines. Snapper Pro offers 

NO WARRANTY

on 

mower engines. Snapper Pro does not guarantee or represent that any engine manufacturer will comply with 
the terms of its warranty.

Items and Conditions Not Covered

This warranty does not cover, and Snapper Pro makes 

NO WARRANTY

regarding, the following:

• Mowers or their parts if a complete and accurate Snapper Pro Product Registration has not been received by Snapper Pro.
• Loss or damage to person or property other than that expressly covered by the terms of this limited warranty.
• Pickup and delivery charges and risk of loss or damage in transit to and from any authorized Snapper Pro dealer.
• Any damage or deterioration due to normal use, wear and tear, or environmental or natural elements, or exposure.
• Cost of regular maintenance service or parts, such as but not limited to, filters, fuel, lubricants, tune-up parts, and adjustments.
• Claims arising due to failure to follow Snapper Pro' written instructions, or improper storage or maintenance.
• Any repairs necessary due to use of parts, accessories or supplies, including gasoline, oil or lubricants, incompatible with the mowing equipment,

or other than as recommended in the operator's manual or other written operational instructions provided by Snapper Pro.

• Use of non-Snapper Pro approved parts or accessories.
• Any overtime or other extraordinary repair charges or charges relating to repairs or replacements.
• Rental of like or similar replacement equipment during the period of any warranty, repair or replacement work.
• Loss of revenue, time or use of the mowing equipment.
• Travel, telephone or other communication charges.
• Damage from continued use of defective mowing equipment.
• Freight charges on replacement parts.
• Any mowing equipment or part which, in the judgment of Snapper Pro, has been altered or tampered with in any way or has been subjected to

misuse, abuse, abnormal usage, unauthorized repair, neglect or accident, damage in transit, or has had the serial numbers altered, effaced or
removed.

• Any equipment, part or item not mentioned under "Covered Parts," above.

General Conditions

Snapper Pro is continually striving to improve its products, and therefore reserves the right to make improvements or changes without incurring any
obligation to make changes or additions to products sold previously. Any oral or written description of Snapper Pro products is for the sole purpose of
identifying the products and shall not be construed as an express warranty. No warranty claim shall give rise to a right for the purchaser to cancel or
rescind any sale. No person is authorized to make any warranty or assume for Snapper Pro any liability not strictly in accordance with this limited war-
ranty. Any assistance Snapper Pro provides to or procures for the purchaser outside the terms, limitations or exclusions of this limited warranty will not
constitute a waiver of the terms, limitations or exclusions of this limited warranty, nor will such assistance extend or revive the limited warranty.
Snapper Pro will not reimburse the purchaser for any expenses incurred by the purchaser in repairing, correcting or replacing any defective products
except for those incurred with Snapper Pro' prior written permission and in accordance with this limited warranty.

Snapper Pro' sole and exclusive liability with respect to this limited warranty, and the purchaser's exclusive remedy, shall be repair or replacement as
set forth herein. All warranty work must be performed by an authorized Snapper Pro dealer using only Snapper Pro approved replacement parts.

SNAPPER PRO SHALL HAVE NO LIABILITY FOR ANY OTHER COST, LOSS OR DAMAGE, INCLUDING BUT NOT LIMITED TO, ANY INCIDEN-
TAL, COMPENSATORY, INDIRECT, PUNITIVE, SPECIAL OR CONSEQUENTIAL LOSS OR DAMAGE. SNAPPER PRO' AGGREGATE LIABILITY
WITH RESPECT TO A DEFECTIVE PRODUCT OR PART SHALL BE LIMITED TO AN AMOUNT EQUAL TO THE MONIES PAID BY THE PUR-
CHASER FOR THAT DEFECTIVE PRODUCT OR PART. THIS LIMITED WARRANTY, AND SNAPPER PRO' OBLIGATIONS HEREUNDER, ARE
EXCLUSIVE AND IN LIEU OF ALL OTHER WARRANTIES, EXPRESS OR IMPLIED, INCLUDING, WITHOUT LIMITATION, THE IMPLIED WARRAN-
TY OF MERCHANTABILITY AND THE IMPLIED WARRANTY OF FITNESS FOR A PARTICULAR PURPOSE. SNAPPER PRO SHALL NOT BE
LIABLE TO THE PURCHASER, OR TO ANYONE CLAIMING UNDER THE PURCHASER, FOR ANY OTHER OBLIGATIONS OR LIABILITIES,
INCLUDING, BUT NOT LIMITED TO, OBLIGATIONS OR LIABILITIES ARISING OUT OF BREACH OF CONTRACT OR WARRANTY, NEGLIGENCE
OR OTHER TORT OR ANY THEORY OF STRICT LIABILITY, WITH RESPECT TO SNAPPER PRO PRODUCTS OR SNAPPER PRO' ACTS OR
OMISSIONS OR OTHERWISE.

It is the express wish of the parties that this agreement and any related documents be drafted in English. Il est la volonté expresse des parties que
cette convention et tous les documents s'y rattachent soient rédigés en anglais.

Snapper Pro - a division of Briggs & Stratton Power Products Group, LLC.

Owner's Limited Warranty Information

(Effective 08/01/2007)

Not 

for  

Reproduction

Summary of Contents for 5900508

Page 1: ...OWER PRODUCTS GROUP LLC 5375 NORTH MAIN STREET MUNNSVILLE NY 13409 800 933 6175 S150XT Series Zero Turn Riding Mowers 5103012 Rev E Operator s Manual Model Description 5900514 S150XTKAV2048 48 Mower D...

Page 2: ...n to make you aware of the hazards and risks associated with this machine and how to avoid them This machine is designed and intended to be used and maintained according to the manual and operated by...

Page 3: ...ntenance Schedule 25 Service Air Filter 25 Engine Maintenance 25 Inspect Muffler Spark Arrester 25 Checking Adding Fuel 26 Fuel Filter 26 Oil Filter Change 26 Lubrication 27 Check Hydraulic Oil Level...

Page 4: ...sk a professional contact your local authorized dealer Read the Manual The operator s manual contains important safety information you need to be aware of BEFORE you operate your unit as well as DURIN...

Page 5: ...up and throw debris that could seriously injure a bystander Be sure to clean up the area to be mowed and remove objects that could be thrown by the blade BEFORE you start mowing Do not operate this un...

Page 6: ...rance permits Retaining Walls Drop offs and Water Retaining walls and drop offs around steps and water are a common hazard Give yourself a minimum of two mower widths of clearance around these hazards...

Page 7: ...ile operating or refueling Do not add fuel while engine is hot or running Allow engine to cool for at least 3 minutes prior to adding fuel Do not add fuel indoors in an enclosed trailer garage or any...

Page 8: ...when loading or unloading the machine into a trailer or truck TRAINING 1 Read understand and follow all instructions in the manual and on the unit before starting If the operator s or mechanic s can n...

Page 9: ...under OPERATION 3 Never allow children or others in or on towed equipment 4 On slopes the weight of the towed equipment may cause loss of traction and loss of control 5 Travel slowly and allow extra...

Page 10: ...drain indoors 6 Keep all hardware especially blade attachment bolts tight and keep all parts in good working condition Replace all worn or damaged decals 7 Never tamper with safety devices Check their...

Page 11: ...RE FIRST TIME USE Inspect the ROLL BAR structure and mounting hardware for 1 Check to make sure the machine GVW Gross Vehicle Weight including attachments restrained payload fuel and operator is not i...

Page 12: ...he following tests it should be replaced BEFORE EACH USE Conduct the following inspections maintenance of the seat belt and retraction mechanism 1 Check for dirt or debris in the retraction mechanism...

Page 13: ...personal injury or damage to the unit understand and follow all safety decals WARNING If any safety decals become worn or damaged and cannot be read order replacement decals from your local dealer A B...

Page 14: ...your dealer NOTE Once the engine has stopped PTO switch must be turned off parking brake must be engaged and the motion control handles must be locked in the NEUTRAL position after the operator return...

Page 15: ...RWARD speed of the associated wheel and pulling back on a lever increases the REVERSE speed Features Controls Features Controls Control Functions The information below briefly describes the function o...

Page 16: ...fuel from the left hand tank With the handle pointing RIGHT it will draw fuel from the right hand fuel tank With the handle pointing towards the operator it will shut off fuel flow to the engine Model...

Page 17: ...e width of the rear wheels of this rider This rider has a zero turning radius and the rear wheels could fall off the ramps or the rider could tip over injuring the operator or bystanders WARNING Check...

Page 18: ...Mowing Height Adjustment A Cutting Height Adjustment Pin B Deck Lift Foot Pedal C Deck Lift Lock lever A B Mowing Height Adjustment The cutting height adjustment pin A Figure 3 control the mower cutti...

Page 19: ...ARNING AVOID SERIOUS INJURY OR DEATH FROM ROLL OVER Keep roll bar in the raised position and use the seat belt THERE IS NO ROLL OVER PROTECTION WHEN THE ROLL BAR IS DOWN Lower the roll bar only when n...

Page 20: ...the middle position will stop rider movement Pivot the levers outward and lock them in NEUTRAL 2 Disengage the PTO by pushing down on the PTO switch 3 Engage the parking brake by pulling the handle u...

Page 21: ...rd Travel Practice Gradually move both ground speed control levers evenly FORWARD from neutral Slow down and repeat NOTE Straight forward travel takes practice If necessary top speed can be balance ad...

Page 22: ...ting the Zero Turn rider you will learn more maneuvers that will make your mowing time easier and more enjoyable Remember the more you practice the better your control of the Zero Turn will be Practic...

Page 23: ...tly higher Letting grass grow a bit longer especially when it is hot and dry reduces heat build up preserves needed moisture and protects the grass from heat damage and other problems However allowing...

Page 24: ...too fast use a slower ground speed Where possible make one or two passes around the outside of the area discharging the grass INTO the lawn to keep the cut grass off fences and walks Mowing Methods P...

Page 25: ...mower as a mulching mower during the first two or three mowings in the spring The long grass blades quick growth and often wetter conditions are more suitable for broadcasting side discharging or gras...

Page 26: ...dry place and fully charged about once a month If battery is left in unit disconnect the negative cable WARNING Never store the unit with gasoline in engine or fuel tank in a heated shelter or in enc...

Page 27: ...e Engine Oil Filter Check Replace Spark Plugs Check Replace Fuel Filter More often in hot over 85 30 C weather or dusty operating conditions Change original hydraulic oil after first 100 hours of oper...

Page 28: ...Figure 14 down through the hole D in the engine deck 3 Place a small pan under the oil drain hose to catch the oil Using the appropriate tools remove the cap B from the drain hose and drain the engine...

Page 29: ...ts deck lift pivots discharge chute hinge Generally all moving metal parts should be oiled where contact is made with other parts Keep oil and grease off belts and pulleys Remember to wipe fittings an...

Page 30: ...after first 100 hours of operation Filter Part Number 5101978X2 NOTE Removing the oil filter from the transmission will drain the oil reservoir Have a suitable container ready to catch any spilled oil...

Page 31: ...es See Sharpening the Mower Blades Regular Maintenance Figure 21 Loosening the Mower Blade for Removal Figure 22 Inspecting the Mower Blade Tips A Mower Blade Cutting Edge B Square Corner C Air Lift D...

Page 32: ...2 See Figure 25 Put the mower blade on a nail in a vise and turn the mower blade to the horizontal position 3 Check the balance of the mower blade If either end of the mower blade moves downward sharp...

Page 33: ...handle alignment as described above Speed Balancing Adjustment If the rider veers to the right or left when the ground speed control levers are in the maximum forward position the top speed of each o...

Page 34: ...d Loosen the nuts from the ball joints and turn the linkage rod A to adjust If the machine creeps forward turn the rod CLOCKWISE while standing at the rear of the machine facing forward if the machine...

Page 35: ...ard or back on the neutral return rod B until the spring length equals 3 25 8 23 cm Retighten the front set collar 3 Make sure that the neutral return bushing E is seated correctly in the spring stop...

Page 36: ...sed to lock the linkage rod in place Loosen the adjustment jam nut E from the adjustment nut B 7 Turn the adjustment nut to change the length of the spring 8 Tighten the adjustment jam nut against the...

Page 37: ...e parking brake engaged measure the compressed spring length The spring should be 2 5 8 6 7 cm 1 1 16 15 cm when compressed 5 If the spring length does not equal the measurement the spring length will...

Page 38: ...the lift pivot arm and secure with the 1 2 clevis pin previously removed Tighten the jam nut against the clevis 8 Remove the blocks from under the mower deck 9 Remove the cutting height adjustment pin...

Page 39: ...nstall the drive belt on the PTO pulley the spindle pulleys and all idler pulleys except the stationary pulley B Figure 37 Carefully rotate the breaker bar COUNTER CLOCKWISE and install the belt on th...

Page 40: ...he correct spring length 4 Measure the coil length of the mower belt tension spring A Figure 39 The measurement should equal the measurement as designated in the chart If the measurement does not equa...

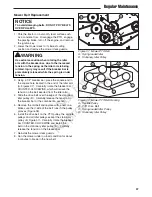
Page 41: ...e it with a new one Make sure the V side of the belt runs in the grooves of the crankshaft pulley D and the transaxle pulleys E 7 Reinstall the spring anchor eyebolt into the anchor tab and loosely fa...

Page 42: ...e brush until shiny 3 Reinstall the battery and reattach the battery cables positive red cable first A 4 Coat the cable ends and battery terminals with petroleum jelly or non conducting grease WARNING...

Page 43: ...nce per hour The battery is fully charged when the cells are gassing WARNING Keep open flames and sparks away from the battery the gasses coming from it are highly explosive Ventilate the battery well...

Page 44: ...n the battery If ice can be seen or if the electrolyte fluid cannot be seen do not attempt to start with jumper cables as long as the battery remains frozen WARNING For your personal safety use extrem...

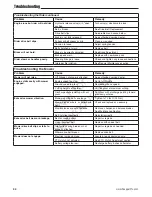
Page 45: ...refill the fuel tank Engine flooded Move choke control to closed position Fuse blown Replace fuse Battery terminals require cleaning Clean the battery terminals Battery discharged or dead Recharge or...

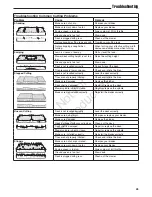
Page 46: ...lls easily with mower engaged Engine speed too slow Set to full throttle Ground speed too fast Decrease ground speed Cutting height set too low Cut tall grass at maximum cutting Discharge chute jammin...

Page 47: ...ires are not properly inflated Check and inflate the tires Blades are damaged Replace the blades Deck shell is damaged Repair or replace the deck Mower spindle is bent or loose Repair or replace the s...

Page 48: ...h SAE Society of Automotive Engineers code J1940 Small Engine Power Torque Rating Procedure and rating performance has been obtained and corrected in accordance with SAE J1995 Revision 2002 05 Torque...

Page 49: ...Notes N o t f o r R e p r o d u c t i o n...

Page 50: ...Notes N o t f o r R e p r o d u c t i o n...

Page 51: ...ro dealer Any damage or deterioration due to normal use wear and tear or environmental or natural elements or exposure Cost of regular maintenance service or parts such as but not limited to filters f...

Page 52: ...S150XT Series Zero Turn Riding Mowers Operator s Manual N o t f o r R e p r o d u c t i o n...

Reviews: