background image

Summary of Contents for 1695197

Page 1: ...TGT2754D 27HPD 4WD 3P 2690629 STGT2754D 27HPD 4WD 3P 2690626 STGT2754D 27HPD 4WD 3P 54 Mower 2690627 STGT2754D 27HPD 4WD 3P 54 Mower 54 Mower Decks Mfg No Description 1695197 54 Mower Deck 1695198 54 Mower Deck 1733761 Revision 02 Rev Date 11 2007 TP 100 4427 02 XL N ...

Page 2: ...e 26 Clean Debris Out of Engine Compartment 26 Clean Engine Oil Cooler or Radiator 26 Clean Transmission Oil Cooler 26 Check Engine Coolant Level 26 Change Engine Coolant 27 Change Fuel Filter 27 Drain Fuel Separator 28 Check Transmission Oil Level 28 Change Transmission Oil and Filter 29 Check Front Axle Oil Level 29 Check Mower Deck Gear Box Oil 30 Safety Interlock System Check 30 Blade Brake Ch...

Page 3: ...roduct s features and controls and maintenance information is included to help you get the most out of your equipment investment Be sure to completely read the Safety Rules and Information found on the following pages Also completely read the Operation section Children Tragic accidents can occur with children Do not allow them anywhere near the area of operation Children are often attracted to the...

Page 4: ...s equipment safely it is equipped with an operator present safety system Do NOT attempt to alter or bypass the system See your dealer immediately if the system does not pass all the safety interlock system tests found in this manual Thrown ects This unit has spinning mower blades These blades can pick up and throw debris that could seriously injure a bystander Be sure to clean up the area to be mo...

Page 5: ... injuries These operators should evaluate their ability to operate the equipment safely enough to protect themselves and others from injury 19 Follow the manufacturer s recommendations for wheel weights or counterweights 20 Keep in mind the operator is responsible for accidents occurring to other people or property 21 All drivers should seek and obtain professional and practical instruction 22 Alw...

Page 6: ...wly and gradually downhill if possible TOWED EQUIPMENT RIDE ON UNITS 1 Tow only with a machine that has a hitch designed for towing Do not attach towed equipment except at the hitch point 2 Follow the manufacturer s recommendations for weight limit for towed equipment and towing on slopes 3 Never allow children or others in or on towed equip ment 4 On slopes the weight of the towed equipment may c...

Page 7: ...er than necessary Ensure clamps grip hoses firmly over the filter after installation 12 Do not use gasoline containing METHANOL gasoho containing more than 10 ETHANOL gasoline addi tives or white gas because engine fuel system dam age could result 13 If the fuel tank must be drained it should be drained outdoors 14 Replace faulty silencers mufflers 15 Maintain or replace safety and instruction lab...

Page 8: ...ers and engine serial numbers in the space provided for easy access These numbers can be found in the locations shown NOTE For location of engine identification numbers refer to the engine owner s manual Tracto Mower ID Tag Model Description Name Number Unit MFG Number Unit SERIAL Number Mower Deck MFG Number Mower Deck SERIAL Number Dealer Name Date Purchased Engine Make Engine Type Spec Engine M...

Page 9: ...decals are lost or damaged replace them at once See your local dealer for replacements These labels are easily applied and will act as a constant visual reminder to you and others who may use the equipment to follow the safety instructions necessary for safe effective operation Decal Operating Instructions North American Models Part No 1726923 ROT AtT_N eGraCtUe Trm _NwGe rBLAD E Decal Danger Rota...

Page 10: ...the seat switch operation every fall and spring with the following tests Test 1 m Engine should NOT crank if PTO switch is ON OR Brake pedal is NOT fully depressed parking brake OFF OR The cruise control lever is NOT in NEUTRAL Test 2 m Engine SHOULD crank if PTO switch is OFF AND Brake pedal is fully depressed parking brake ON AND The cruise control lever is in NEUTRAL Test 3 m Engine should SHUT...

Page 11: ...ut to close the choke _I_IP__ Throttle Control The throttle controls engine speed Move the throttle for ward to increase engine speed and back to decrease engine speed Always operate at FULL throttle _1 Headlights The light switch turns the tractor headlights on and off Front A Je Oil LeveJ Plug 4WD Models Only The front axle oil check plug dipstick is used to check the front axle oil level and to...

Page 12: ...ve the ignition switch in the RUN posi tion with the engine stopped this drains the battery D Brake Pedal Depressing the brake pedal applies the tractor brake Depressing the brake pedal will also return the cruise control lever to neutral Ground Speed Pedals The tractor s forward ground speed is controlled by the forward ground speed control pedal The tractor s reverse ground speed is controlled b...

Page 13: ...firmly in the trac tor seat for the PTO to function _ Reverse Mowing Option RMO The Reverse Mowing Option allows for mowing or use of other PTO driven attachments while traveling in reverse If you choose to mow or operate another attachment in reverse turn the RMO key after the PTO is engaged The L E D light will illuminate and the opera tor can then mow in reverse Each time the PTO is dis engaged...

Page 14: ...uise control is engaged R Low Oil Pressure Light Indicates that the engine oil pressure is low If this indi cator lights shut the engine off immediately and contact your dealer G 4 Wheel Drive Light 4WD Models Only Indicates that 4 wheel drive is engaged H Fuel Separator Full Light Indicates that the fuel separator is full and must be emp tied l Fuel Gauge The fuel gauge shows the level of fuel in...

Page 15: ...your engine manual for specific fuel recommendations 3 Install and hand tighten the fuel cap Starting The Engine 1 While sitting in the operator s seat fully depress the brake pedal or set the parking brake 2 Set the cruise control lever in neutral and make sure that your feet are not depressing the ground speed control pedals 3 Disengage the PTO 4 Set the throttle to middle position set throttle ...

Page 16: ...RNING The engine will shut off if the reverse ground speed pedal is depressed while the PTO is on and the RMO has not been activated The operator should always turn the PTO off prior to driving across on roads paths or any area that maybe used by other vehicles Sudden loss of drive could create a hazard WARNING Mowing in reverse can be hazardous to bystanders Tragic accidents can occur if the oper...

Page 17: ...ls attachments that use the tractor s auxiliary hydraulics via the quick couplers on the front left and right sides of the frame The rate of hydraulic fluid flow and pressure that are available when using the auxiliary hydraulic quick cou plers is listed in the chart in Figure 5 The lever has five positions left right back forward first detent and float pushed forward to second detent Using Inboar...

Page 18: ...der Moving the control lever to the left A Figure 7 angles the attachment left Moving the lever right B Figure 7 angles the attachment right Pulling the lever back raises the attachment lift A Figure 8 Pushing the lever forward to the first detent lowers the attachment lift B Figure 8 Pushing the lever for ward to the second detent locks the control in float position allowing the lift mechanism to...

Page 19: ...UTION Avoid injury A machine with a 3 point hitch attachment installed may become unstable when the attachment is raised Always drive slower over uneven ground and when turning with the attachment raised Locking The Hitch The 3 point hitch can be locked in the raised position When a rear attachment is locked in the raised position the tractor s on board hydraulic cylinder can be used to lift mid m...

Page 20: ...chains D Figure 13 to the back of the sway arms A E using 3 8 x 1 1 2 capscrews C and 3 8 Iocknuts Cross the chains and secure to front of the sway arms with clevis pins and hair pin clips B 4 Attach the adjustable link E Figure 14 and lift link assembly C using clevis pins B and hair pin clips NOTE The adjustable lower lift link E Figure 14 goes on the right side Figure 13 Install Chains A Right ...

Page 21: ...to warm up for several minutes before engaging the PTO 4 Set engine throttle to FULL 5 Place the PTO selector lever in the rear position A Figure 16 if only a rear attachment is being used If a mid and rear attachment are being used simultane ously place the lever inthe mid position B if only a mid or front attachment is being used place the con trol in position C 6 Pull UP on the PTO switch to en...

Page 22: ...un attachments that require more than 18 HP or an input shaft speed other than 540 could result in poor performance shortened equipment life or equipment damage and will void the tractor warranty Improper use can also create an unsafe condition resulting in injury START UP AND STOPPING LOADS This PTO can be used with direct drive attachments that have small start up and stopping loads like tillers...

Page 23: ...nt lift 9 Stop the engine and wait for all moving parts to stop 10 Unhook the two lift chains long chains A Figure 19 from the tractor lift arms E and two leveling chains five link B from lift brackets C 11 Turn the ignition switch to the OFF position 12 Disconnect the electrical connection from the tractor and recap the tractor electrical socket See Figure 20 13 Remove the long hitch pin B Figure...

Page 24: ...t the engine 9 Turn the ignition switch to the OFF position 10 Mount the hitch A Figure 21 to the deck using the long hitch pin B 11 Attach the hitch to the tractor using the two short pins C Figure 21 and safety clips 12 Start the engine 13 Fully raise the attachment lift 14 Shut off the engine and wait for all moving parts to stop 15 Pivot the two front gauge wheels from sliding position to mowi...

Page 25: ...Rules section then perform the following steps Disengage the PTO set the parking brake and remove the key Perform engine maintenance and storage measures listed in the engine owner s manual This includes draining the fuel system or adding stabilizer to the fuel do not store a fueled unit in an enclosed struc ture see warning Battery life will be increased if it is removed put in a cool dry place a...

Page 26: ...nge Transmission Oil Filter O o O o O Check Front Transaxle Oil Level 4WD Only Check Mower Gear Box Oil Level e Check Tire Pressure Clean Battery Cables e Lubricate Tractor Mower e Clean Deck Check Replace Mower Blades e ENGINE MAINTENANCE ITEMS Check Engine Oil Level Check Engine Coolant Level Liquid Cooled Change Engine Coolant Liquid Cooled Check Change Engine Air Filter Change Engine Oil Filte...

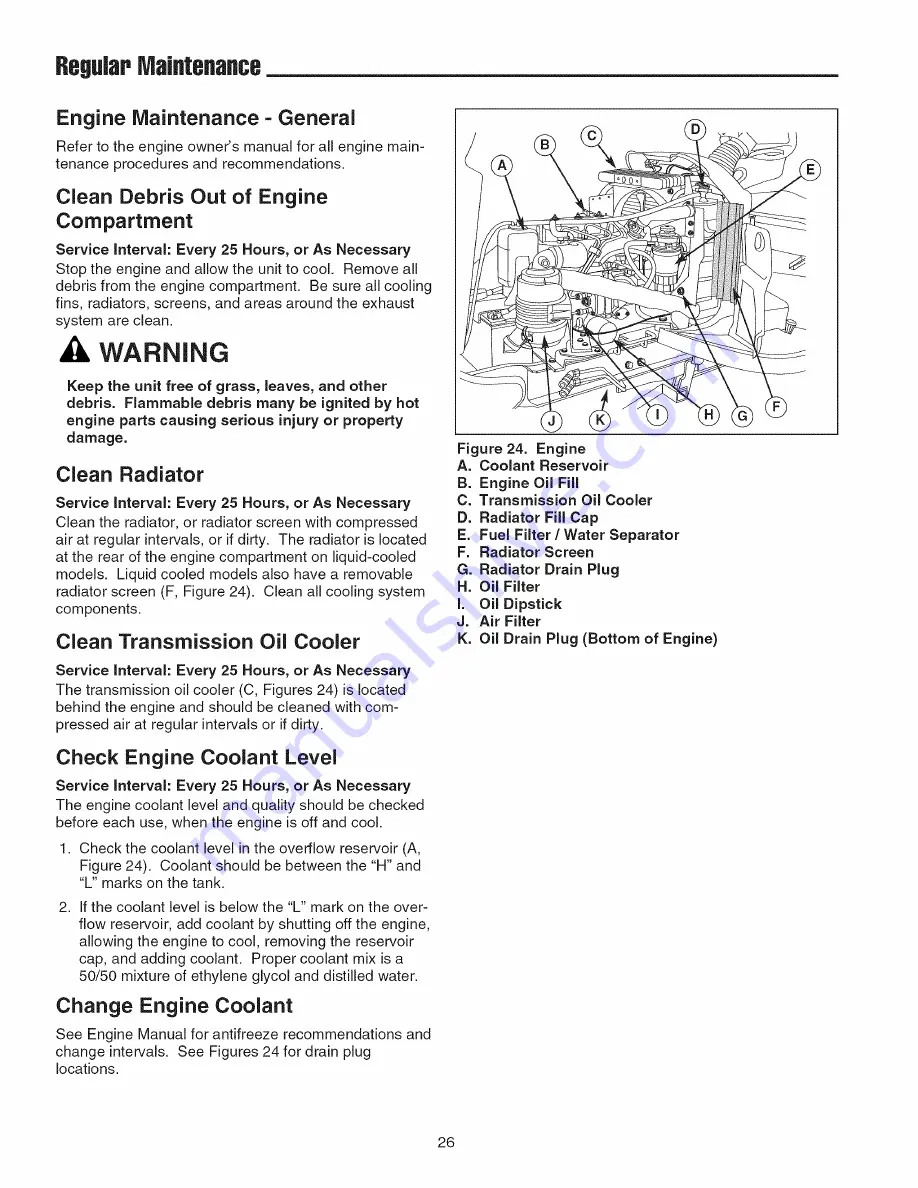
Page 27: ...ler Service interval Every 25 Hours or As Necessary The transmission oil cooler C Figures 24 is located behind the engine and should be cleaned with com pressed air at regular intervals or if dirty Check Engine Coolant Level Service interval Every 25 Hours or As Necessary The engine coolant level and quality should be checked before each use when the engine is off and cool 1 Check the coolant leve...

Page 28: ... or as required To drain the fuel filter 1 Turn the engine off set the parking brake remove the ignition key and wait for all moving parts to stop 2 Allow the engine and surrounding areas to cool to room temperature 3 Place a container under the fuel filter tube and turn the base of the filter assembly E Figure 24 approxi mately 1 turn 4 Allow the filter to drain until all water and debris have dr...

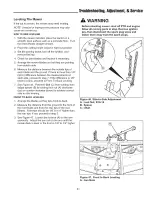
Page 29: ...l Type Type F Automatic Transmission Fluid 1 Clean the area around the transmission dip stick A Figure 25 2 Remove the dip stick A from the transmission and wipe it clean 3 insert the dip stick into the transmission without threading it in Remove the dip stick and read the oil level The oil level should be even with the top of the hash mark area when the transmission is cold Figure 25 Transmission...

Page 30: ...drain plug 3 Add Type F transmission fluid through the oil fill see Figure 25 4 Run tractor for several minutes until transmission is warm and check fluid level using the dip stick A Figure 25 Check Front Axle Oil Level Service Interval Every 25 Hours Oil Type 80W 90 Gear Lube 1 Clean the area around the front axle dip stick A Figure 27 2 Remove the dip stick and wipe it clean 3 Reinsert the dip s...

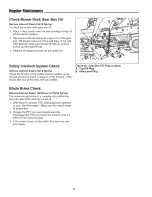
Page 31: ...ng Check the function of the safety interlock system using the test procedure found on page 9 of this manual If the tractor fails any of the tests see your dealer Figure 28 Gear Box Fill Plug Location A Top Fill Plug B Side Level Plug Blade Brake Check Service interval Every 100 Hours or Fall Spring The mower should come to a complete stop within five seconds after PTO switch is turned off 1 With ...

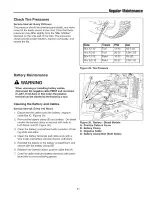
Page 32: ... 10 12 69 83 18 x 8 5 10 Field 20 22 1 38 1 52 Figure 29 Tire Pressure Cleaning the Battery and CabJes Service interval Every 100 Hours 1 Disconnect the cables from the battery negative cable first C Figures 30 2 Remove the battery clamp B and battery On diesel models the battery clamp is secured with bolts to both frame rails D Figure 30 3 Clean the battery compartment with a solution of bak ing ...

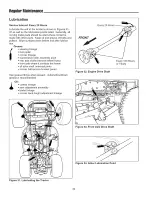
Page 33: ...teering linkage foot pedal mower linkage transmission idler assembly pivot rear axle shafts remove wheel hubs front axle where it contacts the frame all drive shaft universal joints mower belt tension bracket pivots Use grease fittings when present Automotive lithium grease is recommended Oil control linkage seat adjustment assembly brake linkage mower deck height adjustment linkage Every 25 Every...

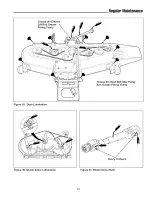
Page 34: ...e Grease the Electric Lift Rod Grease Fitting Yearly Grease the Deck BeJt IdJer PuJley Arm Grease Fitting YearJy Figure 35 Deck Lubrication Every 10 Hours Figure 36 Mower Arbor Lubrication Figure 37 Mower Drive Shaft 33 ...

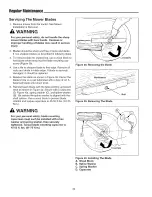
Page 35: ...placed 5 Balance the blade as shown in Figure 39 Center the blade s hole on a nail lubricated with a drop of oil A balanced blade will remain level Reinstall each blade with the tabs pointing up toward deck as shown in Figure 40 Secure with a capscrew D Figure 40 spring washer C and spline washer B Be certain the spline washer is aligned with the shaft splines Use a wood block to prevent blade rot...

Page 36: ...MAINTENANCE RECORDS Regular lVlaifltenance 35 ...

Page 37: ...ine exhaust is black 1 2 Engine runs but tractor will 1 not drive Solenoid or starter motor faulty Safety interlock switch faulty Spark plug s faulty fouled or incorrectly gapped Water in fuel Fuel is old or stale Fuel mixture too rich Spark plug s faulty fouled or incorrectly gapped Low oil level Using wrong grade oil Engine running too hot 2 3 4 5 Using wrong weight oil Too much oil in crankcase...

Page 38: ... chute jamming with cut grass 6 Engine not up to operating temperature 7 Starting mower in tall grass 1 Blade mounting screws are loose 2 Mower blades arbors or pulleys are bent 3 Mower blades are out of balance 4 Mower choked with grass 1 Bent or rough pulleys 2 Using incorrect belt 3 Excessive debris under cover 1 Idler pulley spring broken or not properly attached 2 Excessive debris under cover...

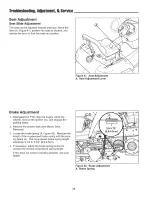
Page 39: ... key and engage the parking brake 2 Remove the mower deck see Mower Deck Removal 3 Locate the brake spring A Figure 42 Measure the length of the compressed brake spring with the park ing brake on The compressed brake spring length should be 3 1 2 to 3 3 4 8 9 9 5cm 4 If necessary adjust the brake spring Iocknut to achieve the correct compressed spring length If this does not correct a braking prob...

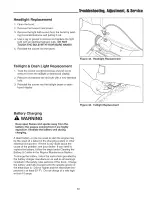
Page 40: ...44 Taillight Replacement Battery Charging WARNING Keep open flames and sparks away from the battery the gasses coming from it are highly explosive Ventilate the battery well during charging A dead battery or one too weak to start the engine may be the result of a defect in the charging system or other electrical component if there is any doubt about the cause of the problem see your dealer If you ...

Page 41: ... cutting heights set the wheels in the upper position To adjust 1 Remove the hair pin clip A B Figure 45 2 For upper position install the pin A through the spindle above the bracket C For the lower position push down on the top of the spindle and installthe hair pin clip B below the top of the bracket C WARNING Before checking mower shut off PTO and engine Allow all moving parts to stop Remove ign...

Page 42: ...ifference is 1 8 3mm or less proceed to Front To Back Leveling 7 See Figure 46 Prevent I Bolt C from turning then adjust spacer B by turning lock nut A clockwise up or counter clockwise down to achieve correct side to side leveling FRONT TO BACK LEVELING 1 Arrange the blades so they face front to back 2 Measure the distance from the ground to the front of the front blade and from the rear tips of ...

Page 43: ...D 5 Inspect all pulleys for wear or bearing damage 6 Lubricate the idler arm pivot with multi purpose lithi um grease and check for free movement 7 Install the new drive belt as shown in the diagram in Figure 48 8 Reinstall the belt covers Be sure the alignment notches are centered on the screws 9 Install the mower deck and run under no load for five minutes to break in the new belt BELT ROUTING V...

Page 44: ...ty 1 6 qt 1 5L DiMENSiONS Overall Length 81 Overall Width 47 25 4WD Height 51 Weight apx 4WD Tractor B S Diesel 1131 Ibs 513 kg 54 Mower Deck 230 Ibs 104 kg The power ratings for an individual engine model are initially developed by starting with SAE Society of Automotive Engineers code J1940 Small Engine Power Torque Rating Procedure Revision 2002 05 Given both the wide array of products on which...

Page 45: ...nt Weight Carrier Triple Bag Collector Turbo Collector Tiller Technical Manuals Additional copies of this manual are available as well as fully illustrated parts lists These manuals show all of the product s components in exploded views 3D illustrations which show the relationship of parts and how they go together as well as part numbers and quantities used Important assembly notes and and torque ...

Page 46: ...Snapper INC 535 Macon Street McDonough GA 30253 www snapper com Briggs Stratton Yard Power Products Group Copyright 2006 Briggs Stratton Corporation Milwaukee WI USA All Rights Reserved ...

Reviews: