background image

Snap Expansion S50 Quick Start Guide

3

5

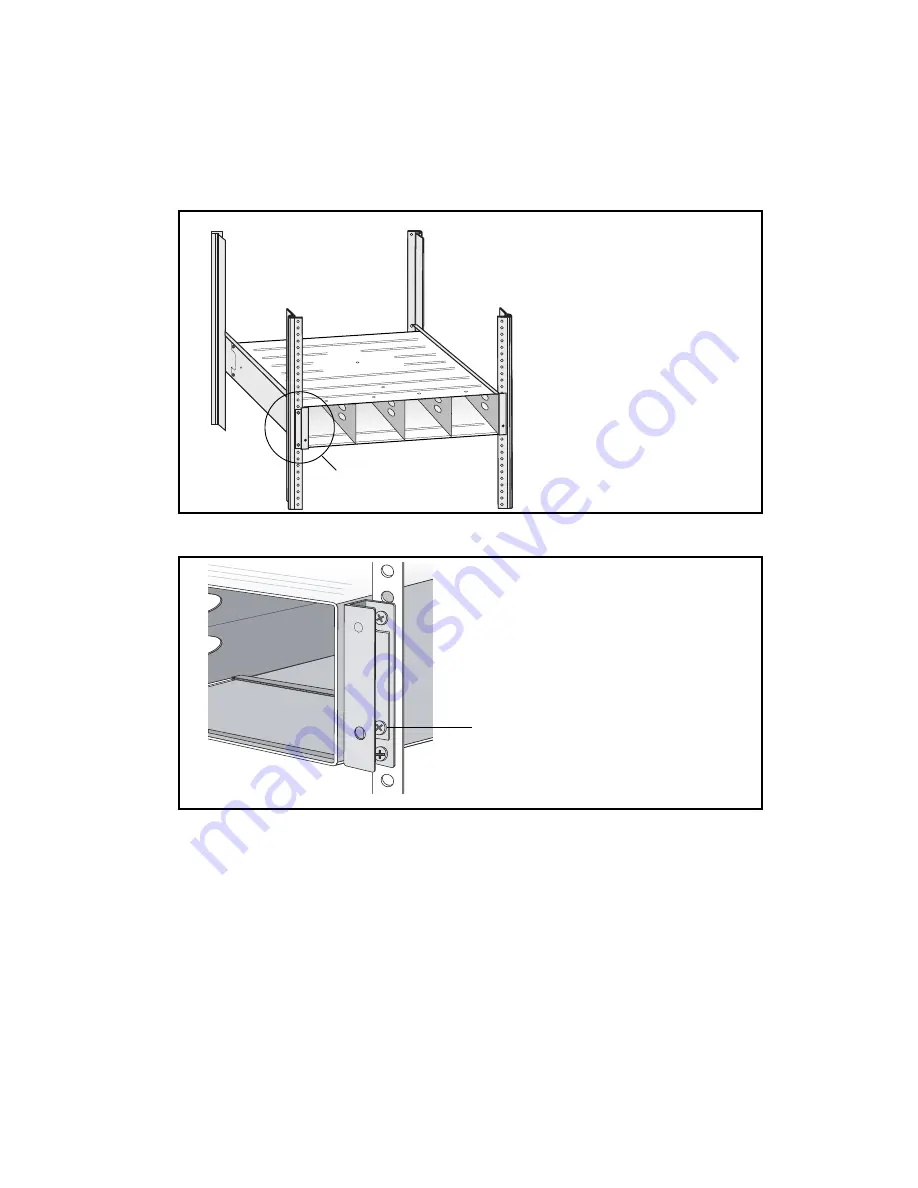
Slide the enclosure onto the rails, then push it all the way back until the 

rackmount ears are flush against the front vertical supports and the enclosure 

rests completely on the rails.

6

Secure both rackmount ears to the front vertical supports.

Rackmount ears rest 
against vertical support

Secure to the front vertical 
supports

Summary of Contents for Expansion S50 JBOD

Page 1: ...Snap Expansion S50 JBOD Enclosure Quick Start Guide Snap Expansion S50 JBOD Enclosure Quick Start Guide www overlandstorage com...

Page 2: ...tten permission of Overland Storage Inc TRADEMARKS Overland Storage the Overland Storage logo Snap Server the Snap Server logo GuardianOS and Snap Server Manager are trademarks or registered trademark...

Page 3: ...Enclosure Features and Accessories 1 Pre installed disk drives 4 or 12 and drive carrier blanks 8 if 4 drives are pre installed 8 SAS I O controller status LEDs 2 Enclosure status LEDs 9 SAS HOST conn...

Page 4: ...r nuts included in the kit Use the nuts if your rack does not have threaded holes 3 Select the right length of rails for your rack then secure them to the rear supports of the rack as shown above Then...

Page 5: ...h it all the way back until the rackmount ears are flush against the front vertical supports and the enclosure rests completely on the rails 6 Secure both rackmount ears to the front vertical supports...

Page 6: ...before you install them Before You Begin While you can combine SAS and SATA drives in the same enclosure you cannot combine SAS and SATA drives in the same column of drives If you are combining SAS an...

Page 7: ...t an open drive slot 2 Hold the disk drive with the LEDs on the left and the lever fully open 3 Slide the disk drive into the drive slot until the lever starts to close Do not include SAS and SATA dis...

Page 8: ...losures installed with SAS disk drives and enclosures installed with SATA disk drives can be included in the same daisy chain You can also include enclosures installed with a combination of SAS and SA...

Page 9: ...e previous enclosure to the HOST port of the next enclosure Note The number of S50 enclosures that can be connected to a single server varies depending on the server configuration Refer to the user do...

Page 10: ...Server name or IP address of the Snap Server to which the Snap Expansion S50 enclosure is connected 2 Click the Administration link and log in as admin with your administrator password 3 Navigate to...

Page 11: ...artment who will then email you a response To obtain additional service or technical support for your Snap Expansion S50 enclosure call 1 888 343 SNAP Overland Storage Inc Worldwide Limited Warranty T...

Page 12: ...y to operate the equipment Safety Precautions Note The maximum current draw is printed on the label on the back of the storage subsystem Caution Before touching any enclosure components ground yoursel...

Page 13: ...g the concern Cleaning the Enclosure Before cleaning the enclosure be sure to disconnect all cabling Do not use any liquid or spray cleaning agents to clean the enclosure use only a damp sheet or clot...

Page 14: ...maximum recommended ambient temperature is 40 C Note Elevated Operating Ambient Temperature When installed in a closed or multi unit rack assembly the operating ambient temperature of the rack enviro...

Page 15: ......

Page 16: ...com Part Number 70990930 002 Rev B 2009 Overland Storage Inc All rights reserved SnapServer Overland Storage the SnapServer logo the Overland Storage logo GuardianOS Snap Server Manager are trademark...

Reviews: