background image


Charging Procedure


(Note: if there is no power pac in the charger, the GREEN light will be on.)  


1)  The lift has a RED power pac indicator light located on the box that will come on when the 

power pac is low.  At this point the power pac should be exchanged as soon as possible with 

one that is fully charged from the charger.  However, it is best to exchange your power pac 

at a regular time(s) for optimum power pac life.


2)


Store the charger unit near an outlet and on a counter or flat surface where the suction cups 

will have good contact.


3)


When setting up a new Volaro lift: Insert power pac into charger and plug charger into               


      outlet. (Power pac will fit in either direction.)


4)  The RED light may come on briefly if the power pac is excessively discharged, but it should 

go off within the first few minutes followed by the YELLOW light.  If the RED light stays 

on it may mean the power pac is extremely discharged.  Leave the power pac on the charger 

overnight to see if it can be restored. If it stays on RED, you have a bad cell. 


5)


When the YELLOW light has gone out, the power pac is fully charged and will shut off au-

tomatically.  However, you should leave the power pac on for its full charging cycle of 12 

hours. The GREEN light will stay on.  It will not harm the power pac to leave it on the 

charger longer than the normal charging cycle.  


Note:


❑ 

Charging sequence: Periodically unplug the charger, insert power pac and then plug 

charger back into outlet for proper electronic function. 


❑ 

Leaving the power pac on the charger will NOT cause it to overcharge.  


❑ 

If the power pac goes to GREEN in a short period it may mean you have a weak cell 

that will not take a full charge. 


❑ 

Plug power pac into charger every night. 


❑ 

Do not remove until charging cycle is complete. 


❑ 

Power pac will not be damaged if left plugged in.  


❑ 

The charger will get warm during its charge cycle.


Additional charging information

:  


The VOLARO charger uses a three part process which could take up to 12 hours.  The first part 

is called the 

bulk charge

.  During this stage the charger supplies 1.5 Amps until the power pac 

terminal voltage reaches 13.8 volts.  The current then begins to ramp down from 1.5 Amps to 

about .5 Amps at the conclusion of the charging process.  This 

ramping charge (absorption 

mode) 

will take several hours.  Finally, the GREEN light will come on indicating that the 

charger has switched to the third part of the cycle, the 

temperature compensated float charge

.  

The charger is now in its maintenance mode, keeping the power pac in its ideal charged state.  

The VOLARO charger is not a trickle charger nor will the power pac be damaged if left perma-

nently attached and powered.  If the GREEN light comes on soon after putting the power pac on 

the charger it means that either the power pac is already charged OR you have a weak power 

pac that will only hold a minimal charge.  

Maintaining the proper power pac voltage when 

the power pac is not in use will extend the serviceable life of the power pac.  


SMT Health Systems, Inc.


1380 Legion Road


Detroit Lakes, MN  56501


Phone:  (218) 847

-

3386 

● (800) 725

-

7761


Fax:  (888) 385

-

2345 


Email: [email protected]


SMT recommends the power pac tester 

#10048BT to help ensure that you will    

always have adequate power pac power.


SMT Volaro 12V Power Pac Charging


12


Summary of Contents for Volaro HD450

Page 1: ...PC450 HD450 Operator s Manual SMT Health Systems 1380 Legion Road Detroit Lakes MN 56501 800 725 7761 www patientlift com Volaro Series 4 Lift 3 2019 ...

Page 2: ...not place fingers between the safety guards of the beam track Do not attempt a transfer from the floor before examining for any injuries that may need special atten tion Do not use a sling that shows wear is torn bleached out or has loose threads Inspect sling before each use PARTS SERVICE SMT Health Systems Phone 218 847 3386 Toll Free 800 725 7761 Toll Free Fax 888 385 2345 Email sales smthealth...

Page 3: ...______ _____________________________Date_____________ Assessment Care Planned by_________________________Date_____________ Can individual safely perform or 50 of lift transfer with only standby assistance from caregiver No Yes Can individual bear weight on at least one leg Yes No No Lift Needed Does the individual have moderate upper body strength and ability to follow simple commands Yes No Does ...

Page 4: ... Indicator Red Light 3 Power Pac Charger Base 4 Handle Up and Down Switches 5 Remote Up and Down Switches 6 Circuit Breaker 7 Plastic Plug for Manual Override 8 Leg Adjuster Handle 9 Rear Brake 10 Hanger Assembly 4 Mechanical Operation ...

Page 5: ...yl Safety Padding Vinyl Storage Bags Plastic Case Power pacs 12VDC 12 AH Lead Acid Battery 12VDC Ball Screw Actuator with 1 diameter screw Steel Hand Control Powder Coat Paint 3 Position Lock Leg Adjuster Digital Hanger Scale High Impact ABS Leg Covers Front Casters 3 Dual Swivel Rear Casters 4 Single Swivel w Brake Safety Pressure Switch Manual Override Emergency Down 5 PC450 HD450 Specification ...

Page 6: ...rength to provide increased ease of toileting MESH SLINGS The Divided Leg and Hammock both come in a mesh fabric for use in bathing or showering Volaro Lift Slings Volaro Sling Laundering Instructions The sling material and webbing are made of nylon If possible put the sling in a Volaro mesh bag P LB2436 to prevent the straps from getting tangled Recommended washing instruc tions are as follows Ma...

Page 7: ...7 ...

Page 8: ...of the person being transferred This comes in handy for charting the colors that would work best for each individual All sling styles come with built in positioning handles on the back of the sling These always face out and are used to position a person back in a chair Lifting from Chair to Bed To apply the divided leg sling on someone sitting in a wheelchair first lean the person slightly forward...

Page 9: ... from bed to chair just reverse the steps in the previous instructions Roll the person to their side and lay the folded sling behind them Align the bottom of the back of the sling by the tailbone Roll the person to their side and pull the rest of the sling through straightening any wrinkles Bring material under the legs the same way as if they were in the chair Crisscross the inside flaps and thre...

Page 10: ... to be next to the person being transferred and to operate the lift at the same time It also aids as a back up source to operate the lift Figure C Emergency Down Feature If your lift is equipped with the emergency down feature engage the rocker switch under power box to lower the lift This is to be used in an emergency only service may be needed Figure D Power Failure If for any reason the lift wo...

Page 11: ...eight on the hanger hooks If using a sling make sure it is empty Push the ON ZERO button and release The display will count down from 16 to 0 When finished the display will show the message C 25 6 Now hang 25 Lb calibration weight on strap which you previously attached to the hanger step 4 above or place it in the sling and permit the scale to stabilize Failure to stabilize the unit may cause the ...

Page 12: ...it to overcharge If the power pac goes to GREEN in a short period it may mean you have a weak cell that will not take a full charge Plug power pac into charger every night Do not remove until charging cycle is complete Power pac will not be damaged if left plugged in The charger will get warm during its charge cycle Additional charging information The VOLARO charger uses a three part process which...

Page 13: ... with the scale still on remove the sling and place it beneath the person to be weighed NOTE the appearance of the screen You will see a flashing This is the weight of the items previously weighed They will automatically be subtracted from the person s weight This reading will stay in memory even if the scale is turned off or the battery is removed Attach and lift the person clear of chair or bed ...

Page 14: ...14 ...

Page 15: ...unt 12 1 PC45026 Mast Cap 13 1 PC45027 Actuator Support Bushing 14 1 PC45023 1 Actuator Support Bushing Mount 15 1 70953 Non Scale Beam SN A6894 or older uses PC45031NS 16 1 70953 Scaled Beam Assembly SN A6894 or older uses PC45006A 17 4 2013 Cam Follower 18 4 PC45037 Carriage Glide Block 19 4 35237 1 Nylatron Roller 20 1 2039 Actuator Assembly 21 1 PC45008A Handle Bar Actuator Assembly 22 2 2008 ...

Page 16: ...A3 Charger Assembly includes 2026 transformer 42 1 10047 2 Hand Control Remote 43 2 35506 2 Scale Face Plate Dual Display 44 1 PL10004A Hanger Assembly not including padding and covers 45 46 1 70756 Strap Retainer and Spring Kit set of 4 47 2 2033 Hanger Thrust Bearing 48 2 2035 Leg Bearing 49 1 PP40053 1 Leg Adjuster Spring Urethane 50 1 PA62201 1 Hand Control Remote Holder 51 1 PL44000 2 Hanger ...

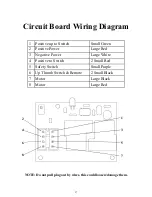
Page 17: ...mage them Circuit Board Wiring Diagram 17 1 Positive up to Switch Small Green 2 Positive Power Large Red 3 Negative Power Large White 4 Positive to Switch 2 Small Red 5 Safety Switch Small Purple 6 Up Thumb Switch Remote 2 Small Black 7 Motor Large Black 8 Motor Large Red ...

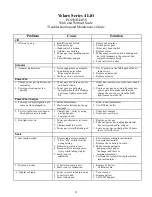
Page 18: ...ft Power Pac Charger 1 Power pac charger lights do not come on when plugged in 1 Failed Transformer 2 Electrical outlet may not be op erational 1 Order a new transformer 2 Use different outlet 2 Yellow light does not come on when power pac is inserted 1 Charger bad verify by using new power pac 2 Power pac dead 1 Order new charger 2 Order new power pac 3 Red light stays on 1 Power pac shorted or r...

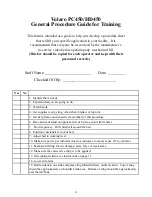
Page 19: ...t supplies ready sling wheelchair blanket or lap robe 5 Get help from experienced team member for this procedure 6 Have assistant stand on opposite side of bed to assist with transfer 7 Provide privacy Pull curtain all around the bed 8 Position wheelchair at foot of bed 9 Adjust bed to working level 10 Make sure power pac indicator does not indicate a low power pac If so replace 11 Examine lift sl...

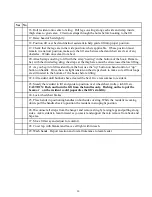
Page 20: ...le Once there is slight tension on the straps check to make sure all four loops are still nested in the bottom of the hooks before lifting 22 Lift resident until buttocks have cleared the bed Give reassurance to resident 23 Steady the resident in lift and guide to position over wheelchair trolley tub lift etc CAUTION Push and turn the lift from the handles only Pushing on the top of the beam or on...

Page 21: ...r Check the movement of the lift remove hair from the casters if needed Check leg covers if cracked replace with new ones Check all vinyl covers if worn replace with new ones Check all external fittings tighten where needed Remove padding and check shoulder bolt and fittings Periodic Testing General Lift Condition A general visual inspection of the external parts and all functions can be carried o...

Page 22: ...r 5 years With And Without Weight Grease 2 General Purpose grease regularly 9 Scale Accuracy Calibration needed 9v Battery 9 Power Box Plastic Guides in Place Terminals Remote Jack Holder or Lens 10 Thumb Switches Left and Right Volaro Lift Items To Inspect 11 Remote Switches Strain Relief Curly Cord 13 Casters Brakes Swivel Roll Bearings 15 Leg Bumpers Cracked or Missing 16 Charger Operation Ligh...

Page 23: ...e this form for Each Lift Date Checked By Repairs Needed Completed SMT Health Systems www patientlift com sales smthealthsystems com 800 725 7761 Lift Inspection must be done Monthly sling included Model Serial 23 ...

Page 24: ...tor Actuator Any Other Moving Parts Limited Warranty on all parts only under conditions of normal and intended use Main Structure Main Integrity and Welds of Frame Base Legs 2YEAR Limited Slings Manufacturer s Defects Misuse damage or alterations to body of lift or any of its parts Voids the Warranty No other warranties written verbal implied or other than listed here will be honored Shipping char...

Reviews: