background image

SMCWPCI-N3

300Mbps Wireless N PCI Adapter 


7


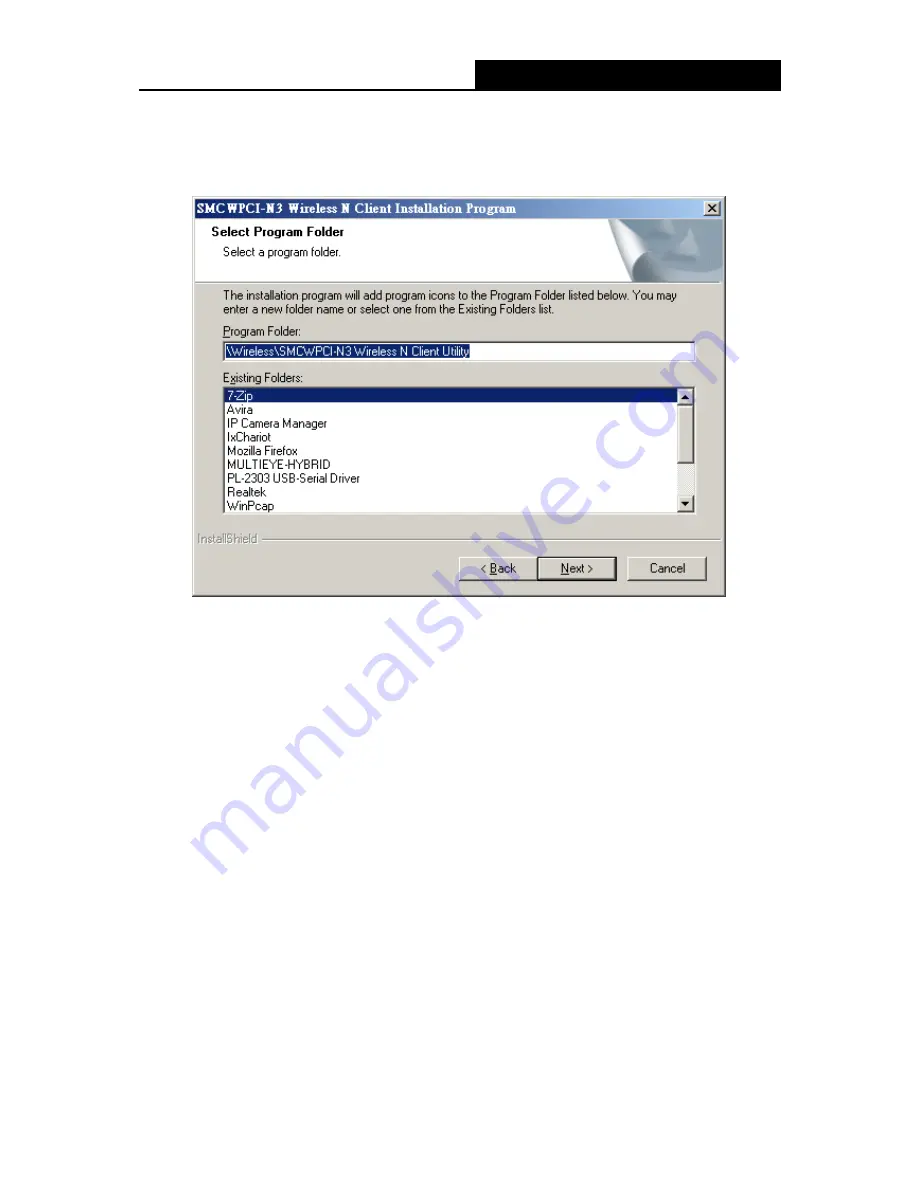
5.  Select the program folder in the start menu where a program shortcut will be added. You can 

create a new folder or select one from the 

Existing Folders

 list. It is recommended that you 

keep the default setting. Click 

Next

 to continue the installation. 


Figure 2-5 

6.  Here you have the option to choose the configuration tool for configuring your wireless 

adapter. Please leave it in the default option. Then click 

Next

 to continue. 

Summary of Contents for SMCWPCI-N3

Page 1: ...EZ Connect N Draft 11n Wireless USB2 0 Adapter EZ Connect N 11n Wireless PCI Adapter SMCWPCI N3 REV 1 0 0 ...

Page 2: ...e dealer or an experienced radio TV technician for help This device complies with part 15 of the FCC Rules Operation is subject to the following two conditions 1 This device may not cause harmful interference 2 This device must accept any interference received including interference that may cause undesired operation Any changes or modifications not expressly approved by the party responsible for ...

Page 3: ...61000 4 4 2004 IEC 61000 4 5 2005 IEC 61000 4 6 2006 IEC 61000 4 8 2001 IEC 61000 4 11 2004 LVD EN60950 1 2006 A11 2009 This is a class B product In a domestic environment this product may cause radio interference in which case the user may be required to take adequate measures National restrictions This device is intended for home and office use in all EU countries and other countries following t...

Page 4: ...thorization required for network and service supply not for spectrum Norway Implemented This subsection does not apply for the geographical area within a radius of 20 km from the centre of Ny Ålesund Russian Federation None Only for indoor applications Note Please don t use the product outdoors in France ...

Page 5: ... 4 2 2 Software Installation 4 Chapter 3 Configuration for Windows XP 14 3 1 Current Status 14 3 2 Profile Management 17 3 3 Diagnostics 26 Chapter 4 Configuration for Windows Vista 29 Chapter 5 Configuration for Windows 7 32 Chapter 6 WPS configuration 34 6 1 PBC Push Button Configuration method 34 6 2 PIN method 36 Appendix A Specifications 39 Appendix B Glossary 40 I ...

Page 6: ...PCI N3 including SMCWPCI N3 Wireless N Client Utility SWCU and Drivers User Guide Other Helpful Information Note Make sure that the package contains the above items If any of the listed items are damaged or missing please contact your local SMC Networks reseller or distributor Conventions The SMCWPCI N3 300Mbps Wireless N PCI Adapter will be referred to as the Adapter in this user guide 1 ...

Page 7: ...uick Setup Wizard guides you step by step through the installation process the SMCWPCI N3 Wireless N Client Utility helps you create a wireless connection immediately With unmatched wireless performance reception and security protection the SMCWPCI N3 is the best choice for easily adding or upgrading wireless connectivity 1 2 Features Compatible with IEEE 802 11n IEEE 802 11g IEEE 802 11b standard...

Page 8: ...tus Status Solid Light The adapter is inserted in the slot and the power is on Activity Flashing Slowly The adapter is trying to scan a networking connection The adapter is already connected but is not transmitting or receiving data Flashing Quickly The adapter is transmitting or receiving data ...

Page 9: ...e your PC case 4 Reconnect your PC s power and turn on your desktop PC 2 2 Software Installation 2 2 1 Overview The Adapter s Setup Wizard will guide you through the Installation procedure for Windows XP The Setup Wizard will install the SMCWPCI N3 Wireless N Client Utility SWCU and drivers If you install the hardware before installing the software the system will prompt Found New Hardware Wizard ...

Page 10: ...fter a few seconds Figure 2 2 will appear Click Next to continue Figure 2 2 3 Please select what should be installed in the Setup type window It is recommended that you select Install Client Utilities and Driver Select Install Driver Only to install the driver ...

Page 11: ...less N PCI Adapter 6 without installing the Client Utility Click Next to continue Figure 2 3 4 Click Browse to change the destination folder for the software then click Next in the screen below shown in Figure 2 4 Figure 2 4 ...

Page 12: ...can create a new folder or select one from the Existing Folders list It is recommended that you keep the default setting Click Next to continue the installation Figure 2 5 6 Here you have the option to choose the configuration tool for configuring your wireless adapter Please leave it in the default option Then click Next to continue ...

Page 13: ...SMCWPCI N3 300Mbps Wireless N PCI Adapter 8 Figure 2 6 7 Click OK to continue the installation Wait a while for the setup to complete as shown in Figure 2 7 Figure 2 7 ...

Page 14: ...ng was not verified by the Windows Logo Identity and the following message will pop up Figure 2 8 Our drivers have been tested thoroughly and are able to work with the operating system Click Continue Anyway to continue the Installation Figure 2 8 8 After all the steps above you will see the screen below click Finish to reboot the system ...

Page 15: ...igure 2 9 2 2 3 Software Installation for Windows 7 1 Insert the installation CD into your CD ROM drive and open the folder named SMCWPCI N3 Double click Setup exe to start the installation then the following screen for preparing setup will appear ...

Page 16: ...SMCWPCI N3 300Mbps Wireless N PCI Adapter 11 Figure 2 10 2 After a few seconds the screen as in the Figure 2 11 will appear Click Next to continue Figure 2 11 3 Click Yes to continue ...

Page 17: ...SMCWPCI N3 300Mbps Wireless N PCI Adapter 12 Figure 2 12 4 The following page will display Please wait for a moment Figure 2 13 5 Click Finish to complete the installation ...

Page 18: ...SMCWPCI N3 300Mbps Wireless N PCI Adapter 13 Figure 2 14 ...

Page 19: ...ere is poor signal strength and the received signal strength indicator RSSI is less than 5dB If the icon is yellow there is poor signal strength and the RSSI is between 5dB and 10dB If the icon is green there is good signal strength and the RSSI is between 10dB and 20dB If the icon is green there is excellent signal strength and the RSSI is more than 20dB Double click on the icon and the Utility w...

Page 20: ...isplayed It included 2 4GHz 300Mbps 2 4GHz 54Mbps and 2 4GHz 11Mbps Network Type The type of network and the station currently connected are shown here The options include Infrastructure connection to an access point or wireless router Ad Hoc direct connection to another laptop PC without access point Note You can configure the network type and wireless mode on the Advanced tab of Profile Manageme...

Page 21: ...e advanced information about the program and its operations Figure 3 2 Network Name SSID The Name of wireless network your adapter connected Server Based Authentication Show whether or not to use the authentication based on server Data Encryption Show the type of data encryption Authentication Type Show the type of authentication Message Integrity Check Show whether or not the MIC is enabled MIC i...

Page 22: ...ave connected to the network 802 11b Preamble The type of message preamble Current Receive Rate The rate of receiving Current Transmit Rate The rate of transmitting Control Channel This shows the currently connected channel Extension Channel This shows the other channel connected when the wireless AP is set in 40MHz channel width Control Frequency This shows the frequency of Control Channel Extens...

Page 23: ...file select the configuration profile from the Profile list and click Modify Then you will see the Management dialog box shown in Figure 3 3 1 Edit the General tab Profile Name Please enter the Profile name which identifies the configuration profile This name must be unique Note that the profile names are not case sensitive Client Name Identifies the client machine i e your PC This parameter is op...

Page 24: ...b In the Security tab you can enter the security parameters of the profile To define the security mode select the radio button of the desired security mode as follows Figure 3 5 Note Select different Security Options the configurations are different you can select the appropriate ...

Page 25: ...is protocol can also be applied to LAN also this is one kind of Enterprise encryption Pre Shared Key Static WEP Enables the use of shared keys that are defined on both the access point and the station To define shared encryption keys choose the Shared Key radio button and click Configure to fill in the Define Shared Keys window shown in Figure 3 6 None No security not recommended Note If the acces...

Page 26: ...up the Wireless PCI Adapter continuously for a short message response time Network Type There are basically two modes of networking Infrastructure The adapter will act as a wireless client and connect to an access point or wireless router Ad Hoc The adapter will connect directly to another computer for peer to peer communication using a wireless network adapter on the remote computer such as SMCWP...

Page 27: ...ess mode and channel of the clients it associates 802 11 Authentication Mode Select which mode the Adapter uses to authenticate to an access point Auto It automatically makes the adapter attempt authentication using shared mode but switches it to open authentication if shared mode fails Open Open System enables an adapter to attempt authentication regardless of its WEP settings In Under Open Syste...

Page 28: ...Profile 1 Go to the Profile Management screen shown in Figure 3 3 2 Select the profile name required in the Profiles List 3 Click Activate 3 2 4 Export a Profile 1 From the Profile Management screen shown in Figure 3 3 highlight the profile to export 2 Click Export the Export Profile window will then appear below 3 Browse the directory where you want to save the profile to 4 Click Save The profile...

Page 29: ...works 1 Click Scan on the Profile Management screen shown in Figure 3 3 the Available Infrastructure and Ad Hoc Networks window will appear below 2 Click Refresh to refresh the list at any time 3 Highlight a network name and click Activate to connect to an available network If no configuration profile exists for that network the Profile Management window will open the General tab screen Fill in th...

Page 30: ...nt screen shown in Figure 3 3 click Order Profiles 2 The Auto Profiles Selection management window will appear shown in Figure 3 12 with a list of all created profiles in the Available Profiles Figure 3 12 3 Highlight the profiles to add to auto profile selection and click Add The profile will appear in the Auto Selected Profiles box 4 Highlight a profile in the Auto Selected Profiles box 5 Click ...

Page 31: ...ction fails the client adapter will try the next highest priority profile that matches the SSID until an available network is found 3 3 Diagnostics The Diagnostics tab of the SMCWPCI N3 Wireless N Client Utility provides options used to retrieve network traffic statistics The Diagnostics tab does not require any configuration The Diagnostics tab lists the following receiving and transmitting diagn...

Page 32: ...s network adapter MAC Address The MAC address of the wireless network adapter Driver The driver name and path of the wireless network adapter driver Driver Version The version of the wireless network adapter driver Driver Date The creation date of the wireless network adapter driver Client Name The name of the client computer 3 3 2 Check Receive and Transmit Statistical Information The Advanced St...

Page 33: ...SMCWPCI N3 300Mbps Wireless N PCI Adapter 28 Figure 3 15 ...

Page 34: ...lled we have to use Windows WLAN Autoconfig to establish a connection Please follow the steps below 1 Right click the icon at the bottom of your screen in your system tray and then select Connect to a network Figure 4 1 2 This page will then display and you will see the available wireless network list Select the SSID of your Access Point take test for example Click Connect Figure 4 2 Select a Netw...

Page 35: ...eless N PCI Adapter 30 3 Enter the passphrase take 1234567890 for example And then click Connect Figure 4 3 Enter Passphrase 4 If the key entered is correct you will successfully connect to the network Figure 4 4 Connecting ...

Page 36: ...SMCWPCI N3 300Mbps Wireless N PCI Adapter 31 5 Click Close to finish Figure 4 5 Successfully Connected ...

Page 37: ...h a connection Please follow the steps below 1 Right click the icon at the bottom of your screen in your system tray and then you will see the available wireless network list Select the SSID of your Access Point take test for example Click Connect Figure 5 1 Select a Network 2 If your wireless network is secured you will be required to enter the security key as shown in Figure 5 2 Enter the passph...

Page 38: ...SMCWPCI N3 300Mbps Wireless N PCI Adapter 33 Figure 5 2 Enter Passphrase 3 If the key entered is correct you will successfully connect to the network as shown in Figure 5 3 Figure 5 3 Connected ...

Page 39: ...the WPS software should be installed Insert the installation CD into your CD ROM drive and open the folder named SMCWPCI N3 Double click WPS exe to start the installation then the following screen for preparing setup will appear Figure 6 1 Please follow the guide of the Operating System to complete the WPS installation After that WPS function can be enabled Here we will introduce how to configure ...

Page 40: ... Double click the icon on the desktop to open the WPS Utility and then you can see the welcome screen shown as Figure 6 3 Click Next to continue Figure 6 3 3 Then select Push the button on my access point in the next screen shown in Figure 6 4 and click Next ...

Page 41: ...N PCI Adapter 36 Figure 6 4 4 Then wait a minute until Figure 6 5 appears Click Finish to complete the WPS configuration Figure 6 5 6 2 PIN method There are two ways to configure WPS by PIN method 1 Enter a PIN into your AP device ...

Page 42: ...lity and then you can see the welcome screen shown as Figure 6 3 Click Next to continue Figure 6 6 will appear Select the second option and you will see the PIN value of the adapter which is randomly generated Click Next Figure 6 6 2 Open the Router s Web based Utility and click WPS link on the left of the main menu Then Figure 6 7 will appear Figure 6 7 3 Click Add device then you can see Figure ...

Page 43: ...the PIN from your AP device 1 Open the WPS Utility and you will see Figure 6 3 Click Next to continue Then Figure 6 9 will appear Select the third option and enter the PIN value which is generally labeled on the bottom of the router Click Next Figure 6 9 2 When Figure 6 5 appears the WPS configuration is complete Note If you generate a new PIN code for your Router please enter the new one instead ...

Page 44: ...1Mbps 11g 6 9 12 18 24 36 48 54Mbps 11n Up to 300Mbps Modulation 11b CCK QPSK BPSK 11g OFDM 11n QPSK BPSK 16 QAM 64 QAM Media Access Protocol CSMA CA with ACK Data Security WPA WPA2 64 128 152 bit WEP TKIP AES Spread Spectrum Direct Sequence Spread Spectrum DSSS Safety Emissions FCC CE Environmental and Physical Operating Temp 0 40 32 104 Storage Temp 40 70 40 158 Working Humidity 10 90 RH Non con...

Page 45: ...nsmitted This bit pattern is called a chip or chipping code Even if one or more bits in the chip are damaged during transmission statistical techniques embedded in the receiver can recover the original data without the need of retransmission To an unintended receiver DSSS appears as low power wideband noise and is rejected ignored by most narrowband receivers However to an intended receiver i e an...

Page 46: ...ism based on a 64 bit or 128 bit or 152 bit shared key algorithm as described in the IEEE 802 11 standard To gain access to a WEP network you must know the key The key is a string of characters that you create When using WEP you must determine the level of encryption The type of encryption determines the key length 128 bit encryption requires a longer key than 64 bit encryption Keys are defined by...

Page 47: ...SMCWPCI N3 300Mbps Wireless N PCI Adapter 42 SMCWPCI N3 ...

Reviews: