background image


10 Specification for Option T


10 - 2 

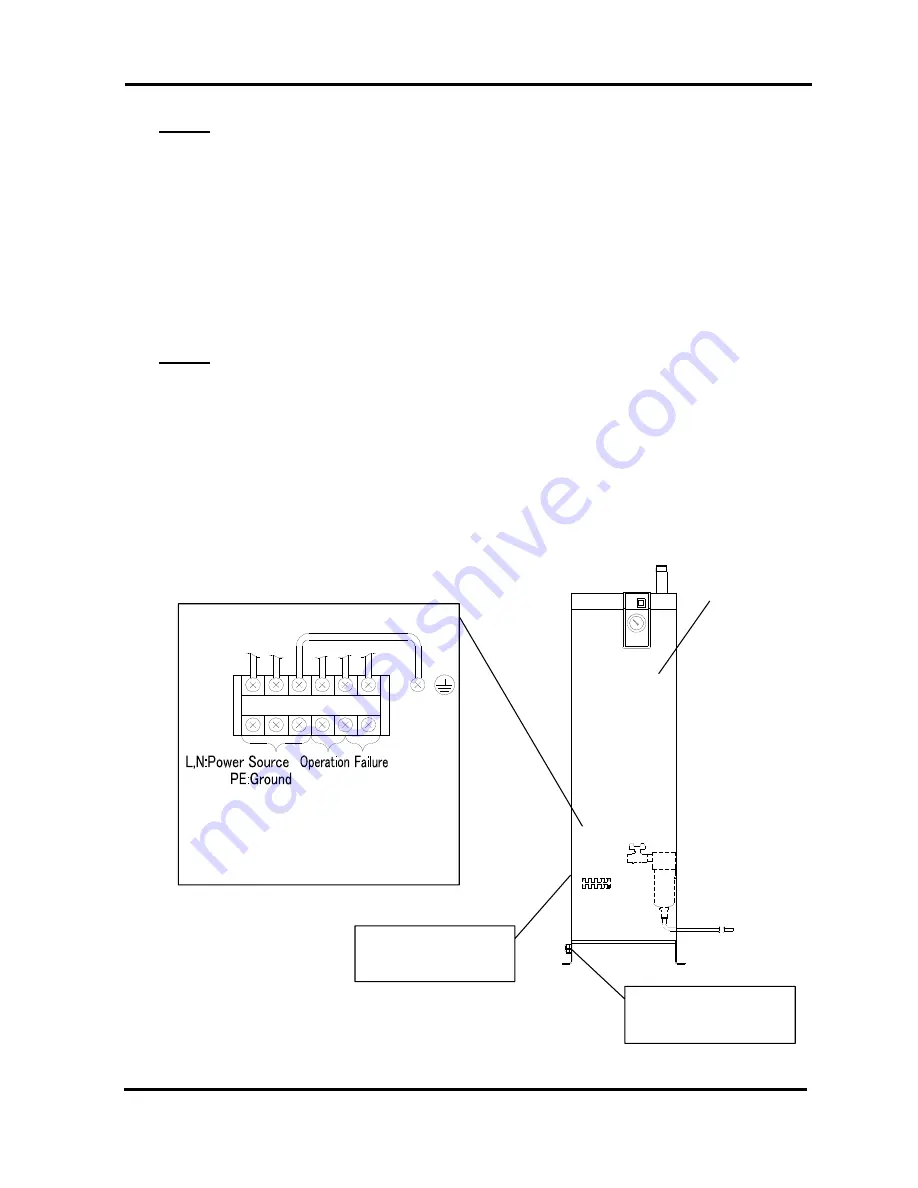
Terminal block 


Grommet 

Signal code inlet 

Rubber grommet 

Power code inlet 

10 - 3 Remote operation 

For the remote operation, turn on and off the power supply side under the condition of the 

illuminated switch ON. 

Keep 3 min. at minimum after stopping the product to restart even for the remote operation. If the 

product is restarted within less than 3 min., protective equipment (overload relay) may activate and 

prevent the product from restarting. 

Additionally, the frequency to start and stop the operation must be restricted to 5 times per hour (to 

prevent breakage of the motor).  


10 - 4  How to connect the power supply and signal cable 

Connect the power cable and signal cable in the following procedures. 

1) Take off the front panel. 

2) Insert the power cable prepared by the customer into the power code inlet (with rubber 

grommet) and bring the power cable near the terminal block through the base hole. 

3) Connect the power cable to the terminal.  

4) Insert the signal cable prepared by the customer into the signal code inlet (with rubber 

grommet) and bring the signal cable near the terminal block. 

5) Connect the signal cable to the each terminal. 

6) Put back the front panel.  


 Front panel  

Customer connection side 

Terminal connecting screw: M3 

Crimping terminal width: 6.5mm and below

Applicable electrical wire:1.25mm

or more


1 2 3

PE


Summary of Contents for IDU22E-23(-C

Page 1: ...Refrigerated Air Dryer IDU22E 23 C L R T V IDU37E 23 C L R T V IDU55E 23 C L R T V IDU75E 23 C L R T V 2007 SMC CORPORATION All Rights Reserved Operation Manual Please read this manual prior of using...

Page 2: ...allation and operation of the equipment Only those who have thorough understanding of the fundamental operating procedure or have basic knowledge and skills of handling industrial equipment for the in...

Page 3: ...Names and Functions 1 1 Chapter 2 Transportation Installation 2 1 Transportation 2 1 2 2 Installation 2 2 2 2 1 Location 2 2 2 2 2 Anchorage 2 3 2 2 3 Air piping 2 3 2 2 4 Drain Tube 2 3 2 2 5 Electri...

Page 4: ...8 4 Maintenance 8 2 Chapter 9 Specification for Option R 9 1 Safety instructions 9 1 9 2 Specifications of the GFCI 9 2 9 3 How to connect the power supply 9 2 Chapter 10 Specification for Option T 10...

Page 5: ...ator or maintemance representative should do daily operations on their own head Operators and maintemance representatives should take the safety of working place and work environment into account It i...

Page 6: ...loss of life if someone handle wrongly during operation or maintenance and did not follow the procedure to avoid danger Caution Statements with the Danger sign explain about possibilities that can res...

Page 7: ...ter 5 Troubleshooting Ask repair and maintenance Warning The equipment should not be operated in the event of any problems When the equipment gets out of order shutdown it immediatery and contact our...

Page 8: ...ry resulting from contact with them What is more there is also the danger of burn injury due to remaining heat after the power supply is cut Therefore wait until the temperature of hot parts become 50...

Page 9: ...rning labels Confirm the positions of danger warning labels Front WARNING 1 Remove panels for maintenance only 2 Never insert anything into product to ensure safety 3 Cut power prior to maintenance to...

Page 10: ...dge and experience about the equipment and incidental device should do the collection of the refrigerant No one but service person or qualified person should remove the cover panel of the equipment Th...

Page 11: ...RESS SERIAL No MAKER MADE IN Front CAUTION 1 Read manual before operation 2 Ensure vantilation and maintenance space 3 Keep water away from the product 4 Secure In Out connector with spanner during pi...

Page 12: ...edge and experience about the equipment and incidental devices should do the collection of the refrigerant No one but service person or qualified person shoud remove the cover panel of the equipment T...

Page 13: ...2 to reset the thermal relay Switch with Lamp ON OFF Switch The lamp is continuously ON during normal operation Use it for ON OFF operations Evaporation thermometer Evaporating temp Indicates the tem...

Page 14: ...tions Parts 1 2 Front Fixing Screw for Front Panel Another one is on the right side Left Side Ventilation Grille Inlet Breathe in cooling air from this grill Do not bung up with wall and so on Rubber...

Page 15: ...it for ON OFF operations Evaporation thermometer Evaporating Temp Indicates the temperature of refrigerant of low pressure side During normal driving it indicates in the green zone Drain Tube Dischar...

Page 16: ...tions Parts 1 4 Front Fixing Screw for Front Panel Another one is on the right side Left Side Ventilation Grille Inlet Breathe in cooling air from this grill Do not bung up with wall and so on Rubber...

Page 17: ...ion The equipment should not be used or stored in the circumstances as follows Those circumstances will cause not only malfunction but also failures Environment where the equipment is exposed to rainw...

Page 18: ...ion to the inlet and outlet of compressed air should be made removable by using union and so on Pressing the hexagonal fitting with screw wrench and so on connect the air piping fittings to the body P...

Page 19: ...rnout of the motor of the refrigerator Supply power for the equipment should meet the specifications The equipment should be grounded for safety Do not connect the earth to a water pipe a gas pipe or...

Page 20: ...he power cable Warning No one but qualified personnel should do the electric wiring Cut off the power supply for safety before the wiring Do not work under energized condition Disassembly of the air p...

Page 21: ...cated next to the auto drain opened 3 2 Operation Start operation according to the procedure below Turn on the breaker of the main power supply Then turn on the Switch with Lamp The lamp will light up...

Page 22: ...while after turning off the switch which is not an abnormality but a process for safety shutdown 3 4 Cautions about restart One must wait for at least 3 minutes before restarting air dryer after it ha...

Page 23: ...ervice Record 4 2 Periodical Maintenance 4 2 1 Cleaning of ventilation grille suction grille Clean dust and other foreign particles from the ventilation area with vacuum cleaner or air blow nozzle onc...

Page 24: ...lease the residual pressure After the air pressure is discharged it tightens as before and it shuts b Open the Residual Pressure Release Cock at the drain tube connection entrance as the cock is clock...

Page 25: ...urn the case assembly lightly to confirm whether it cannnot be turned If it can be turned do this procedure again from the process to fit the case assembly with the body The drain tube is installed ac...

Page 26: ...e circuit referring to 5 2 How to reset the thermal relay Temperature of the compressed air is too high Improve the ventilation system around air compressor or make ambient temperature around air comp...

Page 27: ...ture occurs downstream of the compressed air lines Confluence of piping with another unit without air dryer Install air dryer on the line that does not have it Separate two lines not to converge IN OU...

Page 28: ...an be found on the power supply terminal base Confirm that a green indication does not appear at an indication window of thermal relay If the green indication appears there are other possible causes a...

Page 29: ...ion Note 2 W 960 1600 2300 Electrical Specification Circuit Breaker Note 3 A 10 20 Condenser Air cooling Refrigerant R407C HFC Refrigerant Charge g 450 10 760 10 550 10 745 10 Air IN OUT Connection R1...

Page 30: ...1350 290 46 388 85 680 414 IDU55E 1345 1440 50 IDU75E R2 470 855 1480 53 530 1575 360 36 70 13 500 75 700 526 measure mm BALL VALVE AUTO DRAIN DRAIN TUBE LENGTH 1m O D 10 VENTILATION SWITCH EVAPORATI...

Page 31: ...itor For Compressor Capacitor For Fan Motor Capacitor For Fan Motor Magnetic Contactor MC Switch with Lamp ILS Overload Relay Inside of terminal cover OLR Thermal Protector THP THR Thermal Relay Press...

Page 32: ...as warm and dry air Refrigerant Circuit The fluorocarbon charged in the refrigerant circuit is compressed by the compressor and cooled by the condenser to become liquid Then going through the capilla...

Page 33: ...orrosive gas but it is not perfect rust proof Therefore avoid installing the product in the place exposed to corrosive gas as much as possible 2 If any flaw is given on the painted surface of copper t...

Page 34: ...the supply of air to the primary side of the product exhaust the air from the secondary side and ensure there is no residual pressure If the air pressure is left at the inside of the product parts cou...

Page 35: ...Do not cover this exhaust port Clean exhaust port so that port is not blocked by dust etc 3 Close the ball valve before removing the heavy duty auto drain and open the bleed valve or push the flushing...

Page 36: ...obserbing the following points 1 Be sure to shut off the power supply before wiring For safety do not perform any work on the unit with the power supply on The power supply cannot be completely shut o...

Page 37: ...ply Connect the power cables in the following procedure 1 Take off the front panel 2 Insert the power cable prepared by the customer into the power code fixture and bring the power cable near the term...

Page 38: ...the power supply before wiring For safety do not perform any work on the unit with the power supply on The power supply cannot be completely shut off just by turning off the illuminated switch Be sure...

Page 39: ...to prevent breakage of the motor 10 4 How to connect the power supply and signal cable Connect the power cable and signal cable in the following procedures 1 Take off the front panel 2 Insert the pow...

Page 40: ...PRS ILS Pressure Switch Switch with Lamp SY GR WH WIRE COLOR Magnetic Contactor MC PRS1 Pressure Switch PRS2 High Pressure Switch Fan Motor Thermostat THP1 2 G Green YE Yellow Ground Fault Circuit Int...

Page 41: ...ure If the air pressure is left at the inside of the product parts could suddenly pop out and cause accident when loosened 2 Put gloves to prevent injury when removing the auto drain 3 Operator could...

Page 42: ...The product needs to be maintained Clean it in the following procedure periodically 1 Close the ball valve 2 Press the test switch and make the residual pressure zero 3 Remove the strainer and clean...

Page 43: ...12 Service Record 12 1 12 Service Record 12 1 Service Record It is recommended to keep a maintenance service record Parts No Description Maintenance Service Work Description Date...

Reviews: