background image


____________________________________________________________________________________________ 

DIGITAL VIDEO RECORDER 

36

2)  Each  page  displays  up  to  10-alarm  list.  To  go  to  the  previous  or  next  pages 

press the 

S

T

 buttons or turn the JOG dial. 

3) Press the 

S

,

T

 buttons or turn the JOG dial to move the cursor to the desired 

alarm-recording file.   

4) Press the PLAY or ALARM SEARCH (A-SEARCH) button to play back.


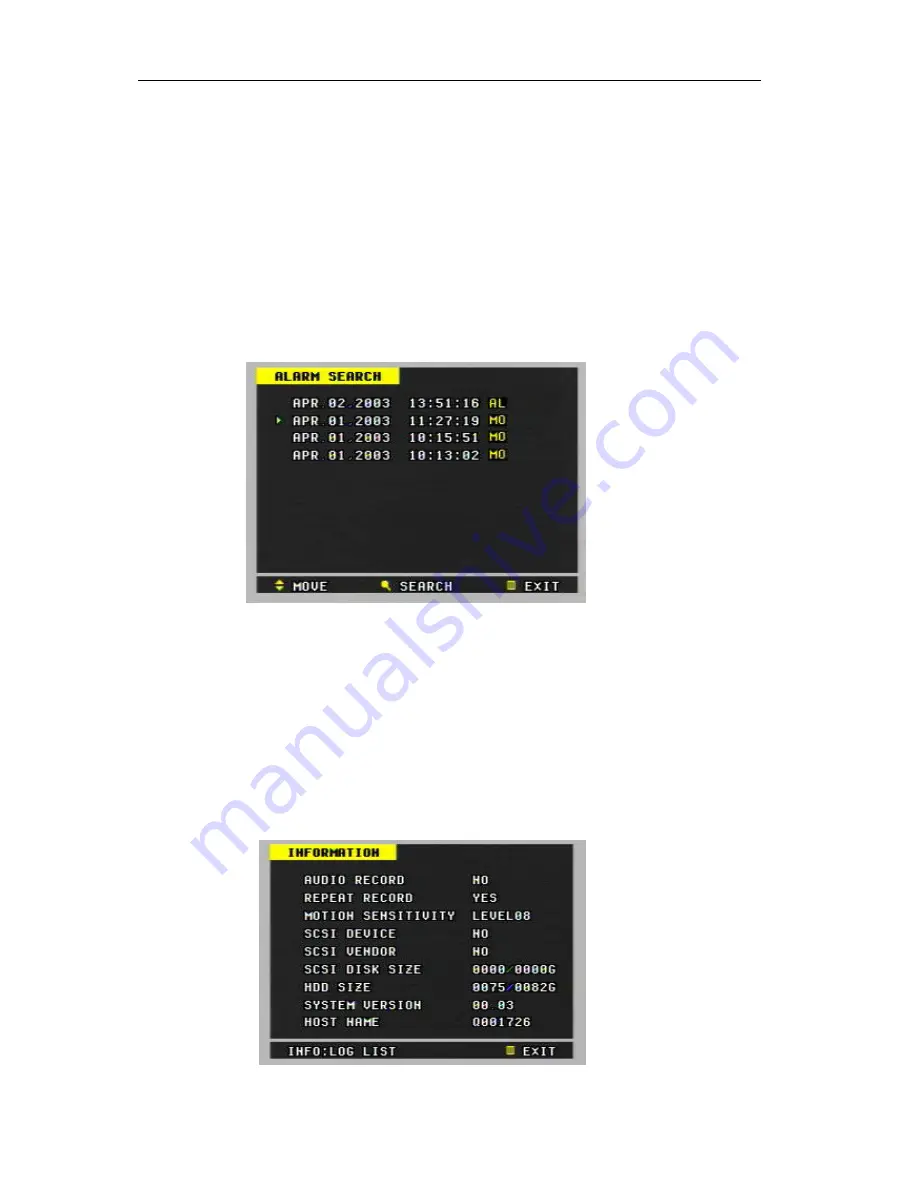
9. Motion Search – Alarm List Search 

1)


Press the ALARM SEARCH (A-SEARCH) button to display the alarm-
recording list


2)


It is same with Alarm Search.   

AL

 means Alarm and 

MO 

means Motion. 


10. Information & Log List


1) Information 

a) Press the INFO button on the front panel of unit or on the remote 

controller to display.


Summary of Contents for EchoVue 405

Page 1: ...Operating Instruction EchoVue 405 Digital Video Recorder...

Page 2: ...with arrowhead symbol within an equilateral triangle is intended to alert the user to the presence of uninsulated dangerous voltage within the product s enclosure that may be of sufficient magnitude t...

Page 3: ...attery This procedure is necessary when using the appliance for the firs time or after it has been unplugged for a long time from the AC outlet Insufficient charging of the battery may cause erasure o...

Page 4: ...larm inputs and Alarm outs 3 External Backup Device 4 PAN TILT ZOOM Camera 5 NETWORK Programming 1 Main Menu 2 Display Set 3 Record Set 4 Group Recording Set Motion Detection Set 5 Alarm Recording Set...

Page 5: ...AL VIDEO RECORDER 5 11 Zoom 12 PAN TILT ZOON Camera Control 13 External Backup Device Control DAT24 Client Program 1 How to install and connect 2 Features 3 Image file down load from the DVR server 4...

Page 6: ...lizing and disk checking 2 LOCK button Press this button to lock all unit s key buttons including the remote controller The LOCK LED green lights goes off when the lock is on off To release press it a...

Page 7: ...to move the cursor In Zoom mode used to move the zoom area 12 TIME SEARCH button Press this button to display the Time Search menu 13 ALARM SEARCH button Press this button to display the Alarm Search...

Page 8: ...S VIDEO 4 4 COMPOSITE VIDEO OUT ALARM IN4 ALARM IN3 ALARM IN2 ALARM IN1 GND POWER ON POWER OFF ALARM OUTPUT GND ETHERNET RS 232C REC END GND 1 2 3 4 5 6 7 8 9 10 11 12 13 14 1 CAMERA IN connectors Th...

Page 9: ..._________________________________________ DIGITAL VIDEO RECORDER 9 9 SCSI 2 connector This connector is for peripheral recording device 10 ALARM IN OUT terminal 11 RJ 45 ETHERNET connector 12 RS 232C...

Page 10: ...MENU PLAY T SEARCH A SEARCH REC STOP STILL STEP QUAD 1 2 3 4 5 6 7 8 9 0 ZOOM INFO SCH CLEAR BACKUP AUDIO PB P T Z SCH T RESTORE LIGHT A FAST POWER AUDIO PB BACKUP RESTORE INFORMATION ZOOM PAN TILT ZO...

Page 11: ...1 1 2 3 2 3 OFF ON 75ohm S VIDEO 4 4 COMPOSITE VIDEO OUT ALARM IN4 ALARM IN3 ALARM IN2 ALARM IN1 GND POWER ON POWER OFF ALARM OUTPUT GND ETHERNET RS 232C REC END GND VIDEO OUT or S VIDEO OUT AUDIO OUT...

Page 12: ...vice connection 1 DDS3 HP Sure Store DAT24 2 On Stream ADR50 50GB 3 HDD SCSI IF Type REC START OUT IN SCSI OUT IN CAMERA CAMERA AUDIO MIC 1 1 2 3 2 3 OFF ON 75ohm S VIDEO 4 4 COMPOSITE VIDEO OUT ALARM...

Page 13: ...IN CAMERA CAMERA AUDIO MIC 1 1 2 3 2 3 OFF ON 75ohm S VIDEO 4 4 COMPOSITE VIDEO OUT ALARM IN4 ALARM IN3 ALARM IN2 ALARM IN1 GND POWER ON POWER OFF ALARM OUTPUT GND ETHERNET RS 232C REC END GND RS485 t...

Page 14: ...ECORDER 14 Programming 1 MAIN MENU 1 Press the MENU button or SHUTTLE HOLD button to display the MAIN MENU 2 Press ST buttons or turn the JOG dial to go to the desired sub menu 3 Press X button or tur...

Page 15: ...n press X button or turn the SHUTTLE ring to the right while the DISPLAY SET flashes The DISPLAY SET sub menu appears 2 Press S T buttons or turn the JOG dial to move to the desired item and then pres...

Page 16: ...red camera and then the brightness contrast color and sequence bypass of each camera can be adjusted individually CAM1 default CAM2 CAM3 CAM4 e BRIGHTNESS adjustment a Camera number can be switched by...

Page 17: ...camera will not be shown in the sequential display mode To complete the setting and return to the MAIN MENU press MENU button or SHUTTLE HOLD button NOTE Screen vertical position adjustment The vertic...

Page 18: ...Select the current recording group you wish to record Refer to the REC GROUP SET GROUP1 default GROUP2 GROUP3 GROUP4 b AUDIO RECORD NO default MIC LINE c REPEAT RECORD applies to both internal main HD...

Page 19: ...ensitivity f MOTION DURATION 20 40 default 60 80 100 120 180 240 Sec To complete the setting and return to the MAIN MENU press MENU button or SHUTTLE HOLD button 4 RECORD GROUP SET MOTION DETECTION SE...

Page 20: ...e of each camera NTSC setting CAMERA 1 CAMERA 2 Real Time recording 30F S 15F S default 12F S 10F S 6F S 5F S 4F S 3F S 2F S 1F S 0F S CAMERA 3 CAMERA 4 Max 15F S 15F S default 12F S 10F S 06F S 05F S...

Page 21: ...nd 10F S respectively ii Not pressing the REC button Camera 2 4 will not activate Camera 1 3 Camera will record only when one of two cameras detects motion as capture rate 15F S and 10F S respectively...

Page 22: ...UTTLE ring to switch the options 4 Settings a ALARM DURATION This setting is determines the alarm recording duration after an input of alarm signal Note When an alarm signal is input the recording mod...

Page 23: ...output type of the alarm SENSOR1 SENSOR2 SENSOR3 SENSOR4 g INPUT TYPE OFF default Alarm recording OFF N C Normally Closed Accepts alarm signals in the open state N O Normally Open Accepts alarm signal...

Page 24: ...ing end d MODE NO inactivate the recording GROUP1 GROUP4 select one of groups Deletion To delete each line select the MODE as then exit to menu To complete the setting and return to the MAIN MENU pres...

Page 25: ...es The REMOTE SET sub menu appears 3 Press the S T buttons or turn the JOG dial to move to the desired item and then press the W X buttons or turn the SHUTTLE ring to switch the options 4 Settings a P...

Page 26: ...nt If you wish to format the HDD while using please follow the steps below 1 Stop the DVR completely and power off 2 Restart the unit 3 Format the HDD on the SYSETM SET menu 4 After that restart the u...

Page 27: ...eral storage only when the BACKUP button is pressed AUTO Backups of previously recorded data are made at the same time the DVR is recording new data c PLAY BACK DISK Choose which HDD you want to searc...

Page 28: ...NU press MENU button or SHUTTLE HOLD button 9 NETWORK SET 1 Press the MENU button or SHUTTLE HOLD button to display the MAIN MENU And then go to the NETWORK SET using ST buttons or the JOG dial 2 Pres...

Page 29: ...2 Press Numerical Button you desired to watch as full screen 2 Basic Recording 1 Press the REC button The REC lights and recording starts 2 Disconnected channels will not be recorded if there are 3 T...

Page 30: ...ture quality and 15 F S for all cameras When the alarm is cleared the recording mode resumes to the previous recording mode 2 If the unit receives a new alarm signal while in the alarm recording mode...

Page 31: ...ed recording mode Note There may be cases when the recorder s built in motion detection function does no operate properly due to the condition of the input video signal or other factors 6 PLAYBACK 1 B...

Page 32: ...while playback The unit begins reverse playback b To resume playback press the PLAY button again R everse P l ayb ack 3 Field by field Still field Playback a Press the STILL button during playback Th...

Page 33: ...t the playback speed Playback speed will vary according to how far the SHUTTLE ring is turned STILL 2 4 6 8 2 4 6 8 FORWARD REVERSE Reverse speed search 8X speed Forward speed search 2X speed Reverse...

Page 34: ...pending on recorded field rate b While playback press the AUDIO PB button to synchronize the sound track with the scenes Note The audio playback cannot be performed properly in the real time recording...

Page 35: ...ext pages press the S T buttons or turn the JOG dial 3 Press the TIME SEARCH T SEARCH button again to search when the cursor is reached to desired time and date Note Time search will not be activated...

Page 36: ...T buttons or turn the JOG dial to move the cursor to the desired alarm recording file 4 Press the PLAY or ALARM SEARCH A SEARCH button to play back 9 Motion Search Alarm List Search 1 Press the ALARM...

Page 37: ...the MENU button 2 LOG LIST 1 Press the INFO button twice to display the log list 2 It displays up to 4 pages and each page displays up to 10 lists To show the previous or next pages press the S T but...

Page 38: ...l Pan Tilt Zoom control mode 2 PAN control Press W or X button on the front panel or the remote controller TILT control Press S or T button on the front panel or the remote controller ZOOM control Pre...

Page 39: ...e next backup recording will begin at this point 3 When the BACKUP mode on the SYSTEM SET menu is set as MANUAL Press the BACKUP button then the BACKUP TIME SET mode appears as picture below 4 Now set...

Page 40: ...on b The DVR unit detects the DAT24 automatically and the external backup device icon appears on the monitor screen c Press the RESTORE button on the front panel or on the remote controller Then the...

Page 41: ...TAL VIDEO RECORDER 41 controller after searching Then a arrow W direction to the left appears and the unit starts restoring to the hard disk from the backup device g The arrow W disappears when the re...

Page 42: ...__________________________ DIGITAL VIDEO RECORDER 42 Client Program 1 How to install and connect 1 Installation A Enter the DVR IP address Then ActiveX control window appears Click Yes B ActiveX contr...

Page 43: ...____________________________________________________________ DIGITAL VIDEO RECORDER 43 D Enter the password of DVR and click the Connect button 2 Features 1 Main Screen A Tool bar control buttons B Ma...

Page 44: ...to view in quad mode C Selection of LIVE Picture Quality HIGH 720 x 486 MID 360 x 243 LOW 180 x 122 D LIVE RECORD button Click to record the current live images OSD OSD On Screen Display ON OFF PRINTE...

Page 45: ...Speed FPS Kbps C Camera Number D DVR Recording status 4 Status Bar A Current DVR Status REC PLAY STOP etc B SCHEDULE Recording ON OFF status C Manual LOCK ON OFF D Remain HDD capacity of internal sto...

Page 46: ...___________ DIGITAL VIDEO RECORDER 46 3 Select one of the files you wish to down load Preview Download Down loading while viewing what images you are downloading with resolution of 180x122 Download Do...

Page 47: ...____________________________________________________________________________________________ DIGITAL VIDEO RECORDER 47 4 Example Preview Download...

Page 48: ...Check window appears Information the current viewer version DVR STATUS the current DVR status DVR Setting To change the DVR setting enter the supervisor password Then click the DVR Setting button Not...

Page 49: ...DER 49 3 DVR Setting General Sever Setting window appears when you click the DVR setting button with the proper password DVR Control REC DVR recording ON STOP DVR recording STOP SCHEDULE O OFF Schedul...

Page 50: ..._________________ DIGITAL VIDEO RECORDER 50 4 DVR SETUP Camera 5 DVR SETUP Record Setting CAM 1 4 Camera selection Brightness 0 99 Contrast 0 99 Color 0 99 GROUP 1 4 Recording Group selection Audio Re...

Page 51: ...QUALITY Picture quality Camera 1 4 Recording speed of each camera M Motion detection ON OFF Alarm recording DURATION Alarm Duration REOCRD CAMERA All Camera start recording of all cameras when any of...

Page 52: ...____________________________________________________________________________________ DIGITAL VIDEO RECORDER 52 8 DVR SETUP System setting BACKUP Setting backup mode setting MANUAL AUTO PLAYBACK DISK s...

Page 53: ...ITAL VIDEO RECORDER 53 5 Local Player 1 Click the Player button on the tool bar to open DVR Player window 2 Click the Open button 3 Select an image file ADV or ADB and click Open button A Time Bar B O...

Page 54: ...54 How to connect modem Please follow the next procedure after installed client software We provide client software in a CD and you can download it at weldex com 1 Connect modem US Robotics to the bac...

Page 55: ..._______________________________________________________________________________________ DIGITAL VIDEO RECORDER 55 3 Double click Make New Connection 4 Click Next at the window of network connection wi...

Page 56: ...______________________________________________________________________________ DIGITAL VIDEO RECORDER 56 5 Check Dial up to private network and click Next 6 Enter the telephone number which is connect...

Page 57: ...___________________________________________________________________________ DIGITAL VIDEO RECORDER 57 7 Check For all user and click Next 8 Type DVR at the parameter check Add a shortcut to my desktop...

Page 58: ...nd enter the password Six digits 000000 are initial password click Dial 10 You can find this window if connection is succeed and see the speed of this connection at the bottom tool bar To the next Run...

Page 59: ...___________________________ DIGITAL VIDEO RECORDER 59 It s max speed is 56kbps Feel free to ask more information to the US Robotics 11 Enter this IP address 192 168 0 60 and press Enter key 12 You can...

Page 60: ..._____________________________________________________________________________ DIGITAL VIDEO RECORDER 60 13 Enter this password Six digits 000000 are initial password click Advance check Modem user and...

Page 61: ...___________________________ DIGITAL VIDEO RECORDER 61 14 You can see the picture if connected successfully 15 To disconnect modem place the cursor on the this Icon and right click and click Disconnect...

Page 62: ...TSC PAL OUTPUT iTV monitor 1 BNC 1Vp p Composite NTSC PAL iS VIDEO VIDEO DISPLAY i1 Quad Switching Compression iWavelet Resolution iDisplay NTSC 720 480 PAL 720 576 iRecording 720 243 Alarm In Out i4...

Page 63: ...Alarm iPlayback Various Speed playback using Shuttle ring Field by field playback using Jog dial iBackup Network backup LAN External SCSI backup device Features iAudio 1CH Audio Line In Out MIC input...

Reviews: