background image

12

www.smartavi.com

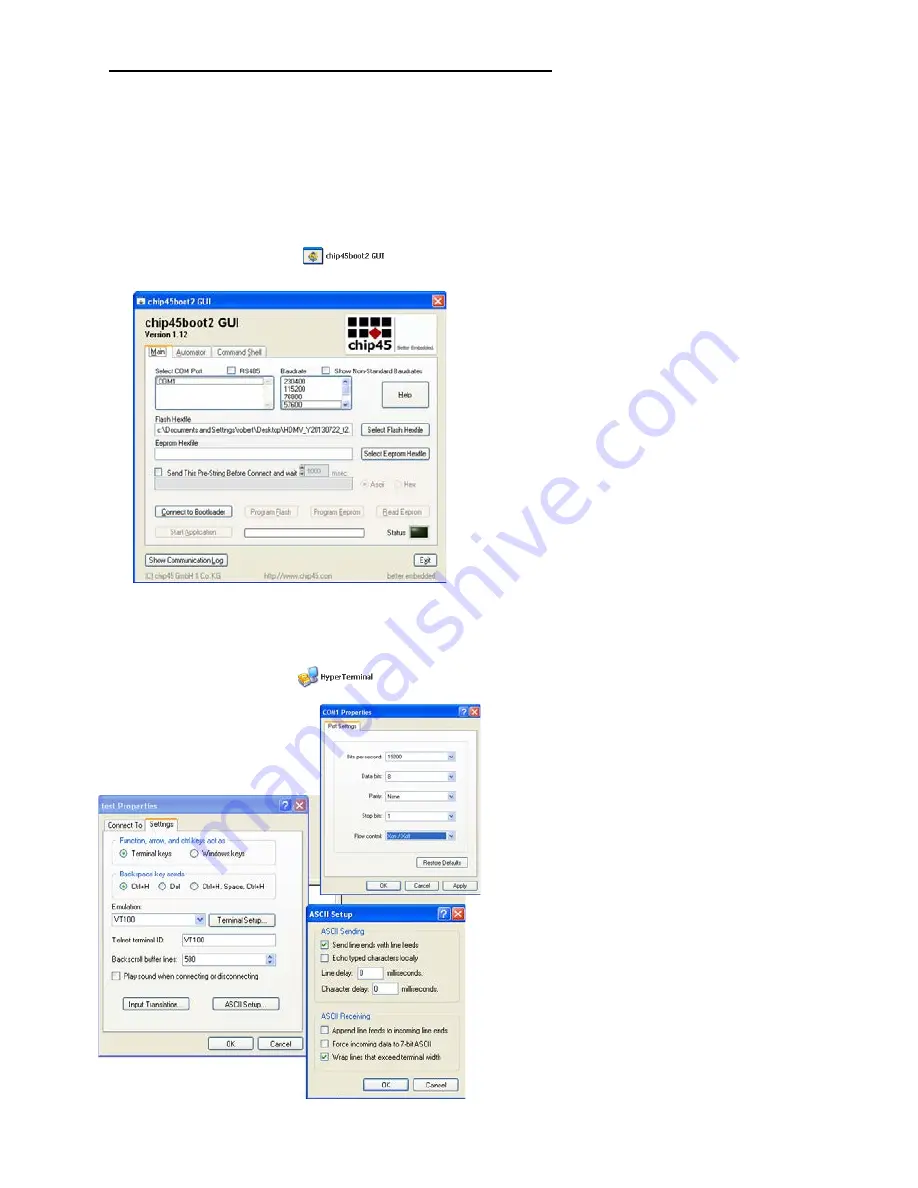
1) Connect an RS-232 cable or USB to

     RS-232 adapter from your computer to

      the HDMV-Plus.

2) Open Chip45Boot2 GUI and select the

     appropriate com port.

3) Select a baud rate of 115200 (if

     connection fails select a lower

     baud rate)

4) Press “Select Flash Hexfile” and locate

     the firmware upgrade. (Don’t forget to

     download the upgrade first.)

5) With the power to the HDMV off, press

     “Connect to Bootloader” then turn the

     power to the HDMV-Plus on.

6) Once connected click on “Program Flash”

7) When finished click “Disconnect from

     bootloader” and power cycle the 

     HDMV-Plus.

Occasionally Chip45 may give an error 

“Unable to connect, with a red status flag.” 

Clicking “connect” just after seeing this 

message will sometimes connect. Also 

consider lowering the baud rate.

        With a Terminal Program:

1) Set PC serial port to 19200 baud, 8N1, XON

    XOFF (we suggest to start with 19200 baud,

    even though higher baud rates are possible,

    depending of target MCU clock.)  Set the

    line endings on your terminal program to

     ‘CR+LF’ for outgoing messages, this means

     to “send line ends with line feeds.”

     Emulation should be set to “VT100.”

2) Hold shift-U keys pressed while powering

     on or resetting your target

3) See the welcome message “c45b2” plus

     version number plus prompt on the next

     line now the boot loader is ready to accept

     the firmware.

4) Type “pf” to load the firmware. An echo of

      “pf+” will return.

5) Send text file, go to desktop and “show all”

     and select the hex file. (Send it as a text file

      although it is a hex file.)

How to Upgrade the Video Firmware

Download the latest firmware upgrade from the SmartAVI website.

Open either Chip45Boot2 or a serial data application such as HyperTerminal. Chip45Boot2 may be 

downloaded from the Chip45 website.  HyperTerminal, Putty, TeraTerm are widely distributed and 

free to use.

Using Chip45Boot2 GUI

Using HyperTerminal

Summary of Contents for HDMV-Plus

Page 1: ...com Installation Manual 4 Port Full HD Multiviewer HDMV Plus www smartavi com 1 800 AVI 2131 Made in the U S A View four different HDMI video sources simultaneously on one screen with USB keyboard and...

Page 2: ...e CBLDB906 1 6ft DB9 Serial RS 232 Cable Table of Contents TABLE OF CONTENTS AND TECHNICAL SPECIFICATIONS 2 3 INTRODUCTION AND FEATURES 4 APPLICATIONS 5 CONNECTING THE BOX AND USING THE FRONT CONTROL...

Page 3: ...0 Output Cable Length Up to 20 ft HDCP Compliance 1 0 2 0 Video Bandwidth Single link 340MHz 10 2Gbps Input Interface 4 HDMI Output Interface HDMI Connector Type A 19 pin female CONTROL Front Panel T...

Page 4: ...ing them all through a single display and set of controls Features View up to four computers on a single monitor at the press of a button Supports USB keyboard and mouse On screen display OSD makes se...

Page 5: ...te Servers User Control Call Centers for Technical Support Industrial Long Range Workstation Isolation Airport Installations Air Traffic Control Passenger Information H D M I O u t D V I D I n R S 2 3...

Page 6: ...nd mouse control will default to the last channel selected To switch to Quad Mode press QUAD on the front control panel and then select the desired channel 1 2 3 or 4 The keyboard and mouse control wi...

Page 7: ...to factory defaults To change modes with the OSD simply navigate with the attached keyboard and press the up and down arrow keys press the right key to activate the submenu and the left to deactivate...

Page 8: ...k scroll down to Factory Reset and press enter The HDMV Plus will perform a power reset on itself The position of the OSD can be moved around Select the OSD Position text and press enter Next use the...

Page 9: ...Commands OR USB to RS 232 Adapter Cable RS 232 Cable The HDMV Plus may also be controlled via RS 232 commands this feature requires an RS 232 card installed on your computer or a USB to RS 232 adapte...

Page 10: ...reen displaying full screen F4 Full mode input 4 selected Picture in Picture Mode P CR 4 inputs on screen main selection largest Area P3 Picture in picture mode input 3 selected Change User Control U...

Page 11: ...None the stop bits are 1 and there is no flow control HyperTerminal comes standard on Windows XP and can be enabled on Windows Vista Windows 7 and Windows 8 There are many applications available for...

Page 12: ...19200 baud 8N1 XON XOFF we suggest to start with 19200 baud even though higher baud rates are possible depending of target MCU clock Set the line endings on your terminal program to CR LF for outgoing...

Page 13: ...erminal The ASCII setup is found by clicking ASCII Setup under the settings tab in properties In the console type menuon and press enter Next type bootusb and hold the shift u button quickly afterward...

Page 14: ..._________________________________________________________________________________ Q I see vertical lines on the display What happened A The video memory needs to be refreshed Issue a console command...

Page 15: ...15 www smartavi com Notes...

Page 16: ...Rights Reserved S M A R T AU D I O V I D E O I N N O VAT I O N SmartAVI Inc Twitter smartavi 11651 Vanowen St North Hollywood CA 91605 Tel 818 503 6200 Fax 818 574 5581 http www SmartAVI com At SmartA...

Reviews: