background image


ESTABLISHING AN RS-232 CONNECTION


Before you start: 

Controlling a Smart-AVI device via RS-232 requires an RS-232 card installed on your computer or a USB 
to RS-232 adapter. Below are instructions on how to create an RS-232 connection between a PC and the 
Smart-AVI device. 
 
Make sure to use communication settings 9600 bps, N, 8, 1, No flow control. 
 
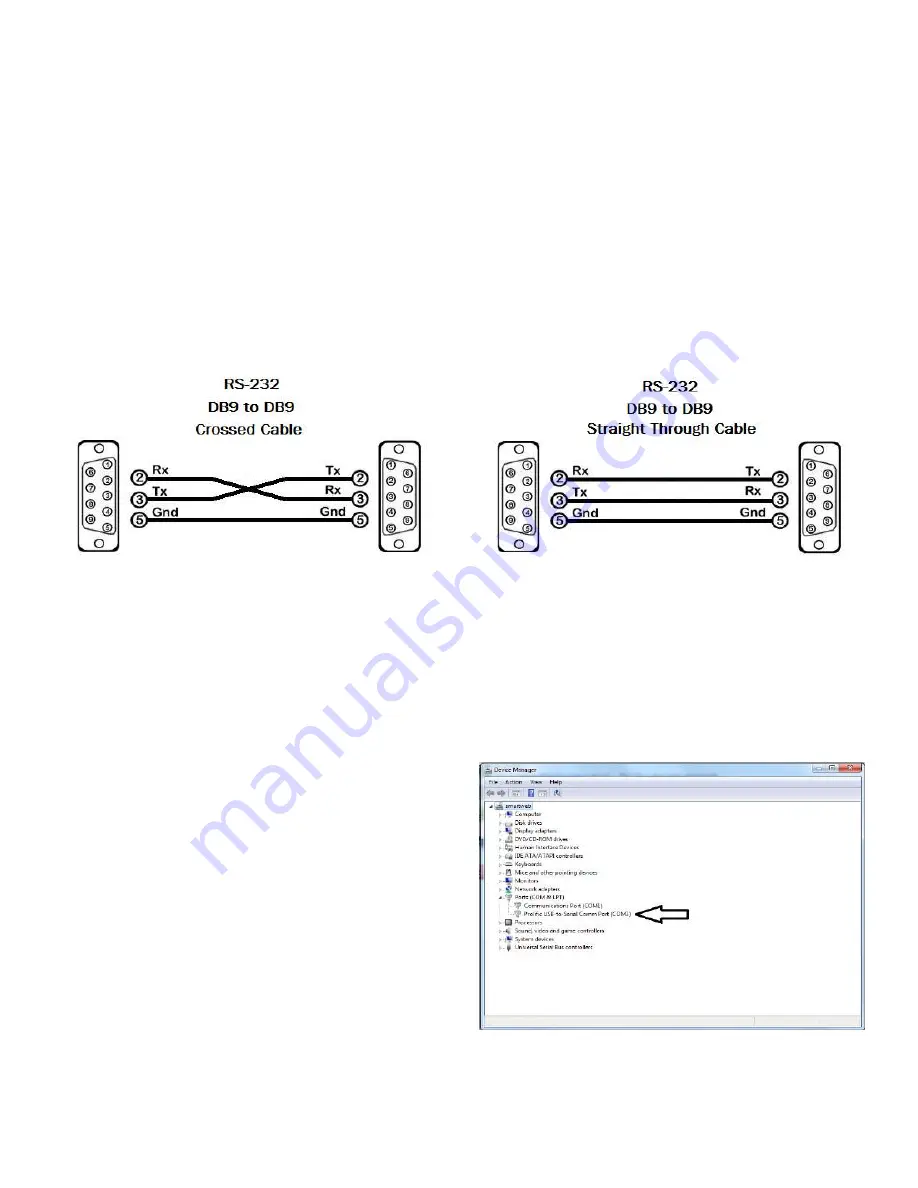
Check the device and your PC to determine if you need a male to male or a male to female cable and how 
long it needs to be. The Smart-AVI device requires a straight through cable. You  can use a Null Modem 
Adapter to convert a crossed cable to a straight through cable. Examples of crossed and straight thorough 
cable pin-outs are shown below. The standard maximum length for an RS-232 cable is 50 feet. Call our 
Smart-AVI Support Engineer if you require more information.  


Figure 8-1 

Examples of 9 pin RS-232 Straight Through and Crossed Cables 


Establish a connection to the Smart-AVI device:


1.  Connect an RS-232 cable to the RS-232 connector on the PC. 
2.  Connect the other end of the cable to the RS-232 port of the Smart-AVI device. 
3.  Use Windows Control Panel / Device Manager to identify the Com port number. See instructions and 

Figure 8-2 below. 

4.  Power on the device. 
 
If you are using a USB to COM port adapter on a Win-
dows PC and need to identify the COM port used, do 
the following: 
 
1.  Click on the start button.  
2.  Click on  Control Panel.  
3.  Click on Device Manager. In Windows 7 you need 

to click on “Hardware and Sound” to get to Device 

Manager. 

4.  Click on the arrow  next to Ports (COM & LPT). You 

should see the name of  your  adapter and the 
COM port number in use. 


Figure 8-2 

Summary of Contents for DVR8X8

Page 1: ...1 Made in U S A www SmartAVI com 1 800 AVI 2131 DVR 8X8 User Manual Display Content From Any 8 Computers On Any 8 Screens Independently Up To 20 Feet Away 8 port DVI D Matrix Switch ...

Page 2: ...LEARNING 7 IR REMOTE CONTROL 7 ESTABLISHING AN RS 232 CONNECTION 8 USING THE SmartControl SOFTWARE 9 11 LIMITED WARRANTY STATEMENT 12 Figure 2 1 WHAT S IN THE BOX PART NO QTY DESCRIPTION DVR8X8S 1 DVI D 8x8 Router PS5VDC4A 1 Power Adapter SM EYE2 1 IR Eye Optional SAVI RMT 1 IR Remote Control Optional EN DVR8X8 EAR P 2 Rack Mount Brackets 1 Quick Start Guide ...

Page 3: ...ront panel button or remotely using RS 232 connection and Windows based software that is easy to understand and simple to use a cornerstone of all SmartAVI products FEATURES Supports resolutions up to 1920 x 1200 Control from either Front Panel or via RS 232 IR Remote Control available optionally Ethernet control available optionally Easy to use Windows based software for remote control via RS 232...

Page 4: ...ngth Up to 20 ft Output Cable Length Up to 20 ft CONTROL Front Panel Buttons Select Switch between sources and view the current selected channel RS 232 DB9 Female 115200 N 8 1 No flow control IR Remote Control Remote Control and IR EYE Optional OTHER Power External 100 240 VAC 5VDC4A Weight 2 55 lbs Dimensions 17 W x 7 D x 2 H Operating Temp 0 to 55 C 32 to 131 F Storage Temp 20 to 85 C 4 to 185 F...

Page 5: ...on the rear of the DVR 8X8 4 Optionally connect the IR Eye for IR remote control 5 Optionally connect a computer to the RS 232 port on the DVR 8X8 for additional remote control 6 Power on the DVR 8X8 7 Power on the computers and displays SmartAVI s DVR 8X8 uses the Windows based SmartControl software application that makes user inter face via RS 232 simple See the full manual for more information ...

Page 6: ...output port To exit the port editing mode wait 5 seconds and the DVR8X8 will return to status mode MENU Options To access the other features of the DVR8X8 press and hold both the Scroll and Enter buttons simultane ously for 3 seconds and release to bring up the MENU screen Press Scroll to cycle through the following list of options Figure 6 3 To change the status of the selected option press the E...

Page 7: ...bring up the MENU screen and use Scroll to cycle through the menu options To select a mode press Enter The currently selected DDC Mode will be indicated by a letter in brackets P for PC M for Mac and S for Screen Figure 7 1 IR REMOTE CONTROL Plug in the optional IR Eye Receiver into the IR port on the back of the DVR8X8 Secure it with tape so it is visible to the remote control Point the optional ...

Page 8: ...mum length for an RS 232 cable is 50 feet Call our Smart AVI Support Engineer if you require more information Figure 8 1 Examples of 9 pin RS 232 Straight Through and Crossed Cables Establish a connection to the Smart AVI device 1 Connect an RS 232 cable to the RS 232 connector on the PC 2 Connect the other end of the cable to the RS 232 port of the Smart AVI device 3 Use Windows Control Panel Dev...

Page 9: ...ntrol Pro launcher as well as a shortcut to uninstall SmartControl Pro Click on SmartControl Pro in order to launch the software When the software starts you will see a screen like this Advanced Configuration If you have more than one Router in stalled you will want to check this box Router Type Select DVR 8X8 Inputs Outputs Enter the number of Inputs Outputs your HDR16X16 has The HDR16X16 can hav...

Page 10: ...o the output above Note Inputs can be routed to several different outputs but each output can only have a single input at any one time That means you can have several connections horizontally but not vertically On the screen shown in figure 10 1 the input buttons run down the left side and the output buttons run across the top They re each labeled 1 through 8 This configuration directs video from ...

Page 11: ...re is no limit on the number of routes you may record If you click a macro button while in the record mode the macro will be executed and these routes will be added to the recording This makes it possible to combine the routes of two or more macros into one bigger macro 3 When finished click the Save Macro button You will be instructed to then click on one of the macro buttons Doing this will save...

Page 12: ...rt AVI Any replacement product could be new or like new provided that it has functionality at least equal to that of the product being replaced Smart AVI limited warranty is valid in any country where the covered product is distributed by Smart AVI B Limitations of warranty To the extant allowed by local law neither Smart AVI nor its third party suppliers make any other warranty or condition of an...

Page 13: ...warranties of merchant ability and fitness for particular purpose SmartAVI will not be liable for errors contained herein or for inci dental or consequential damages in connection with the furnishing performance or use of this material No part of this document may be photocopied reproduced or translated into another language without prior written consent from SmartAVI Technologies Inc 20170314 ...

Reviews: