background image

AuDIo:

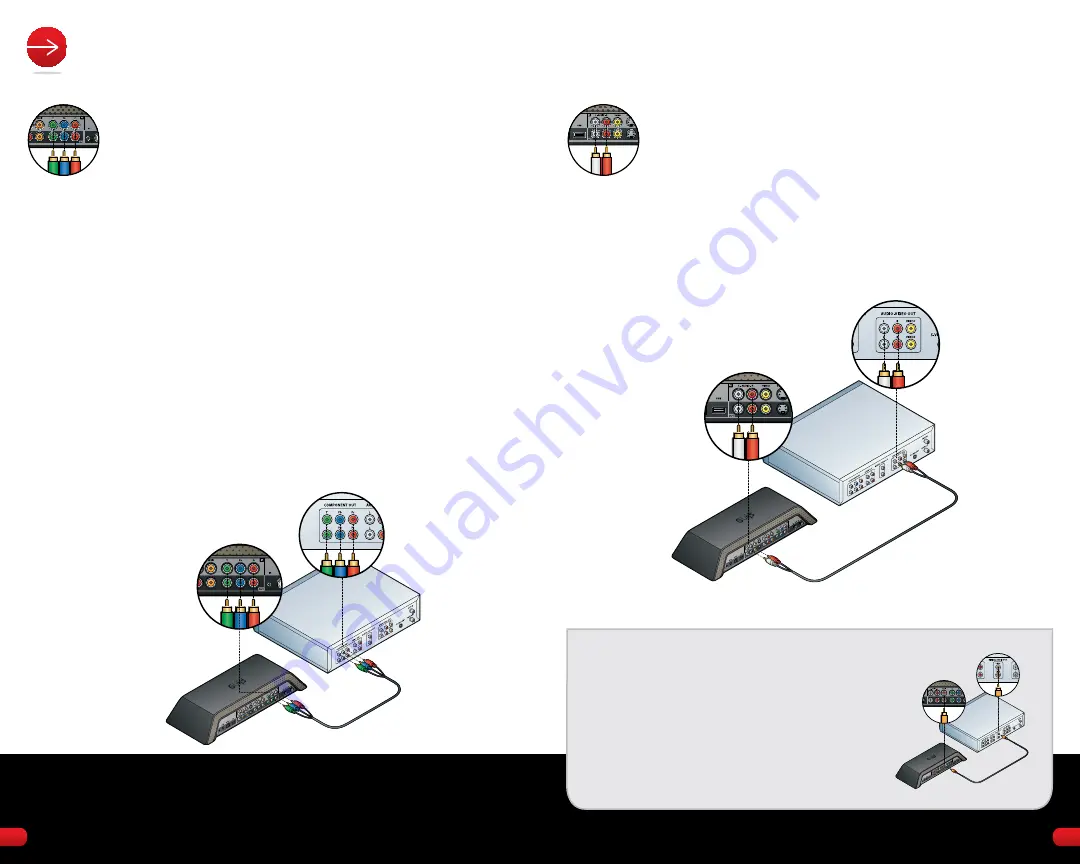
analog audio connectors are usually red and white. To connect 
using analog audio, use the included stereo audio cable. The 
red connector is for the right audio channel, and white is for the 
left audio channel. Insert one end of these audio cables into the 
jacks labeled In on your Slingbox PrO-HD. These jacks are also 
in the top row on the back of your Slingbox. Insert the other 
end into the audio output jacks on your a/V source. These jacks 
are typically labeled aUDIO OUT.

TIP:

 If your HD source has digital audio, connect it for 

better sound. Digital audio connections are usually 
orange. These connections are also called S/PDIF  
(Sony/Philips Digital Interface) audio. Connect one end 
of the S/PDIF audio cable (sold separately) to the orange 
jack labeled In on your Slingbox PrO-HD. Connect the 
other end to the output S/PDIF audio jack on your a / V 
source. These audio jacks are typically labeled DIgITaL 
aUDIO OUT or S/PDIF OUT.


 STEP 1:

 CONNECT YOUR HD SOURCE

VIDeo:

If you have a high-definition device, you can connect it to 
your Slingbox with the included component video cables. 
Component video cables have a set of green, blue and red 
connectors. Connect these cables to the component jacks 
labeled In on your Slingbox PrO-HD. These jacks are in the top 
row on the back of your Slingbox. Connect the other ends of 
the component cables to the output component jacks on your 
HD video source. 

If your HD a/V source is already connected to your TV with 
component cables, disconnect them from the TV and then 
re-connect these cables to the component In jacks on your 
Slingbox. Use the matching cable set included with your 
Slingbox to connect to the component OUT jacks on the back of 
your Slingbox, and then to the In jacks your TV. 

NOTE: THE SLINGBOX PRO-HD SUPPORTS RESOLUTIONS UP 
TO 1080i. IF  YOUR A/V SOURCE OUTPUTS 1080p, YOU MUST 
SET IT TO 1080i . THE  SLINGBOX WILL NOT WORK WITH 1080p.

5

4

Summary of Contents for Slingbox PRO-HD SBPB3051

Page 1: ...user GUIDE pro hd ...

Page 2: ...R NETWORK 10 STEP 6 attach the power adapter 11 STEP 7 INSTALL THE SOFTWARE 12 STEP 8 ENJOY YOUR SLINGBOX 12 TROUBLESHOOTING 13 technical specifications 14 Warranty Safety Regulatory 15 and Legal Information Welcome Thank you for purchasing the Slingbox PRO HD Follow these instructions to connect your new Slingbox and to start watching yourTV programs almost anywhere If you run into any problems a...

Page 3: ...TO 1080i THE SLINGBOX WILL NOT WORK WITH 1080p TIP Your Slingbox comes with component composite and coaxial cables to pass through connections to your TV or set top box Use the highest quality connection that your TV has available The Slingbox PRO HD supports connecting up to three audio video sources One high definition HD device using component cables for video You can use either analog or digit...

Page 4: ...your A V source These audio jacks are typically labeled DIGITAL AUDIO OUT or S PDIF OUT Step 1 CONNECT YOUR HD SOURCE VIDEO If you have a high definition device you can connect it to your Slingbox with the included component video cables Component video cables have a set of green blue and red connectors Connect these cables to the component jacks labeled IN on your Slingbox PRO HD These jacks are ...

Page 5: ...ur Slingbox Connect the other end of this video cable to the yellow video output jack on your SD video source If your SD A V source is already connected to your TV with composite cables disconnect them from the TV and then re connect these cables to the composite IN jacks on your Slingbox Use the matching cable set included with your Slingbox to connect to the composite OUT jacks on the back of yo...

Page 6: ...sensor shine a flashlight on the front of the device and look for a small bulb similar to the one on the end of the remote control IR cable To control more than one device you can use the multi head remote control IR cable that came with your Slingbox PRO HD You can use one or more IR heads per device as needed Step 3 CONNECT YOUR COAX SOURCE Coaxial cable carries both video and sound They re used...

Page 7: ...he reset button on the back for 10 seconds When you let go of the button the network light should come on See Troubleshooting on page 13 for more solutions or go to http support slingmedia com Step 5 LINK to your network Plug one end of the Ethernet cable into the Slingbox NETWORK jack Connect the other end into your router The Slingbox works with almost any router with a high speed Internet conne...

Page 8: ...ors on the back of the Slingbox and your A V devices The cables should fit snugly 6 If the SlingPlayer application is not controlling your A V source Make sure the remote control IR cable is fully inserted Move the IR emitters to a different location on the front of your cable satellite box or DVR 7 If yourTV is no longer receiving a signal Connect the output of the Slingbox to your TV s inputs Ma...

Page 9: ...l Sling Media Do If your Slingbox hardware product is defective Sling Media will repair or replace it with the same product or another product with similar features How Do You Get Warranty Service Please contact the Sling Media technical support team at 1 877 GO SLING option 4 to verify eligibility Once the Sling Media technical support agent determines that your eligible Slingbox product is defec...

Page 10: ... expense within 30 days from original shipment as long as it is in good condition Please contact the Sling Media Online Store billing support team at 1 877 GO SLING option 2 to obtain a Return Material Authorization RMA number Our agents will help you through the process through which you can return your product Products must be shipped to Sling Media s designated Returns Center using a trackable ...

Page 11: ...ervicing Do not attempt to service this product yourself as opening or removing covers may expose you to dangerous voltage or other hazards Refer all servicing to qualified service personnel Contact your local office for servicing information Damage requiring service Unplug this product from the wall outlet and refer servicing to qualified service personnel under the following conditions When the ...

Page 12: ...th the limits for a class B digital device pursuant to part 15 of the FCC Rules These limits are designed to provide reasonable protection against harmful interference in a residential installation This equipment generates uses and can radiate radio frequency energy and if not installed and used in accordance with the instructions may cause harmful interference to radio communications However ther...

Page 13: ...erms of the GNU Lesser General Public License http www gnu org licenses SoundTouch Library Copyright Olli Parviainen 2001 2005 Microsoft This product includes technology owned by Microsoft Corporation and under a license from Microsoft Licensing GP Use or distribution of such technology outside of this product is prohibited without a license from Microsoft Corporation and or Microsoft Licensing GP...

Page 14: ...10 24 25 NOTES ...

Page 15: ...pro hd ...

Reviews: