background image

-25-

-25-

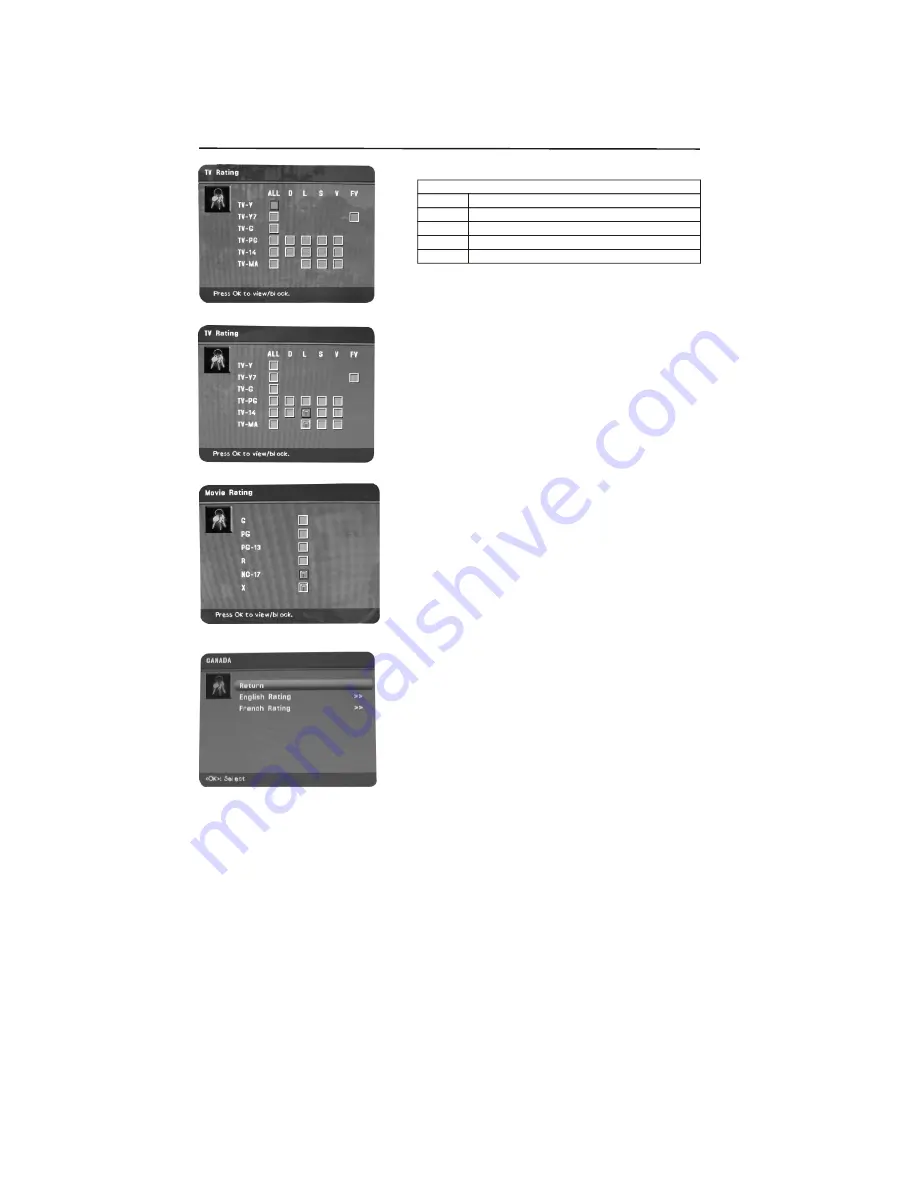
Blocking Specific Content Themes

You can block programs based on their content. 
(Content is represented by the 

D, L, S , V 

and 

FV 

on 

your screen.) When you block a content theme for a 
particular rating, you automatically block that content 
theme for higher rated programs as well. To block 
program content:
1. Determine the content themes you want to block.
2. Press the down arrow button to scroll to the rating 
    whose content theme you want to change.
3. Press the right arrow button to move the highlight 
    to a particular content theme.
4. Press the OK button to change its status to block. 
    (For example, you block the language (L) 
    corresponding with TV-14. The language for TV-
    MA is blocked as well.)
To view content theme after you've locked them, 
follow the same steps as above to unlock.
Note that if you unlock the language corresponding 
with 

TV-14

, the language for 

TV-MA 

doesn't unlock. 

You have to unlock the content theme status for each 
rating separately.

                        Content Themes
D

         Sexually explicit dialogue

L

         Adult language

S

         Sexual situations

V

         Violence

FV

         Fantasy Violence

You can automatically block all program ratings 
above a specified age-based rating level.
1. Choose 

Parental control 

from the Main Menu. If 

    Parental controls have previously been locked, you 
    must enter your password.
2. Highlight and select 

V-Chip

. Then highlight and 

    select 

US V-Chip

.

3. Highlight and select 

TV Ratings

.

4. Press the up or down arrow button to scroll to the 
    rating corresponding with the lowest rating you do 
    not want the child to watch.
5. Press the OK button to toggle between 

View 

and 

    Block

. The status for the rating and all higher 

    ratings automatically changes to Block.
6. Repeatedly press the MENU button to get back to 
    the 

Parental Control 

menu.

7. Select 

Lock Parental Control 

from the Parental 

    Control menu for rating limits to take effect, you 
    must press OK and enter a 4-digit password. To 
    view age-based ratings after you've locked them, 
    follow the same steps as above to unlock.

Parental Control Menu

Summary of Contents for SKYWORTH SLTV-32L29A-2

Page 1: ...Description MODEL Engineering Dept Artwork By Checked By Approved By Brand Name JOB NO Date Date Date MANUAL 8R28 2009 05 20 32L29 95054U SKYWORTH SLTV 32L29A 2 SIZE A5 ...

Page 2: ... menu option to CATV Cable Television PORTABLE CART WARNING 9 VENTILATION Slots and openings in the cabinet back or bottom are provided for ventilation to ensure reliable operation of the unit and to protect it from overheating These openings should never be blocked by placing the unit on a bed sofa rug or other similar surface This unit should never be placed near or over a radiator or heat sourc...

Page 3: ...antenna discharge unit connection to grounding electrodes and requirements for the grounding electrode 18 SERVICING Do not attempt to service this unit yourself as opening or removing covers may expose you to dangerous voltage or other hazards Refer all servicing to qualified service personnel A When the power supply cord or plug is damaged B If liquid has been spilled or objects have fallen into ...

Page 4: ...in the TV 12 Put Batteries in the Remote 12 Turn on the TV 12 How to Use the Remote Control to Complete the Initial Setup 12 Complete the Initial Setup 12 Set the Menu Language 12 Complete Channel Setup 12 What To Expect 13 Watching TV 13 Changing Channels 13 Explanation of Jacks in alphabetical order 13 Buttons and Other Jacks On Your TV 14 Side Panel Buttons 14 Using the Remote Control The Butto...

Page 5: ...ange Password 27 US V Chip Rating System 32 Canadian English V Chip Rating System 32 Canadian French V Chip Rating System 33 Frequently Asked Questions FAQs 28 Care and Cleaning 28 Troubleshooting 29 31 TV Problems 29 Problems with HDMI connection 30 The remote control dones t work 31 Problems with V Chip Parental controls 31 What else can I do 31 V Chip Rating Explanations 32 33 34 Warranty Card ...

Page 6: ...the product is installed with the screen in landscape orientation Any 90 clockwise or counterclockwise installation may induce poor ventilation and excessive component damage Preparing Your LCD TV For Wall Mounting The HDTV can either be kept on the stand base or mounted to the wall for viewing If you choose to mount the HDTV to the wall please follow the instructions below To Remove The Stand Bas...

Page 7: ...r place it on the top shelf so the heated air from it won t flow around other devices Position Cables Properly to Avoid Audio Interference Insert each cable firmly into the designated jack If you place devices above the TV route all cables down the side of the back of the TV instead of straight down the middle If your antenna uses 300 ohm twin lead cables do not coil the cables Also keep the twin ...

Page 8: ...l analog and digital stations are available using a certain antenna When you are ready to watch channels the channel banner displays the type of channel you re viewing Look for a D at the bottom of the screen for digital channels look for an A for analog channels There are several ways to connect your TV Please use the following chart to determine which connection is best for you Proceed to the ap...

Page 9: ...t Video Advanced Connection This is an example of a connection using the Component Video jacks Video Basic Connection This is an example of a connection using the composite video jack 8 8 Connections and Setup ...

Page 10: ...e Video Output jack on the DVD player 3 Connect your red and white audio cables Connect the audio red and white cables to the VID1 R and L Audio jacks on the back of the TV and to the Audio Output jacks on the DVD player This connection allows you to connect a device that has Y Pb Pr jacks for example a DVD player Using the example of a DVD player 1 If necessary connect your cable and or off air a...

Page 11: ... an integrated mini plug cable Since HDMI technology is based on Digital Visual Interface DVI the jack on the back of your TV is also compatible with devices that have a DVI output jack Using the example of a set top box If your set top box has an HDMI jack connect an HDMI cable Connect an HDMI cable to the DVI Input jack or the HDMI jack if it is more convenient on the back of the TV and to the H...

Page 12: ... until you enter PRESET MENU select the item PC Sound Source and then use left or right arrow button to select PC or AV PC Connecting This connection allows you to connect to a personal computer 1 If necessary connect your cable and or off air antenna as described on page 12 2 Connect your monitor cable Connect one end of a 15 pin monitor cable to the PC VIDEO jack on the TV and the other end to t...

Page 13: ...To choose another language press the LEFTor RIGHT arrow button until that language is highlighted and press the OK button Complete Channel Setup Make sure you ve connected the TV to cable or an off air signal before you start the next part of the setup Set the Signal Type From the Channel menu Select Auto Channel Search Press the left or right arrow button to high light Signal Type If you connecte...

Page 14: ...Coaxial Use a digital coaxial cable to connect your TV to a compatible audio receiver AUDIO VIDEO INPUT AV1 Lets you connect a device that has composite video jacks such as a VCR or DVD player L AUDIO Provides left audio connection when using the VIDEO INPUT1 and Component Video jack The left audio connectors usually white For mono audio sources be sure to use the Left audio input R AUDIO Provides...

Page 15: ...u system selects highlighted items when press the button MENU Brings up the TV Main menu When in the menu system it displays sub menus and selects highlighted items VOL Increases the volume VOL Decreases the volume CH Scans up through the channel list In the menu system up selects items when press the button CH Scans down through the channel list In the menu system down selects items when press th...

Page 16: ... or press CH or CH buttons GO BACK Returns you to the previous channel VOL or VOL Decreases or increases the TV s volume SUB CH To enter the digital channel with the button INFO Press once to display the channel banner press again to remove the menu CH or CH Scans up or down through the current channel list Press once to change the channel up or down press and hold to continue changing channels Ar...

Page 17: ...lay the electronic program guide EPG when available PRESETS Press the button to enter the PRESETS menu Display Picture and Sound preset CC Setting Current Audio SLEEP Press to display the TIME menu and set Sleep Timer CC Press to select Closed Caption OFF CC display Muted on V CHIP Press to display the Parental Control Submenu directly FREEZE Press to freeze the picture TIME Press to display the c...

Page 18: ...u contains menus and controls to configure how the picture looks The Picture menu options apply to the video for the main TV and video input selections All picture options can be applied to each input TV VIDEO CMPT HDMI and PC Picture Settings Preset Displays a choice list that lets you select one of the preset picture settings SOFT NATURE BRIGHT or PERSONAL Choose the setting that is best for you...

Page 19: ... might not be available for digital video Film Mode 3 2 Pull down Automatically detects video sources that were originally recorded on film like most movies and subsequently converted to a different format for TV broadcast for example Film mode processes the converted signal so that it looks as close as possible to the original Another name for this process is reverse 3 2 pull down The On setting ...

Page 20: ...reo appears in the channel banner when you tune to a program that is broadcast in stereo Second Audio Program SAP Plays the program s audio in a second language if one is available The letters SAP appear in the channel banner when you tune to a program that is broadcast with SAP information SAP audio is broadcast in mono SAP is also used to broadcast a program s audio with descriptions of the vide...

Page 21: ...lay your Favorite channel in the list Highlight the EDIT CHANNEL NAME and press OK to select the submenu of Favorite channel then press OK you may select MAX 6 channel in the list AUTO CHANNEL SEARCH Selects Auto Channel Search then press OK to access the Auto Channel Search menu Signal Type Choose the type of signal you have connected to the ANTENNA CABLE INPUT Auto Channel Search Searches for ch...

Page 22: ...that your favorite in list 21 21 Channel Banner There are several indicators that might appear when you press the INFO button on the remote This display is called the Channel Banner The following list describes the items on the Channel Banner screen left to right and top to bottom D14 10 The D means it s a digital channel If it s an analog channel A is displayed The channel sub channel if availabl...

Page 23: ...to CC1 which displays complete text of the program in the primary language in your area Digital CC Type If available lets you select a closed caption service mode 1 6 for digital channels Digital CC Preset If available lets you select between Default and Custom options Custom changes according to what you set for the options below Digital CC Style If available lets you customize the following disp...

Page 24: ...ntic Newfoundland Samoa Hawaii Alaska Pacific Setup Time Lets you choose the time you want Highlight your choice and press OK enter num buttons that you want Auto clock when you choose ON the time come from broadcasting information when you choose OFF you may set the Setup Time item Sleep Timer Lets you choose the off TV time from OFF 30min 60min 90min 120min 150min and 180min Using The Menu Syste...

Page 25: ...press OK to enter your password and temporarily deactivate the parental controls Broadcasters are not required to provide content themes so programs received with no content themes will only be blocked if you block their age based rating You can also block out programs that have been given an exempt rating and programs that are considered unrated Selecting this option lets you lock and unlock Pare...

Page 26: ...o unlock the content theme status for each rating separately Content Themes D Sexually explicit dialogue L Adult language S Sexual situations V Violence FV Fantasy Violence You can automatically block all program ratings above a specified age based rating level 1 Choose Parental control from the Main Menu If Parental controls have previously been locked you must enter your password 2 Highlight and...

Page 27: ...y block the higher rated programs as well To block Canadian English and French program ratings 1 Press MENU on the remote control the TV s Main Menu appears 2 Select Parental Control 3 Select V Chip 4 Select Canada V Chip 5 Highlight English Ratings or French Ratings and press OK 6 Press the down arrow button to scroll to the rating you want to change 7 Press the OK button to change its status to ...

Page 28: ...ion while you have the side panel blocked Don t forget to lock parental controls after you change the status If you don t the Block Buttons action will not take effect Change Password This option let you set a new V chip password 1 Press MENU on the remote control the TV s Main Menu appears 2 Select Parental Control 3 Select Change Password and press OK to display the password resetting menu 4 Usi...

Page 29: ...nges as you press the ZOOM Left and Right arrows buttons and the format type is displayed at the bottom of the screen Some channels are enabled by the cable company that don t carry programming such as video on demand When channels are unavailable your TV s screen is blank or appears like snow You probably want to get rid of these so they no longer appear in your channel list Remove these in the C...

Page 30: ...e getting no picture from a device you ve connected to your TV you might have your video cable connected to the VIDEO OUTPUT jack on the back of your TV These jacks are used to connect recording devices Ayellow Video cable connects to the yellow VIDEO input jack on the side or back of your TV 3 Check antenna connections Make sure all of the cables are firmly connected to the jacks 4 Try adjusting ...

Page 31: ...tion in the Setup menu Problems with HDMI Connection 1 Make sure the HDMI or DVI device is turned on and the cables are firmly connected If problems still occur turn off your device Re connect your device Reset the power by unplugging the power cord and plugging it back in 2 If you are tuned to the HDMI 1 or 2 input and you re receiving Unusable Signal message on screen press the INFO button on th...

Page 32: ...ld VOL UP on the side panel and CLEAR on the remote for 10 seconds Next time you enter the Parental control menu enter a new password The V Chip won t let me watch a program even though it s not rated as violent 2 Maybe the movie was given an NR Not Rated status After you block movie ratings you must set NR to View separately in order to view movies with an NR rating What Else Can I Do If you ve b...

Page 33: ...en younger children Canadian English V Chip Rating System 18 Adult Programming intended for adults 18 and older It may contain elements of violence language and sexual content which could make it unsuitable for viewers under 18 Violence Guidelines Maycontain violence integral to the development of the plot character or theme intended for adult audiences Other Content Guidelines May contain graphic...

Page 34: ...ian French V Chip Rating System 18 Adult Programming is for adults only This program contains sustained violence or extremely violent scenes 16 Viewer 16 and over Programming is not suitable for those under age 16 This program contains frequent scenes of violence or intensely violent scenes 13 Viewer 13 and over Programming may not be suitable for children under the age of 13 This program either c...

Page 35: ...ution 1366 x 768 Brightness 500cd m Contrast 800 1 Type Viewing angles Terminals HDM1I HDMI2 VGA Component AV1 AV2 Eeaphone out S PDIF out OSD language English Spanish German Operating temperature 32F to 104F 0C to 40C Weight with stand 11 5kg Dimension with stand 778 x 220 x 560mm Accessories User manual Remote controller AAA Battery 3 EA Warranty card Note Design and specification modification m...

Page 36: ... 35 35 ...

Page 37: ... 36 36 8R28 ...

Reviews: