SKY-WATCHER Star Discovery Mount Instruction Manual Download Page 21


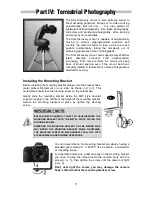
Part V: Astronomy with the SynScan Version 4 

20 


4.  If  the  1st  alignment  star  is  not  a  planet,  the  SynScan  hand  control  will  now  display 

“Alignment Successful”. Press 

(

ENTER

)

 to complete the alignment process. 


The 2-Star Alignment Method 

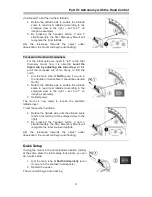
Aligning the 1st Star: 

1. 

The  LCD  screen  displays  “Choose  1st  Star”  in  the  first  line.  Use  the  scrolling  keys  to 
browse  through  a  list  of  star  names  and  Press 

(

ENTER

)

  key  to  pick  the  one  on  the 

screen as the 1st alignment star. 

2.  Now  the  screen  will  dis

play  “Point  scope  to  ZZZ  zz.z’  TT  tt.t’  ”,  which  means  point  the 

telescope to the direction whose azimuth is ZZZ degree, zz.z minutes and whose altitude 
is TT degree, tt.t minutes. This is also the direction of the selected 1st alignment star. 


The  mount 

can  be  manually  moved  to  the  star’s  position,  then  direction  keys 

used  on  the  SynScan  hand  control to move  the  mount  to center  the  star  in  the 
field of view of the finder scope. By default the SynScan hand control will select a 
medium speed. Please see als

o chapter “

Moving the mount around

” to select 

any other usable slewing speed. 

3.  Press ENTER key to proceed to the next step. 

4. 

Now the screen will display “Ctr. to eyepiece” and the name of the selected 1st alignment 
star. The star should be visible in the field of view of the telescope’s eyepiece if the finder 
is  correctly  aligned.  Use  the  direction  keys  to  center  the  star  in  the  eyepiece  and  then 
press the 

(

ENTER

)

 key to proceed to the next step. 


During this step the mount will select a slow speed allowing centering the star in 
the eyepiece field of view easily. Don’t move the mount manually, otherwise you 
will “overshoot” the star position and lost it. If the proposed speed is inadequate 
you can change it like explained in chapter 

Moving the mount around.


Aligning the 2nd Star: 

1. 

The LCD screen displays “Choose 2nd Star”. Use the scrolling keys to browse through a 
list  of  star  names  and  Press 

(

ENTER

)

  key  to  pick  the  one  on  the  screen  as  the  2nd 

alignment  star. 

The  mount  will  then  automatically  slew  and  point  the  telescope 

towards the 2nd alignment star in the sky. 

2. 

After the mount stops, the hand control will display “Ctr. to eyepiece” and the name of the 
selected  2nd  alignment  star.  The  telescope  should  point  rather  closely  to  the  2nd 
alignment star (generally, in the field of view of the finder scope.) 

3.  Use  the  direction  keys  to  move  the  telescope  to  align  with  the  2nd  alignment  star.  To 

align,  center  the  2nd  alignment  star  in  the  field  of  view  of  the  finder  scope,  and  then 
center it in the field of view of the telescope’s eyepiece.  Press 

(

ENTER

)

  key  to confirm 

centering of the star and proceed to the next step. 


After  pressing 

(ENTER)

  to  complete  the  alignment  process  the  SynScan  hand 

control will display the alignment menu again. Press the button 

(ESC)

 twice until 

the SynScan hand control displays « CHOOSE MENU » 


During this step the mount will select a slow speed allowing centering the star in 
the  finder  field  of  view  easily.  If  the  proposed  speed  is  inadequate  you  can 
change it like explained in chapter 

Moving the mount around.


Summary of Contents for Star Discovery Mount

Page 1: ...INSTRUCTION MANUAL Star Discovery Mount Copyright Sky Watcher SL26032014 V1...

Page 2: ...IV Terrestrial Photography Installing the Mounting Bracket 11 General Operations 12 Setting and retrieving preset positions 12 Camera Cruising Function 13 Video Cruising and Time Lapse Photography Fu...

Page 3: ...ted Freedom Find TM technology like the biggest Sky Watcher mounts After moving to a new object the telescope will automatically begin to track the new object accurately No re setup is required in one...

Page 4: ...Leg support for Hand Controller A3 Mounting bracket assembly Common Parts 1 The Star Discovery mount 2 The tripod with adjustable legs 3 The accessory tray Specific Parts to SD GoTo B1 SynScan version...

Page 5: ...just the clutch knob Fig 6 to obtain a locking force enabling the main tube to be pushed manually while staying steady once released The final step is to connect the controller to the mount On the arm...

Page 6: ...iece is its focal length expressed in mm It is important because the enlargement provided by the eyepiece is directly linked to its focal length Here is the formula to calculate the enlargement provid...

Page 7: ...lace Please install the eyepiece as follow For reflectors Fig 9 Unscrew the thumbscrews on the end of the focus tube then insert the desired eyepiece and re tighten the thumb screws to hold the eyepie...

Page 8: ...way then turn the knurled ring at the end of the finder scope until the image is in focus Fig 1 NEVER LOOK DIRECTLY AT THE SUN WITH THE FINDER SCOPE IT COULD IMPAIR DEFINITIVELY YOUR VISION Choose a d...

Page 9: ...proposes two red light models SKU 92015 a voltage regulated LED flashlight that emits soft red light to assist telescope operation with adjustable brightness and SKU 92010 a multipurpose flashlight wi...

Page 10: ...n the Southern Hemisphere it should be oriented North 2 Rotate the altitude axis to enable the altitude scale to read local latitude according to the enlarged view to the right set to 21 on image as e...

Page 11: ...on off by simultaneously pressing the buttons 1 and 2 While tracking the backlight of the button representing the current selected speed will flash If tracking is off the backlight will be continuousl...

Page 12: ...he mounting bracket please note the bracket has a metal plate reinforcement on one side as shown in Fig 1 This metal plate should face the blocking screw on the vertical axe Gently slide the mounting...

Page 13: ...perations The hand control always activates the celestial object tracking function after power is turned on For terrestrial application user could press buttons 1 and 2 simultaneously to turn off the...

Page 14: ...e starts the cruising again This function can be turn on off by pressing GO buttons when the mount is in Camera Cruising operation 3 By default when the mount stops at a pre stored position the active...

Page 15: ...and d positions are skipped A position which is not set after turning on power will also be skipped during cruising If both axes positions are changed between two preset points the axis with shorter s...

Page 16: ...sition after it finishes the photography 5 Start panoramic photography Press buttons a and c simultaneously to start taking panoramic pictures The mount will start taking pictures from the preset lowe...

Page 17: ...er EQ8 mount After moving to a new object the telescope will automatically begin to track the new object accurately No re setup is required in one observing session Moving the mount around In many sit...

Page 18: ...al setup 1 Once the mount has been leveled and powered please see the SynScan Version 4 will start the initialization process by displaying the Firmware Version Press ENTER to proceed to the next step...

Page 19: ...croll keys to select Yes or No YES indicates the time entered in the previous step is daylight saving time while NO indicates the time entered is in standard time Press the ENTER key to confirm and pr...

Page 20: ...is step the mount will select a slow speed allowing centering the star in the eyepiece field of view easily Don t move the mount manually otherwise you will overshoot the star position and lost it If...

Page 21: ...o the next step During this step the mount will select a slow speed allowing centering the star in the eyepiece field of view easily Don t move the mount manually otherwise you will overshoot the star...

Page 22: ...p continued on p24 Locating NGC Objects Press the NGC 5 shortcut key to access the NGC catalog The screen will display NGC Catalog NGC The NGC catalog index number ranges from 1 to 7840 Use the number...

Page 23: ...see below h Double stars please see below i Variable stars please see below j Deep Sky Tour same as TOUR 1 button menu k User Objects same as USER 9 button menu Press ENTER key to select the desired m...

Page 24: ...ng The screen will display Save Press the ENTER key again to start saving the coordinates Users should use the scroll keys to select a storage space index number between 1 and 25 and press the ENTER k...

Page 25: ...selected object The screen will display View Object Press the ENTER key to have the mount slew towards the target When the mount stops the SynScan hand control will return to the previous step The mo...

Page 26: ...SynScan Version 4 menu tree The SynScan Version 4 menu tree is a useful reference to the menus that the controller will display when connected to the Star Discovery Mount In this manual only the most...

Page 27: ...ity Choosing the best time to observe The best conditions will have still air and obviously a clear view of the sky It is not necessary that the sky be cloud free Often broken cloud conditions provide...

Page 28: ...support available alongside with the list of distributors and dealers worldwide on our worldwide internet site http www skywatcher com Sky Watcher offers this product with the best available quality i...

Reviews: