


19
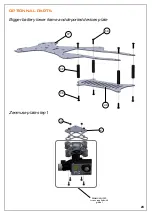
ATTACHING A ZENMUSE GIMBAL
If you install or are going to install a DJI ZENMUSE H3 3D Gimbal, now install the spacers (22) un
-
der the lower frame (21) with the 3 x 5 mm button head screws (5).
You have the choice between a centered or forward position.
Do not forget to use some thread lock as the screws will be hard to reach after the frame is assem
-
bled
22
ZENMUSE H3-3D
WITH ZENMUSEʼS
PROVIDED SCREWS
21
5
Forward position for Zenmuse
Centered position for Zenmuse
Summary of Contents for Little Spyder
Page 1: ...LITTLE SPYDER Manuel d utilisation Instruction Manual LITTLE SPYDER ...
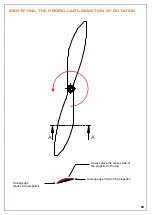
Page 13: ...13 CW CW CCW CCW AIRCRAFT MOTOR ROTATION AND IDENTIFICATION ...
Page 25: ...25 Zenmuse plate step 2 22 5 41 5 ZENMUSE H3 3D ...
Page 29: ...29 APPENDIX 1 ESC MANUAL ...
Page 30: ...30 SKY HERO 42 rue des Vétérinaires 1070 Anderlecht Belgique SAV sky hero com 32 0 23301845 ...