


10
•
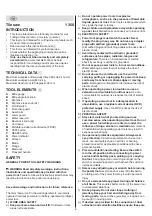
Filling water reservoir
e
-
fill the water reservoir J with clean tap water (stop at
MAX indication of the lower guard)
! lack of water may damage the saw blade and will
result in saw dust in the air
-
after use, discard waste water in accordance with local
regulations
•
Rip fence / mitre gauge
r
-
install the rip fence C as shown and lock knobs D
-
slide the mitre gauge A on the rip fence C
•
On/off
t
-
the tile saw is equipped with a portable residual current
device (PRCD) M
8
b
-
always test the PRCD before use:
1. plug the PRCD into the mains socket
2. press RESET button P (power indicator Q is red)
3. press TEST button N (power indicator Q is black)
4. press RESET button P to activate the PRCD
! do not use the tool if the PRCD fails the test
! never stand directly in line with the saw blade
-
switch on/off the tool by pushing switch E
8
in “I”/”O”
position
! in case of current interruption or when the plug is
accidentally pulled out, the tool will not restart on
its own
-
make sure that switch E is in OFF position
-
press RESET button P (power indicator Q is red)
•
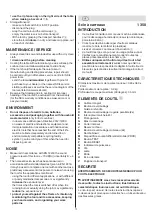
Making a cut
y
-
set the protective guard slightly higher than the
workpiece and lock with knob
-
loosen knob D on each side
-
adjust rip fence to the desired distance to the blade by
using the scale
-
tighten knob D on each side
! make sure that the rip fence is parallel to the blade
! make sure that the workpiece is not in contact
with the saw blade
-
turn on the tool
-
the tool should run at full speed before the blade enters
into the workpiece
-
hold the workpiece firmly against the rip fence and feed
it into the blade with a steady even pressure (do not
force)
! never place your hands in the path of the saw
blade
-
turn off the saw when the cut is complete
-
wait until the blade has come to a complete stop before
removing any part of the workpiece
•
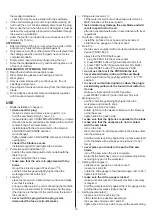
Setting mitre angles
u
-
slide the mitre gauge A on the rip fence C
-
loosen lock knob B
-
rotate the mitre gauge to the desired angle (-45° to 45°)
-
tighten lock knob B
! make sure the mitre gauge is locked
-
make some trial cuts and measure if extreme accuracy
is required
-
hold the workpiece firmly against the mitre gauge while
guiding the workpiece slowly forwards
•
Setting bevel angles
i
-
loosen knob K on each side
i
a
-
tilt the table to the desired bevel angle
-
the saw has end stops at 0° and 45°
-
tighten knob K on each side to secure the bevel setting
the wedged workpiece
-
check if the rip fence is parallel with the sawblade
•
If the cord is damaged or cut through while working, do
not touch the cord, but immediately disconnect the plug
•
Never use the tool when the cord is damaged; it must be
replaced by a specially prepared cord available through
the service organization.
•
Allow the tool to cool down after a continuous use of 10
minutes (S₂ 10 min.)
AFTER USE
•
After switching off the tool, never stop the rotation of the
accessory by a lateral force applied against it
•
Only remove cut-offs or other parts of the workpiece from
the cutting area when all moving parts have come to a
complete standstill
•
Empty water reservoir before transporting the tool
•
Store the tool
indoors
in a dry and locked-up place, out
of reach of children
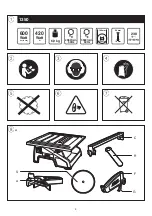
EXPLANATION OF SYMBOLS ON TOOL
2
Read the instruction manual before use
3
Wear protective glasses and hearing protection
4
Wear gloves
5
Only use saw blades with a continuous rim, free of
openings and grooves
6
Keep fingers, hands and arms away from the rotating saw
blade
7
Do not dispose of electric tools and batteries together
with household waste material
USE
•
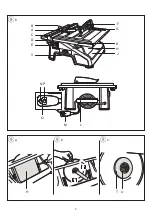
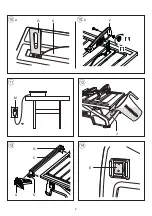
Blade installation / change
9
! disconnect the plug
-
loosen 2 screws and remove lower guard H
9
a
-
hold the saw blade firmly by hand
9
b
-
loosen blade nut U COUNTERCLOCKWISE (= in same
direction as arrow printed on saw blade) with wrench R
-
remove flange T and saw blade
9
c
-
install blade with the arrow marked on the blade in
COUNTERCLOCKWISE direction
-
mount flange T
-
tighten blade nut U CLOCKWISE with wrench R (do not
overtighten)
! check if the blade is secure
-
install lower guard H and tighten the 2 screws
•
Protective guard installation
q
-
position the protective guard arm G underneath the
table top
q
a
-
insert and tighten the 2 screws
! make sure that the arm is in alignment with the
blade
-
mount the protective guard F as shown
q
b
-
set the protective guard slightly higher than the
workpiece and lock with knob
•
Location
w
-
place the tile saw on a flat and level surface and make
sure that it is stable
-
arrange a drip loop in the cord connecting the machine
to mains to prevent water from dripping onto the plug
(the drip loop is that part of the cord below the level of
the socket)
9
! never touch the plug when the plug is wet,
disconnect the fuse or circuit breaker
Summary of Contents for 1350
Page 5: ...8 9 9 9 5 F G K H J b a L M H T U Q N P b c B A C D E V ...
Page 6: ...6 q w r e t q a b G M D A J S F E D C ...
Page 7: ...ACCESSORIES WWW SKIL COM u i i a b 7 y y a b K A D C B ...
Page 125: ...125 ...
Page 132: ...132 u i i a b y y a b K A D C B WWW SKIL COM ...
Page 133: ...133 q w r e t q a b G M D A J S F E D C ...
Page 134: ...134 8 9 9 9 F G K H J b a L M H T U Q N P b c B A C D E V ...
Page 136: ... البالط منشار كونينانبرج ڨ ب سكيل هولندا بريدا د ب 2340135001 07 21 1350 ...


