Site Buddy PROFESSIONAL SERIES 30TP Owner'S Manual Download Page 9


PRE-OPERATION PREPARATION


Suction Hose


The first step in preparing the pump for operation is to install the suction 

hose. For 

the suction hose, 

use a reinforced-wall or wire braided hose to prevent suction collapse. A short hose is recommended 

over a 

long 

hose. 

The

 pumps have standard National Pipe Threads on them; therefore, any 

standard 

hose set will 

fit with the pump. 

If your hoses 

arc 

metric threads or any other standard, please give our 

company a call and we may carry a 

full line of 

adapters or provide 

you with a 

possible solution.   


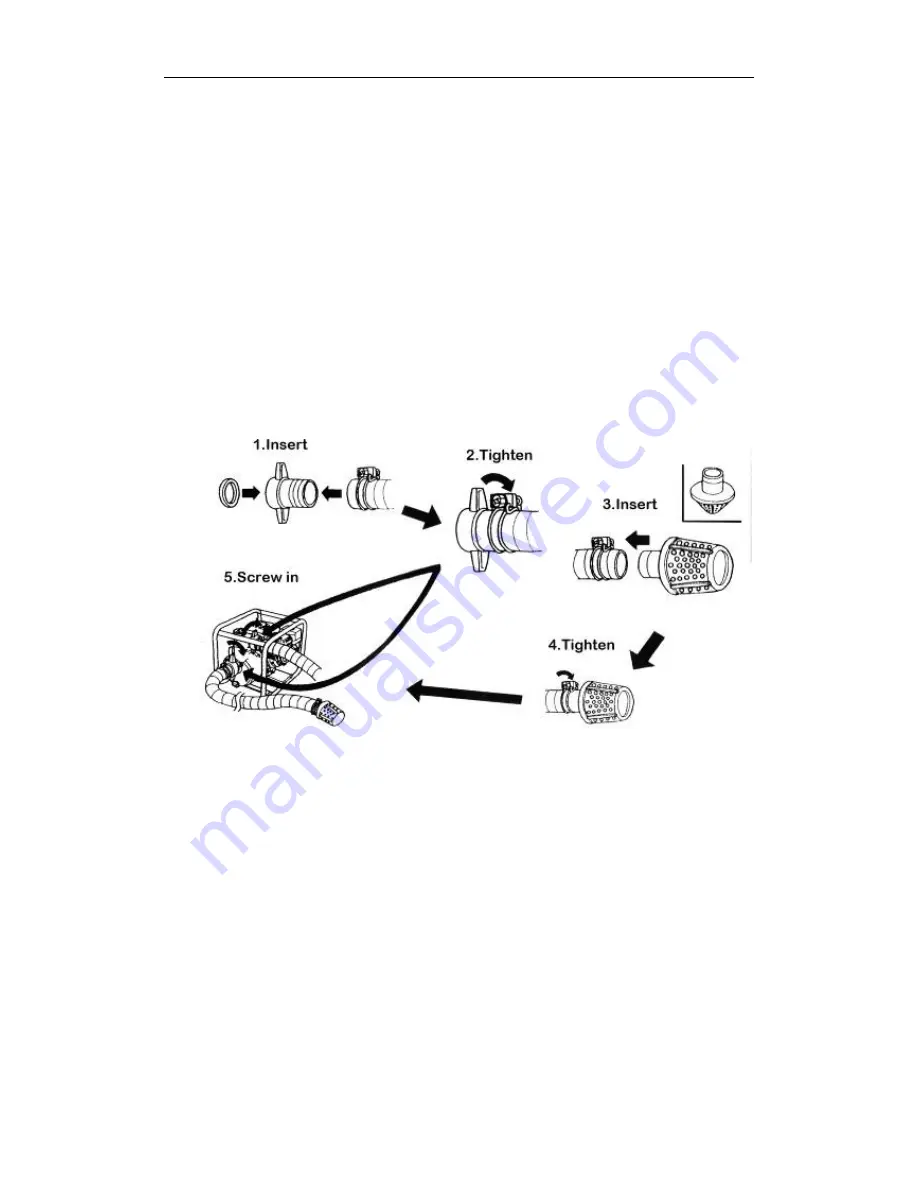
NOTE: Always install the provided strainer on the end of the suction hose before pumping. If gravel or 

debris enters the pump, the impeller can he seriously damaged.   


Shown below 

is 

the pump hose utilizing 

barbed connection and hose clamp. If you already 

have specialized hose, disregard the following diagram. When using the barbed connection 

setup, make sure to use a hose clamp to properly secure the hose to the barb connector. 


Discharge hose   

The second step is 

to 

install the discharge hose. The discharge hose can be fabric, just make 

sure to use a hose clamp to secure the hose to the barb. This will prevent the hose from 

disconnecting under high pressure.   

Note: A short and large-diameter hose is preferred over any other. A 

short and large 

diameter 

will 

provide lower 

fluid 

friction 

and 

improve efficiency. 


Summary of Contents for PROFESSIONAL SERIES 30TP

Page 1: ...OWNER S MANUAL DIESEL POWERED TRASH PUMP IMPORTANT Please make certain that persons who are to use this equipment thoroughly read and understand this user s manual prior to operation ...

Page 2: ...all us concerning missing parts service questions operating advice and or assembly questions Our diesel powered water pumps have some of the following features Lightweight construction Hard working four stroke diesel internal combustion engine Large fuel tank High quality mechanical seals Self priming structure The air cooled diesel semi trash pumps are self priming single stage centrifugal water ...

Page 3: ...TECHNICAL SPECIFICATIONS 2 WATER PUMP SAFETY PRECAUTIONS 4 KNOWING YOUR SEMI TRASH PUMP 5 PRE OPERATTON PREPARATION 6 STARTING THE ENGINE 10 OPERATION 14 STOPPING THE ENGINE 15 MAINTENANCE 16 IRAN SPORTING AND STORAGE 20 TROUBLESHOOTING 21 PUMP DIAGRAMS AND PARTS LISTINGS 23 ...

Page 4: ...OVERVIEW OF VARIOUS MODELS OF WATER PUMPS Figure 1 Overall view of the diesel water pump unit PROFESSIONAL SERIES MODEL ...

Page 5: ...ameter mm 80 Discharge port diameter mm 80 Suction height m 7 Pump lift m 25 Pump Displacement m3 55 Engine TP178E Speed rpm 3600 Displacement cc 296 Max Output kw 4 0 Cooling system Forced air cooling by flywheel Ignition Direct fuel injection Engine Shaft rotation Clockwise from flywheel end ...

Page 6: ...Wiring Diagram optional for electric start models only ...

Page 7: ...objects or liquids close to the pump Before operating your semi trash pump please check your local laws and regulations before operating your pump It is illegal in some areas to operate an engine without a spark arrester Know all the pumps controls and know how to stop the pump quickly in the event of an emergency Do not let anyone without proper instructions operate the pump Always keep children ...

Page 8: ...KNOWING YOUR WATER PUMP STANDARD MODEL Fuel cap Muffler Cleaner Recoil Starter Oil drain plug Oil Depth Gauge and Inlet Port Suction Port Priming water filler cap Outlet ...

Page 9: ...strainer on the end of the suction hose before pumping If gravel or debris enters the pump the impeller can he seriously damaged Shown below is the pump hose utilizing a barbed connection and hose clamp If you already have specialized hose disregard the following diagram When using the barbed connection setup make sure to use a hose clamp to properly secure the hose to the barb connector Discharge...

Page 10: ... clean and insert the dipstick back into the oil filler neck Do not screw it in Please refer to Fig 2 1 If the level is low fill engine oil to the top of the oil filler neck with the recommended oil below Fig 2 1 Illustration of checking the engine oil Below is a table of recommended oil grades for the engine in various weather conditions Please use the proper oil according to the Table 2 1 Table ...

Page 11: ...el number 2 which can be easily obtained from a gas station Do not use other fuels until consulting with your local dealer or our company Do not smoke or allow flames or sparks to get near fuel Always refuel your engine in a well ventilated place Do not overfill the tank and always close the filler cap securely ...

Page 12: ...lean the air filter if necessary Priming water The pump chamber should be completely filled before operating Note Never operate the pump without priming water or the pump will overheat Prolonged operation of the pump under these dry conditions will damage and destroy the seal Follow these guidelines to fill the pump with priming water ...

Page 13: ...STARTING THE ENGINE Recoil Starting Note When the engine is running do not pull the recoil handle otherwise the engine may be damaged ...

Page 14: ......

Page 15: ...ng to start the engine again 1 Battery a Always check the liquid level of the battery every month if the level is lower than the low limit mark refill the battery with distilled water till you reach the upper limit mark If the liquid level in the battery is to low the electric stater will not function to its best potential Always keep the level of the liquid in the battery between the upper and lo...

Page 16: ...lid plug is provided instead Warning Never use flammable liquids as fuel such as gasoline etc Also never take away the air cleaner for easy starting of the engine doing so may cause explosions from the intake gases Never take the oil plug unless you re planning on filling the oil If the plug is not in place rain dust and other impurities may be sucked into the engine causing serious damage to the ...

Page 17: ...ount of decrease can be estimated by subtracting 10 meters from the local atmosphere value If you are using sour pump at high altitudes and having difficulty obtaining NPSH values please consult your local power equipment dealer It is better to use a straight and short pipeline when operating the water pump A short and straight pipeline will minimize the frictional loses in the pipeline The pipeli...

Page 18: ...ression lever Set the fuel cock at S stop position If the engine comes with an electric starter turn the starting switch to the Off position Pull the recoil handle slowly until pressure is felt by your hand this means the piston is on the compression stroke where the intake and exhaust valves arc closed and then let the handle recoil back into the engine This natural position will prevent rust fro...

Page 19: ...il on time Change the engine oil more frequently if the engine is used in dusty areas Changing the oil while the engine is still warm will yield best results for the engine When the oil is still warm you get rapid and complete draining of the oil Oil change procedures Remove the oil filler cap and drain plug to drain the oil Install the drain plug and tighten it securely Refill with the recommende...

Page 20: ... will be shortened at dusty place Clean fuel tank Every month Clean or chane fuel filter Clean Change Check nozzle Check injection pump Check pipeline of fuel Change if necessary Adjust value clearance of inlet and exhaust First time Grind value holder of inlet and exhaust Change piston ring Check accumulator liquid each month Clean the core of air filter Clean Every month or 50 hours Air filter s...

Page 21: ...oam filter element After washing rinse it thoroughly with water and allow the element to dry Soak the element in clean engine oil and squeeze the oil out If there is too much oil left in foam element the engine will smoke during startup Tap Lightly several times on a hard surface to remove excess dirt from the paper filter Never brush on the paper element as this just forces more dirt into the pap...

Page 22: ... ease the seal into place Please refer to Figure 2 2 for a cross sectional view of the housing and shaft Figure 2 2 Cross sectional view of water pump and components 1 Sealing ring 2 Ceramic ring 3 Fixed graphite ring 4 Corrugated pipe 5 Washer Note After operation the pump during winter be sure to drain all the liquid out of the pump to prevent damage to the pump The pump may be damaged if left o...

Page 23: ...ll fluids from the pump Leaving fluid in the pump will cause rapid corrosion to the impeller Turn the fuel valve to the Off position and empty all of the fuel out of the gas tank Note While dealing with diesel fuel do not smoke or allow flames to come near the fuel as accidents may occur Failing to do so will lead to serious injuries or death Change the engine oil Remove the cold start oil fill pl...

Page 24: ...ne or impeller is clogged Clean out the clogging matter Speed is low Increase speed Impeller or seal is seriously worn and gap is too large Adjust the gap or change the impeller and seal Leaking inlet pipe Check the inlet pipe and connector of pipe change pipe or tighten the clipper joint screw Not enough water flow Impeller damage or serious leakage Change the impeller to a new one The total lift...

Page 25: ... of the pump Suction head is too high and causing cavitation Check the Suction head and lower the position of the pump Large water output Decrease the output of the water Inlet pipe is clogged with foreign matter so the resistance is too large Check the inlet pipe and filter net and clean if necessary Rotary part is loose Listen carefully and inspect the part that causes the noise then stop the ma...

Page 26: ...parts No Parts Name QTY No Parts Name QTY 1 φ87 hose band 3 10 O ringφ275 5 1 2 Hose coupling handle 2 11 Snap pin 6 3 In Out Joint 2 12 Pump Base 1 4 In Out Joint gasket 2 13 Hose Coupling 1 5 O ringφ130 3 1 2 14 Strainer 1 6 Plug 1 15 T Bolt M6 6 7 Water Guide 1 16 Pump Body 1 8 O ringφ54 3 1 1 17 Check valve 1 9 Impeller 1 18 Mechanical seal 1 ...

Reviews: