background image

Sirona Dental Systems GmbH
Operating Instructions SIROLaser Xtend

8 Maintenance and service

8.5 Replacing the rechargeable battery of the control unit

63 18 351 D3576
D3576.201.01.05.02    11.2018

67

8.5

Replacing the rechargeable battery of the control
unit

After the upgrade the SIROLaser Xtend is equipped with a rechargeable
battery.

If the rechargeable battery does not load more than 30% even by
charging it overnight, the battery should be replaced.

1.

Disconnect the power supply.

2.

Take the handpiece out of the holder and unwind the tube
completely.

3.

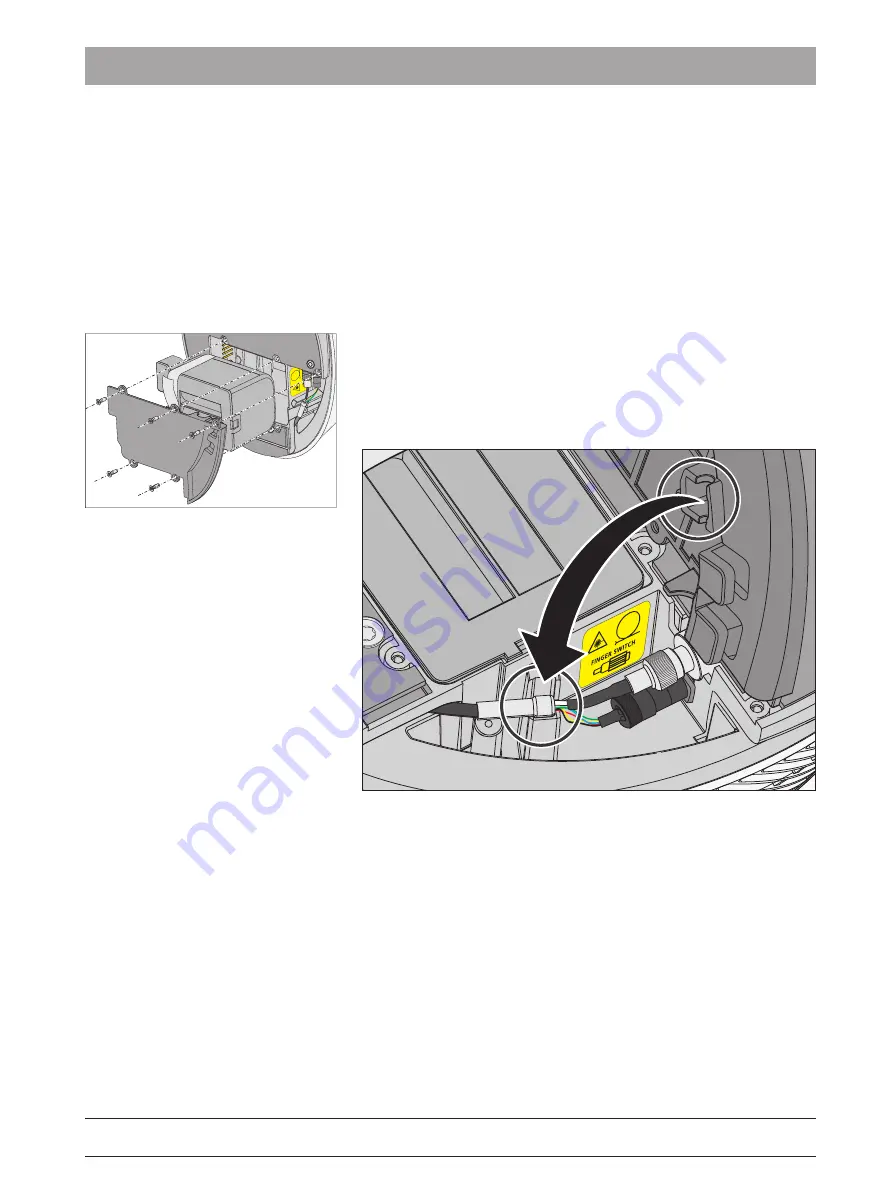
Remove the battery cover.

4.

Pull out the battery with the strips applied to the battery.

5.

Mount the new battery.

6.

Closing the battery cover. Make sure that the small metal cylinder of
the cable is properly placed in the anti-pull protection! Otherwise,
the handpiece is damaged.

7.

Switch on the laser (use power supply if necessary).

8.

Choose "Battery calibration" in the set-up menu.

Ä

The following message will appear: "Unplug the laser and press
OK for battery calibration. For further steps refer to user
manual."

9.

Unplug laser and press 'OK'.

Ä

The battery will now discharged automatically until the device
switches off due to lack of power.

10. Plug in the power supply, switch on the laser device and charge the

battery for at least 2 h (best over night).

For perfect battery performance a battery calibration must be proceeded
in any case of having removed and again mounted or completely
replaced the battery pack, see chapter "Battery calibration"  [→ 50].

Summary of Contents for SIROLaser Xtend

Page 1: ...New as of 11 2018 SIROLaser Xtend Operating Instructions English...

Page 2: ...ns 7 2 3 Operating personnel 8 2 4 Physical working principle 8 2 5 Functional check 8 2 6 Laser radiation hazards 9 2 7 Nominal ocular hazard distance 9 2 8 Laser protective goggles 10 2 9 Optical fi...

Page 3: ...n 38 5 5 1 Favorites 39 5 5 2 Submenus for endodontics periodontology surgery and miscellaneous 39 5 5 3 My Settings 45 5 5 4 Set up 46 5 5 4 1 History file 46 5 5 4 2 Calibration check 46 5 5 4 3 Sou...

Page 4: ...e 64 8 1 Safety checks 64 8 2 Maintenance 64 8 3 Troubleshooting of simple defects 65 8 4 Technical support repair and testing 66 8 5 Replacing the rechargeable battery of the control unit 67 8 6 Repl...

Page 5: ...t programs The activation of the laser occur by pressing the finger switch at the handpiece These Operating Instructions are designed to assist you prior to initial use and whenever you require inform...

Page 6: ...uct Help If you reach an impasse despite having thoroughly studied the Operating Instructions please contact your dental depot 1 4 Intended use The SIROLaser Xtend is developed as a table top laser de...

Page 7: ...situation which could lead to damage of the product or an object in its environment NOTE Information to make work easier For application information and other useful information 2 2 Standards and regu...

Page 8: ...r Xtend equipment must be protected against unauthorized access when not in use This can be achieved for example by switching the SIROLaser Xtend off after usage so that the electronic access key pin...

Page 9: ...n this manual Flammable materials Never direct the laser beam towards any flammable material e g paper or plastics They could catch fire due to the high temperatures produced by the laser beam The uni...

Page 10: ...delivery of the SIROLaser Xtend Optical instruments Never use optical instruments such as microscopes eye loupes or magnifiers together with the original protective goggles Otherwise sufficient eye pr...

Page 11: ...IROLaser Xtend is to be protected against the intrusion of liquids The SIROLaser Xtend must not be used in areas in which the appearance of liquids is probable Verify that the line voltage corresponds...

Page 12: ...al line power supply Modifications to this system which might affect the safety of the system owner patients or other persons are prohibited by law For reasons of product safety this product may be op...

Page 13: ...13 3 System description 3 1 System overview SIROLaser Xtend Control unit Laser Stop C B A K J I H G F E D L SIROLaser Xtend A LED lights B Touch screen C Laser Stop key D Carry handle E Optical fiber...

Page 14: ...nterlock connector bridge E USB port 3 2 Performance and equipment differences SIROLaser Xtend Upgrade Power 5 W 7 W Peak pulse power 10 W 14 W Frequency 1 000 Hz 10 000 Hz Duty cycle 50 fixed adjusta...

Page 15: ...er the upgrade the duty cycle can be adjusted The average power is the product of power and duty cycle The result is a better thermal control due to the fact that the OFF periods are used for thermal...

Page 16: ...ne 24 2007 USA ONLY This label stands for device compliance with FDA laser product performance standard XX 20XX Date of manufacture month year Best before date Do not use after month year XXXX XX XX L...

Page 17: ...ISIBLE LASER RADIATION AVOID EYE OR SKIN EXPOSURE TO DIRECT OR SCATTERED RADIATION CLASS 4 LASER PRODUCT Warns of Class 4 laser radiation hazards when using the unit Warns of laser radiation emission...

Page 18: ...ous V m Volt per meter ap prox approximately mA Milliampere IR Infrared diode A m Ampere per meter g Gram mW Milliwatt kg Kilogram W Watt s Microseconds P Power ms Milliseconds Pmax Maximum power s Se...

Page 19: ...al power CW SIROLaser Xtend approx 0 5 5 0 W After upgrade approx 0 5 7 0 W Optical peak power SIROLaser Xtend approx 10 W diode After upgrade approx 14 W diode Emission modes CW continuous wave chopp...

Page 20: ...r and easy transport CAUTION Do not leave the SIROLaser Xtend in a vehicle parked in the sun The inside temperature of the car could thus heat up to a point where individual components may be damaged...

Page 21: ...The SIROLaser Xtend may be operated in the following environmental conditions Temperatures from 10 C to 33 C Relative humidity from 10 to 95 Atmospheric pressure from 800 hPa to 1060 hPa CAUTION Follo...

Page 22: ...ger switch 1 x Starter kit fibers 1 x 200 m and 4 x 320 m 1 x Fiber cutter 50 x Single use tips including 1 x Bending tool 2 x Laser protective goggles for operator and assis tant 1 x Laser protective...

Page 23: ...ncl bending tool 62 56 692 Fiber cutter 60 91 669 Laser protective goggles 65 41 515 Laser protective goggles for spectacle wearers 65 46 407 Laser protective goggles for patients 65 41 523 Rechargeab...

Page 24: ...lt in failure or destruction of the laser unit If any power supply other than the one recommended is used the approval of the entire unit automatically becomes void and the warranty granted by Sirona...

Page 25: ...the bending tool to the angle that you need for best handling and depending on the treatment WARNING Do not move the fiber in the single use tip after having bent the tip risk of fiber damage Always u...

Page 26: ...efore assumes no liability in such cases Therefore use only Sirona optical fibers 4 4 2 3 2 Initial use of an optical fiber Initial check Before using an optical fiber for the first time check its bes...

Page 27: ...ube 5 Remove the transport and sterilization tube from the optical fiber 6 Put the laser into operation by choosing any preset treatment A corresponding description is provided in chapter Operation 32...

Page 28: ...r Adjusting the optical fiber with the fiber cutter 30 Any liability of the manufacturer regarding mechanical damage to the optical fiber is thereby canceled 9 Insert the handpiece body back into the...

Page 29: ...application 1 Select the required optical fiber 200 m or 320 m see chapter List of preset indications 2 Make sure that the optical fiber is clean and sterile Handpiece sleeve and the stainless steel...

Page 30: ...tip Also check if the snap tabs have clicked into their rests 8 Trim the end of the optical fiber with the fibercutter until the light of the aiming beam projects an uniform circular pattern see chap...

Page 31: ...performed by a qualified electrician who is also responsible for the installation and maintenance of the electrical system to which the SIROLaser Xtend is connected NOTE Additional or different safet...

Page 32: ...grade Connected charging battery Battery is connected to power supply and charging only available after the upgrade Activate Laser Laser is being activated Back User goes back one screen Home User goe...

Page 33: ...action Step back one screen Help User wants to open additional help information to this application New User wants to generate a new application within My Settings or to add a new user within User pa...

Page 34: ...l be set from 1 Hz 10 Hz in increments of 1 Hz from 10 Hz 100 Hz in increments of 10 Hz from 100 Hz 1 kHz in increments of 100 Hz and after the upgrade from 1 kHz 10 kHz in increments of 1 kHz If 0 Hz...

Page 35: ...d When starting the SIROLaser Xtend for the very first time you will automatically be asked to set up the unit Please proceed as requested 1 Country setting For all users except US users Change the pr...

Page 36: ...inger switch is disconnected and the appropriate box will be marked with a cross for defect missing NOTE If the finger switch is marked cross for defective missing please check if the handpiece sleeve...

Page 37: ...onal Unit is month Time to service The safety test is a mandatory test for all medical devices The SIROLaser Xtend needs to be tested once every two years Time to service counts down from 24 to zero a...

Page 38: ...time the pincode 3 3 3 4 is to be entered It changes the country setting to Non US see chapter Country setting 50 Then you will have access to the full range of pre set indications 5 5 Main home scree...

Page 39: ...ngs press the delete button NOTE If Favorites are full and you try to add another favorite a warning screen will signal to remove another application from Favorites else the chosen application cannot...

Page 40: ...he laser protective goggles as soon as it is advised to wear laser protective goggles and whenever the green LEDs are lit Any actuation of the finger switch activates the laser unit Wrong settings may...

Page 41: ...higher or lower by using plus or minus After the upgrade you will be able to adjust the emitted power up to 7 W WARNING The preset power levels are considered to be safe for patients Increasing the po...

Page 42: ...W the duty cycle will not be changeable 5 Frequency in our example CW continuous wave mode This is the modulation frequency of the laser unit By pushing frequency touch field you will be transferred t...

Page 43: ...be proceeded back to the treatment submenu in which you can further adjust the time and average power The power will be preset to 10 W peak pulse after the upgrade to 14 W The duty cycle will be calc...

Page 44: ...ove 0 3 W When returning from peak pulse mode to chopped mode note that the average power will remain and the power will be calculated regarding a preset duty cycle of 50 6 Energy in our example 0 J j...

Page 45: ...is opened 2 Name the new application by touching the empty description field on the top left corner of the screen A keyboard field is shown 3 Confirm your text input with OK The keyboard field is hid...

Page 46: ...nstructed on the screen 5 5 4 2 Calibration check WARNING You must wear the supplied laser protective goggles during the entire calibration check The following section describes the procedure to check...

Page 47: ...e also for 7 watt For each value the device compares the delivered current with the calibration value If the value is inside the tolerance the test is passed If the measurement is out of the tolerance...

Page 48: ...nter five additional users via new button NOTE The set up of the key user is fixed and not changeable but to give him a user name e g SMITH instead key user and to change the pin code 2 9 7 4 The key...

Page 49: ...ed as follows 1 Choose in main menu the item Set up 2 Choose there the item Software update these can be found on the second sheet 3 Follow the instructions in the note message and insert the USB stic...

Page 50: ...e selection Enter the pin code 3 3 3 4 and press OK Now you will have access to the full range of pre set indications 5 5 4 11 Battery calibration After the upgrade the SIROLaser Xtend is equipped wit...

Page 51: ...not accepted Please plug it in again or try another USB device Version 2 0 Con firmation via OK The battery is malfunction ing Please contact Sirona Dental Systems GmbH your local dental depot or you...

Page 52: ...ice center Confirmation via OK There occurred an error to the photo diode inside the handpiece which could not be handled Please con tact Sirona Dental Sys tems GmbH your local dental depot or your au...

Page 53: ...a OK External calibration check 1 Watt level is being checked when laser beam is directed to the power meter and finger switch is pressed for three seconds Confirmation via OK External calibration che...

Page 54: ...firmation via OK Before proceeding it is ad vised to take on the laser safety goggles Then con firm with OK Software update proce dure Before going on please plug the USB de vice into USB port Confir...

Page 55: ...ease wait until the inter lock is open See chapter Troubleshooting 65 Confirmation via OK 5 5 5 3 Information messages The calibration check was successfully performed Confirmation via OK For informat...

Page 56: ...button Note that the laser is interrupted and deactivated but not switched off If you want to continue enter the pin code Main switch During or after treatment the laser can be switched off by switchi...

Page 57: ...eed of fiber tip movement 6 2 List of preset indications Application Power W Modus Duty Cycle Fre quenzy Hz Fiber m Help Menu Endodontics Endo Germ Reduction 1 5 PF 50 15 200 Carefully insert the fibe...

Page 58: ...Germ Reduction 1 5 PF 50 10 320 Irradiate the whole pocket starting from the deepest position using a meandering course to cover all contaminated regions Reduce power if pain sensations appear Sulcul...

Page 59: ...contact to the tissue Permeate larger vessels with fiber start laser and retract the fiber slowly To co agulate larger vessel perform multiple treat ments Implant Uncovery 3 0 CW 320 Stretch the tiss...

Page 60: ...carring of the radicular area Countermeasure When working in periodontal pockets always aim the laser parallel to i e never perpendicular to the roots Run the distal end of the optical fiber over the...

Page 61: ...to wear and tear 68 7 1 Cleaning NOTE Manual cleaning must always be combined with disinfection All tissue residues must be removed from the optical fiber before it is detached from the handpiece Opt...

Page 62: ...e the instructions for use provided by the manufacturer and attached to the goggles in the case 7 2 Disinfection Disinfect the upper mentioned parts by wipe disinfection SIROLaser Xtend wipe disinfect...

Page 63: ...ber CAUTION Always protect the optical fiber with the transportation and sterilization tube as well as the sterilization cap The optical fiber may be damaged if it is seriously bent or improperly rout...

Page 64: ...er the upgrade 8 2 Maintenance The SIROLaser Xtend does not require special maintenance In case of malfunctioning see chapter Technical support repair and testing However Sirona Dental Systems GmbH re...

Page 65: ...SIROLaser Xtend remains dark after switching it on Check the connection of the power cable and or check the rechargeable battery Make sure that the switch on the switching power supply is switched on...

Page 66: ...l for activating the laser and or pushing the buttons Check the settings for the accustic signals in the set up submenu If you cannot solve the malfunctioning switch off the laser and contact Sirona D...

Page 67: ...ount the new battery 6 Closing the battery cover Make sure that the small metal cylinder of the cable is properly placed in the anti pull protection Otherwise the handpiece is damaged 7 Switch on the...

Page 68: ...to wear and tear Check the following parts subject to wear and tear and replace where applicable Optical fibers change after 10 treatments sterilizations Single use tips change after every treatment...

Page 69: ...erative with a certain level of performance 9 1 Electromagnetic emission The UNIT is intended for operation in the electromagnetic environment specified below The customer or user of the UNIT should m...

Page 70: ...differential mode 2 kV common mode voltage The quality of the line power supply should be that of a typical commer cial or hospital environment Voltage dips short interruptions and variations of the...

Page 71: ...ss than the compliance level 3 in each frequency range Interference is possible in the vicinity of equipment bearing the following graphic symbol 1 The higher frequency range applies at 80 MHz and 800...

Page 72: ...g of the transmitter W Working clearance according to transmission frequency m 150 kHz to 80 MHz 80 MHz to 800 MHz 800 MHz to 2 5 GHz d 1 2 P d 1 2 P d 2 3 P 0 01 0 12 0 12 0 23 0 1 0 38 0 38 0 73 1 1...

Page 73: ...ermany To initiate return of the electrical device please send a disposal request to enretec GmbH You have the following options here Use the Returning an electrical device button under the eom menu i...

Page 74: ...he disposal regulations and legal requirements applicable in your country Prior to disposal remove the Lithium battery in the SIROLaser Xtend 10 2 Accessories Optical fibers single use tips handpiece...

Page 75: ...ance with the provisions of Council Directive 93 42 EEC concerning medical devices 11 2 Appendix B Label positions The following figures show the positions of the labels on the SIROLaser Xtend Front s...

Page 76: ...VISIBLE AND INVISIBLE LASER RADIATION WHEN OPEN AVOID EYE OR SKIN EXPOSURE TO DIRECT OR SCATTERED RADIATION Complies with FDA performance standards for laser products except for deviations pursuant to...

Page 77: ...st close the interlock circuit when the treatment room door is closed Lp1 Optional low level lamp used as an optical warning while the laser is in operation T1 Power transformer S2 Main switch for pow...

Page 78: ...may be required due to technical improvements Sirona Dental Systems GmbH Sprache englisch Printed in Germany D3576 201 01 05 02 11 2018 Nr 126 130 Sirona Dental Systems GmbH Fabrikstr 31 64625 Benshe...

Reviews: