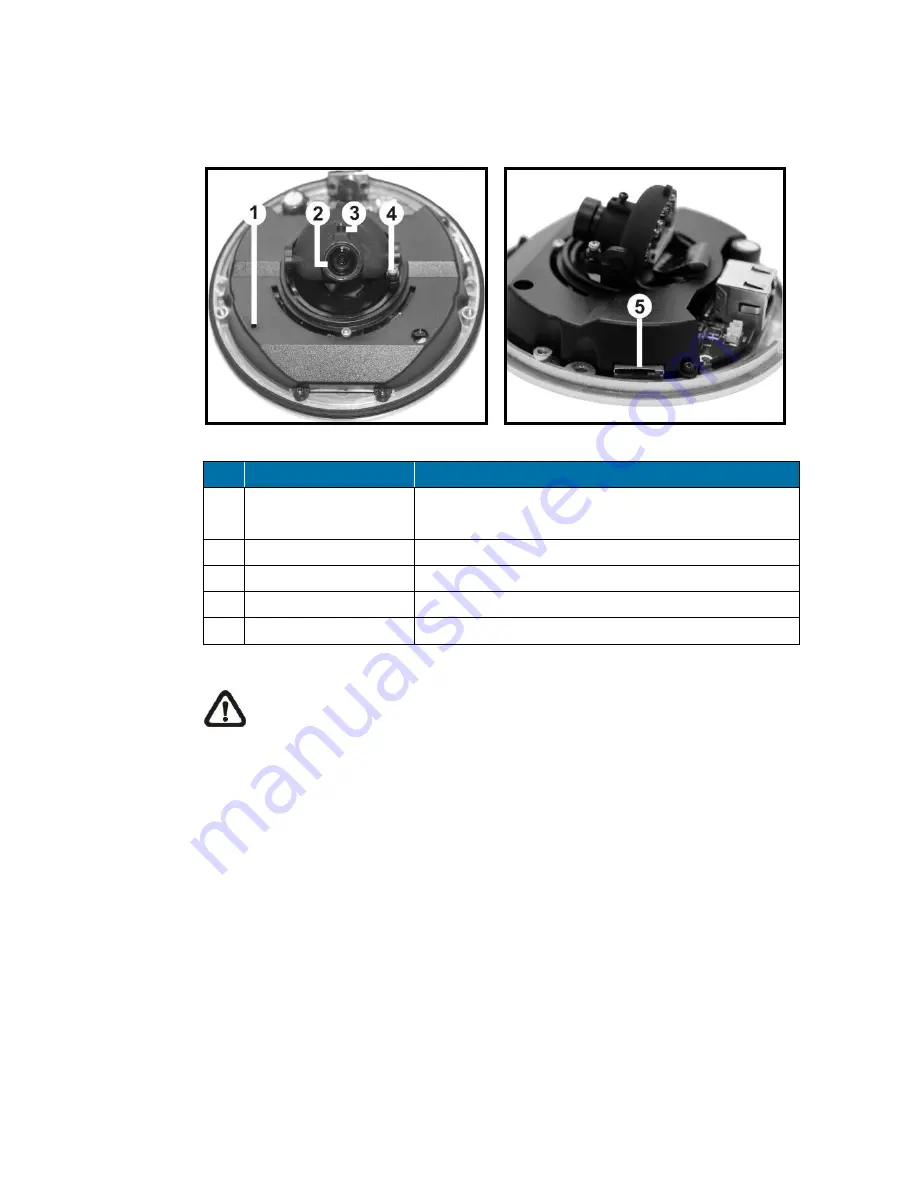
Siqura CD810F1 Installation Manual Download Page 7

[7] 


1.6 

Connectors 


No.  Item 

Description 

Reset Button 

Press  the  button  with  a  proper  tool  for  at  least  20 
seconds  to  restore  the  system  to  the  factory-default 
settings. 

Lens 

Rotate the lens right/left to adjust focus 

Focus Fixed Screw 

Loosen the screw to adjust the lens 

Tilt Fixed Screw 

Loosen the screw to adjust tilt angle 

microSD Card Slot 

For video recording storage 


NOTE:

 It is not recommended to record with the microSD card for 24/7 

continuously, as it may not be able to support long term continuous data 

read/write operations. Contact the manufacturer of the microSD card for 

information regarding the reliability and the life expectancy. 


Summary of Contents for CD810F1

Page 1: ...Siqura CD810F1 Compact Fixed Dome IP Camera Installation Manual...

Page 2: ...nect the Ethernet cable 8 3 System requirements 10 4 Access the camera 11 4 1 Connect via web browser 11 4 2 Connect via Siqura Device Manager 11 4 3 Change network settings 12 4 4 Log on to the camer...

Page 3: ...design the CD810F1 camera is easily installed and aesthetic in appearance 1 1 Features Progressive scan CMOS sensor 2 Mpixel resolution Full HD 1080p resolution Dual stream H 264 and MJPEG video Mult...

Page 4: ...ood For other installation environments such as cement wall it is required to pre drill and use plastic anchors before fastening the supplied self tapping screws to the wall CD810F1 Security torx Barr...

Page 5: ...5 1 3 Dimensions 1 4 Power and Ethernet connectors No Connector Definition 1 RJ 45 For network and PoE connection 2 Power Jack DC 12 V Power connection 2 1...

Page 6: ...a at the installation location Then attach the camera to the ceiling by fastening it with the supplied screws through the screw holes Step 3 Refer to section Connectors and chapter Camera Cabling for...

Page 7: ...Fixed Screw Loosen the screw to adjust the lens 4 Tilt Fixed Screw Loosen the screw to adjust tilt angle 5 microSD Card Slot For video recording storage NOTE It is not recommended to record with the m...

Page 8: ...ter and connect it to the camera and the power outlet or you can use an Ethernet cable and connect it to the RJ 45 connector of the camera and a PoE switch See the section below for Ethernet cable con...

Page 9: ...the LEDs are unlit check the LAN connection A green link light indicates a good network connection An orange activity light flashes for network activity indication NOTE Please use an Ethernet cable wi...

Page 10: ...ribed below Items System Requirement Personal computer 1 Intel Pentium M 2 16 GHz or Intel CoreTM 2 Duo 2 0 GHz 2 2 GB RAM or more Operating system Windows 7 or higher Web browser Microsoft Internet E...

Page 11: ...t you are directed to the login page of the camera 4 2 Connect via Siqura Device Manager With Siqura Device Manager a tool included on the supplied Siqura Product CD you can locate manage and configur...

Page 12: ...sfully changed the settings click OK 6 Wait one minute and then rescan the network 7 To access the webpages of the camera double click its entry in the list of found devices To assign a DHCP server 1...

Page 13: ...creates separate user accounts as needed 4 5 Siqura Viewer For the initial access to the camera a client program Siqura Viewer is automatically installed to the PC when connecting to the camera If the...

Page 14: ...home page of the IP camera is displayed as in the figure below Note that function buttons will vary depending on the camera model For a description of the CD810F1 webpages see the User Manual on the s...

Page 15: ...nterface Video Format can be found under this path Streaming Video Format The default values of video resolution are as below 2M H 264 1920 x 1080 13 15 fps H 264 720 x 480 13 15 fps 2M Real time H 26...

Page 16: ...configuration file to the IP camera It is especially convenient to make multiple cameras have the same configuration Export Users can save the system settings by exporting the configuration file bin...

Page 17: ...m your computer before initial access to the camera over the network or when you encounter an A new version is available message To uninstall Siqura Viewer 1 On the Windows Start Menu click Control Pa...

Page 18: ...el for this zone click the Custom Level button The Security Settings Internet Zone dialog box displays 5 Under ActiveX controls and plug ins set all items listed below to Enable or Prompt Note that it...

Reviews: