2
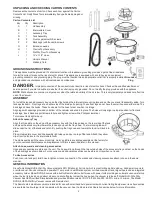
UNPACKING AND CHECKING CARTON CONTENTS
Remove entire contents of carton. Check each item against the Carton
Contents List. Notify Sioux Tools immediately if any parts are damaged or
missing.
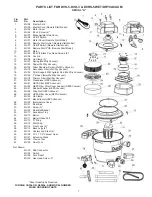
Carton Contents List
Key
Qty
Description
A
1
Lid Assembly
B
1
Intermediate Cover
C
1
Accessory Tray
D
1
Tank Assembly
E
2
Front Legs (smooth) & screws
F
2
Back Legs (with/hooks) & screws
G
2
Extension wands
H
1
Crevice Tool Accessory
I
1
Wet/Dry Floor Tool Accessory
J
1
12' x 1-1/2" Hose
1
Owner’s Manual
1
Warranty Card
GROUNDING INSTRUCTIONS:
This appliance must be grounded. If it should malfunction or breakdown, grounding provides a path of least resistance
for electric current to reduce the risk of electric shock. This appliance is equipped with a cord having an equipment -
grounding conductor and grounding plug. The plug must be inserted into an appropriate outlet that is properly installed
and grounded in accordance with all local codes and ordinances.
DANGER
–
Improper connection of the conductor can result in a risk of electric shock. Check with a qualified electrician or
service person if you are in doubt as to whether the outlet is properly grounded. Do not modify the plug provided with the appliance.
NOTE:
Static shocks are common in dry areas or when the relative humidity of the air is low. This is only temporary and does not affect the
use of the Vacuum.
ASSEMBLY
To install the legs and accessory tray, undo the clips holding the intermediate cover in place and set the cover and lid assembly aside. Turn
tank upside down. Front legs are on either side of the drain port opening. These front legs do not have the small hooks on either side. The
back legs do have the hooks. These hooks are for the hose to rest on when in storage.
Align legs with openings provided on bottom of the canister and slide into place. The holes will only align in proper position for front and
back legs. Insert black support screw into hole and tighten screw with a Phillips screwdriver.
Turn cleaner tank right side up.
Attach Accessory Tray
Align the three slots on the edge of the accessory tray with the three guides on the rear side of the tank
and press the accessory tray toward the tank as you push the tray down. The two lock ing tabs will
slide under the rim of the tank and catch. By pushing the tray down and toward the tank it will lock into
place.
Place intermediate cover and lid assembly right side up and set on top of the tank. Attach the yellow
clips from the tank onto the intermediate cover.
The Lid Assembly with the vacuum controls, motor, and filters are all preassembled at the factory for
your convenience. Maintenance and replacement of filters is described later in this manual.
Attach hose, wands and cleaning accessories
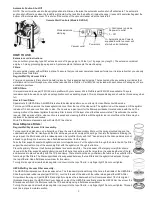
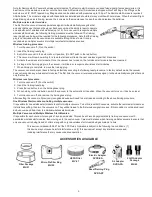
Hose and accessories are stored on the unit. The hose will loop through the two outside holes of the accessory tray and rest on the hooks
of the back legs as shown below. For convenience, additional accessories can be stored on tray when not in use.
To Use Accessories
Push hose into tank port; twist hose to tighten or loosen connection. The wands and cleaning accessories attach to hose in the same
manner.
GENERAL INFORMATION
Sioux Tools Model DVS-5 Wet/Dry Vacuum delivers 99% filtration at .5 micron which is great for fine particle pick-up, like drywall, concrete,
or surface dust. All units come with a powerful 11 amp motor, dual filtration system, corrosion resistant tank, large wheels and an integrated
accessory holder. Model DVRS-5 comes with a built-in Remote start outlet for use with power tools providing an automatic vacuum start-up
when the tool is turned on and about a 6 second shut-off delay to clear the hose when the vacuum is turned off. Model DVH-3 Wet/Dry
Vacuum has HEPA certified filters installed and provides filtration rated at D.O.P Eff. Mil. Std. 282: 99.97% min. at .3 micron. The Model
DVRS-5 HEPA Wet/Dry Vacuum comes with Remote start.
The Remote start model vacuums are intended for use with small hand held power tools with current rating 8 amperes or less. Accessories
are available to allow larger tools to operate with the vacuum. See the Remote start Operation section below for more information.
Grounded
Plug

