Sinotec ST-29ME70H1 Operating Manual Download Page 9

Setting Up 

Installing remote control batteries

Battery precautions: 

Improper use of batteries can result in a leakage of chemicals and/or explosion. 
Be sure to follow the instructions below.

·

Place  batteries  with  their  terminals  corresponding  to  the  (+)  and  (–) 
indications.

·

Different types of batteries have different characteristics. Do not mix batteries 
of different types.

·

Do not mix old and new batteries. Mixing old and new batteries can shorten 
the life of new batteries and/or cause old batteries to leak chemicals.

·

Remove batteries as soon as they are non-operable. Chemicals that leak from 
batteries can cause a rash. If chemical leakage is found, wipe with a cloth.

·

Dispose of batteries in a proper manner. 

·

If the remote control is not used for an extended period of time, remove the 
batteries.

·

The batteries should not be exposed to excessive heat such as sunshine, fire or 
the like.


Open the battery cover. 

1

Insert two AAA batteries into the battery compartment. Make sure that 
the + and – symbols on the batteries match the + and – symbols in the 
battery compartment.  

2

Replace the cover.

3

Selecting a location 

You should select a 

location

 for the TV: 

·

Where direct light does not reflect on the screen. 

·

That has indirect and soft lighting. 

·

Where the TV has access to an antenna or cable TV connection. 

·

Where the TV has access to a power outlet. 

Note:

 Watching TV in total darkness or with a reflection on the screen may 

cause eyestrain. 

To install remote control batteries: 

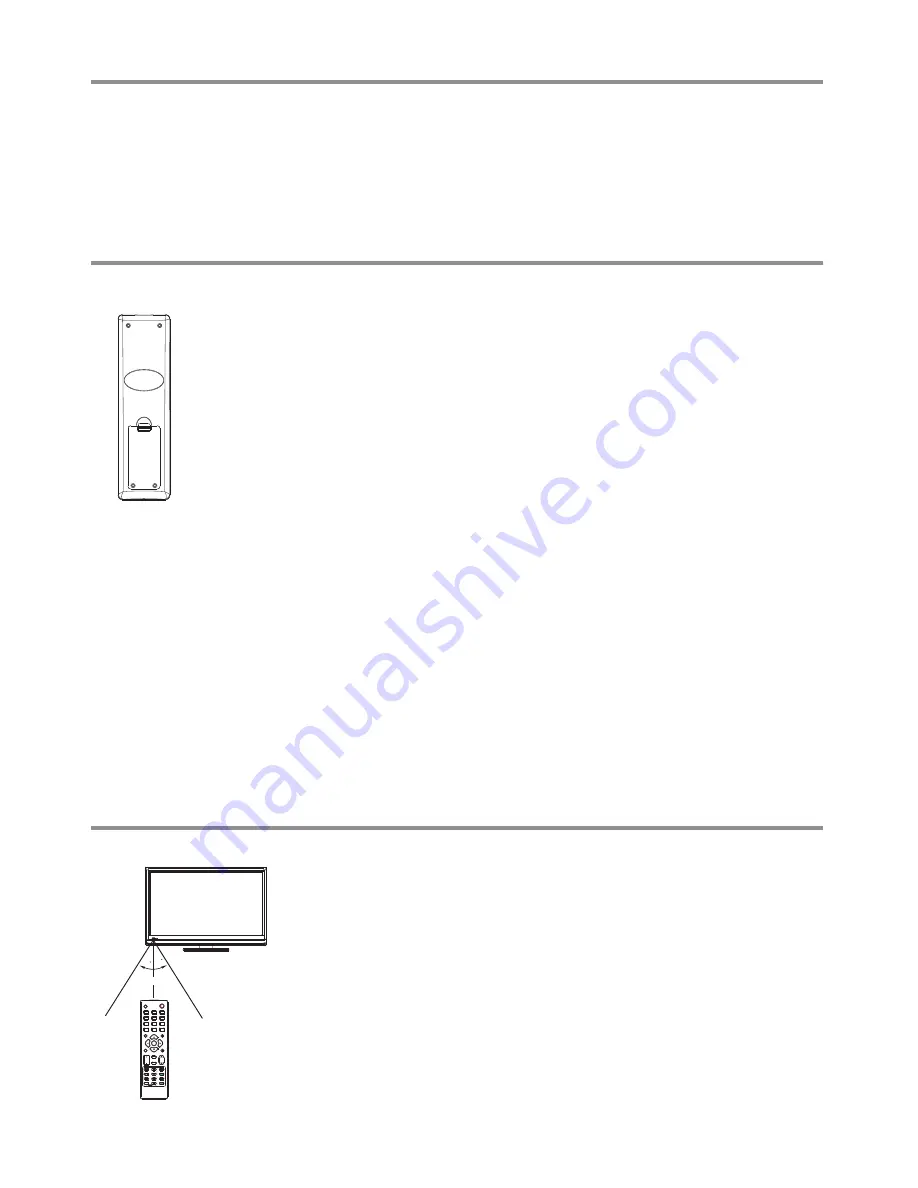
Aiming the remote control 

Use the remote control by pointing it towards the remote sensor on the 
front  of  your  TV.  Objects  between  the  remote  control  and  the  remote 
sensor may prevent proper operation.

Cautions regarding use of remote control

·

Do not expose the remote control to shock. In addition, do not expose the 
remote control to liquids, and do not place in an area with high humidity.

·

Do not install or place the remote control under direct sunlight. The heat may 
cause deformation of the unit.

·

The remote control may not work properly if the remote sensor window of the 
main unit is under direct sunlight or strong lighting. In such a case, change the 
angle of the lighting or the TV set, or operate the remote control closer to the 
remote sensor window.

7

30

30

5m

1

7

4

2

8

5

0

3

9

6

USB

US B

ZOOM

SLEEP

DC R

IN PU T

MU TE

ME NU

DISPLAY

FREEZE

PI CT UR E

AU DI O

VO L

CH

OK

FAV

Summary of Contents for ST-29ME70H1

Page 1: ...Before connecting operating or adjusting this product please read the manual completely Please keep this manual for future reference LCD TV Operating Manual...

Page 2: ...Controls 5 Setting Up 7 Connections 8 Basic Operations 12 Memorizing the Channels Setting Channels 14 Picture Adjustment Audio Adjustment Adjusting Basic Settings Adjusting Computer Settings Troublesh...

Page 3: ...elevision is not hanging over the edge of the supporting furniture Not placing the television on tall furniture for example cupboards or bookcases without anchoring both the furniture and the televisi...

Page 4: ...electric shock 9 Entering of objects and liquids Never insert an object into the product through vents or openings High voltages are present in the product and inserting an object can cause electric...

Page 5: ...ly with dry cloth Unplug this product from the wall outlet before cleaning Do not use liquid cleaners or aerosol cleaners Use a soft cloth for cleaning 20 Ventilation Do not block any ventilation open...

Page 6: ...ge Do not allow a still picture to be displayed for an extended period as this can cause a permanent after image to remain on the screen Examples of still pictures include logos video games computer i...

Page 7: ...ese jacks to record programs AV INPUT Connect an AV device to these jacks 1 Remote Sensor 2 Power Indicator 3 MENU Press this button to access the main menu screen 4 INPUT To access Input Source menu...

Page 8: ...menus or adjust an item Press OK to confirm a selection or enter a sub menu 6 FREEZE To freeze the current picture 7 PICTURE Selects picture mode 8 VOL VOL Increases or decreases the volume 9 AUDIO S...

Page 9: ...e the cover 3 Selecting a location You should select a location for the TV Where direct light does not reflect on the screen That has indirect and soft lighting Where the TV has access to an antenna o...

Page 10: ...when not using for a long period of time This illustration is for reference only The AC plug may be different on different models Connections When connecting an external device to the TV make sure th...

Page 11: ...device and set it to the correct mode Refer to the instructions that came with the HDMI device If the external device has a DVI output only use a DVI to HDMI adapter cable to connect to the HDMI term...

Page 12: ...AUDIO output jacks on the device Connecting a computer To connect a computer 1 Turn on your TV and press the INPUT button The Input Source menu will open 2 Press 5 or 6 to select VGA and press OK to c...

Page 13: ...t a videotape and press the Play button To play the AV device Connecting a VCR for recording Connect an AV cable to the AV OUT jacks on the TV and the AV IN jacks on the VCR To connect a VCR for recor...

Page 14: ...atch the signal from the HDMI2 input terminal USB Watch the media source from the USB Press OK to confirm the selection 3 You can press the DISPLAY button to display current program information such a...

Page 15: ...unit works in different mode The above main menus are illustrated under TV mode Menu items that are not selectable are grayed out If without special indication this manual is described under TV mode...

Page 16: ...the auto search press the MENU button 3 Press 5 or 6 to select the Manual Tuning and press 4 or OK to access Press4 for the unit to search towards higher frequency Press3 for the unit to search toward...

Page 17: ...ine tune until the best possible picture and sound are obtained In the CHANNEL menu press 5 or 6 to select the Fine Tune and press 4 or OK to access Fine Tuning 1 Select a channel that you want to fin...

Page 18: ...K to access the channel Skipping Channels You can skip unnecessary channels so that only the channels you want to watch can be selected by CH button 1 In the CHANNEL menu press 5 or 6 to select Progra...

Page 19: ...Adjusts color hue for image Only for NTSC system Adjusting the Picture Picture Adjustment 17 User The picture quality you set Advanced Video Allows you to adjust Backlight Color Temperature Overscan A...

Page 20: ...ynamic Backlight and use 3 or4 to turn on or turn off the function Reset Picture Settings Reset all PICTURE settings to factory defaults Aspect Ratio You can select the aspect ratio display proportion...

Page 21: ...round sound are enormous You can be completely enveloped in sound just as if you were at a concert hall or cinema Select Off to turn the surround sound off Reset Audio Settings Reset all AUDIO setting...

Page 22: ...g of a stable image 1 Press MENU and the main menu screen displays Press 3 or4 to select the SETTING menu and press6 or OK to access the menu 2 Within the menu press5 or6 to select items press3 4 or O...

Page 23: ...supported 1 Press the USB button to access the USB multi media playing menu Press 3 or 4 to select PHOTO and press OK to access 2 Press 3 or 4 to select the C disk and press OK to open it If you want...

Page 24: ...button is pressed Zoom in zoom out of the photo image Pan left right up down You can use Pan only when the photo is magnified or Pause Play Zoom In Rotate 90 MoveView Rotate 90 Zoom Out Info Playlist...

Page 25: ...press OK to open the highlighted folder or press to start playing music from the current music file Below we will take it as an example that your desired music files are contained in a folder Highligh...

Page 26: ...l index While the movie is playing you can make use of the Movie Menu Bar to perform many functions To open and operate the Movie Menu Bar press the button The Movie Menu Bar will be displayed at the...

Page 27: ...point AB set will display on the screen The unit will rewind the selected part of the movie to where it will be repeated Press OK again to cancel Highlight StepView SlowView View the movie in frame st...

Page 28: ...index To return to the root highlight Return and press OK To go back to the upper level folder highlight Up Folder and press OK To start to play your desired text file highlight this file and press T...

Page 29: ...station trouble Adjust the antenna Move the TV away from noise sources such as cars neon signs or hair dryers Using a highly directional outdoor antenna may solve the problem Good picture no sound The...

Page 30: ...d external appearance may be changed for the sake of improvement Note 28 Type LCD TV Panel 29 TFT LCD TV system PAL BG DK I NTSC AV Power Requirement AC 220 240 V 50 60 Hz Power Consumption 90W Dimens...

Page 31: ...tructions thoroughly before attempting this installation NOTE 1 Appearance of this product in illustrations may differ from your actual product and is for comparative purposes only 2 Design of this ac...

Page 32: ...PRINTED ON RECYCLED PAPER Ver 1 0 5944040920...

Reviews: