background image

© Nov. 2020

9-4

GTTZ10EJ Operation Manual

MAINTENANCE

MAINTENANCE SCHEDULE

Components

Intervals

Daily

Every 500h

or 6 months

Every 1000h

or annually

Every 2000h

or bi-

annually

Every 5000h

or 5 years

Every

10000h or 10

years

Safety belt &
helmet

12

1–Check for proper installation
2–Check for damages, cracks, deformation or wear, etc.
3–Check for leaks
4–Check oil level
5–Check battery level
6–Lubricate
7–Drain, clean and refill
8–Replace
9–Tighten
10–Check by testing
11–Check by testing
12–Verify
13–Check tensioning
14–Overall check (disassembly may be required)

CONDUCTING A PRE-
DELIVERY INSPECTION

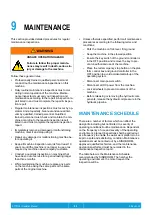
When the machine owner/company changes, in addi-
tion to conducting a pre-delivery inspection, the corre-
sponding inspection shall be carried out according to
the maintenance schedule requirement and repair & in-
spection report. When conducting a pre-delivery in-
spection, comply with the following requirements:

1.

It is the responsibility of the machine owner/com-
pany to perform a pre-delivery inspection.

2.

Follow this procedure each time before delivery.
Performing a pre-delivery inspection could reveal
potential problems with the machine before you be-
gin putting the machine into service.

3.

Never use a damaged or malfunctioning machine.
Tag the machine and do not use it.

4.

Only professionally trained, qualified personnel may
repair the machine and must follow the procedures
as stated in

operation manual

and

maintenance

manual

.

5.

A competent operator must conduct daily mainte-
nance on this machine as stated in

operation man-

ual

and

maintenance manual

.

Before delivering the machine, complete the following
record using these instructions:

1.

Prepare the machine before delivery, which in-
cludes performing a pre-delivery inspection, follow-
ing maintenance procedures and performing
functional inspections.

2.

Use the following table to note the results. After
each section is complete, mark the appropriate box.

3.

Record the inspection results. If any inspection re-
sults are "NO", the machine must be stopped and
re-inspected after repair is completed and marked
in the box marked "inspection".

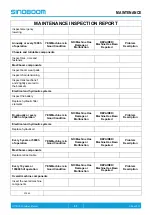
Table 9-2

PREPARE THE WORK RECORD BEFORE DELIVERY

Model

Serial No.

Inspection Item

YES/Machine is in

Good Condition

NO/Machine Has Damage

or Malfunction

REPAIRED/Machine

Has Been Repaired

Pre-operational Inspection

Maintenance Procedure

Summary of Contents for GTTZ10EJ

Page 1: ...GTTZ10EJ ML10EJ ML340EJ Operation Manual Part No 509002100002 Rev A Nov 2020 G T JZ 0608E 2132E G T JZ 0808E 2732E G T JZ 0808E 2732E G T JZ 0808E 2732E PRODU C T MAN U AL...

Page 2: ......

Page 3: ...are known to the State of California to cause cancer and birth defects or other reproductive harm To minimize exposure avoid breathing exhaust do not idle the engine except as necessary service your v...

Page 4: ...ast Jinzhou Avenue Ningxiang High tech Industrial Park Changsha Hunan China Zip Code 410600 Copyright Hunan Sinoboom Intelligent Equipment Co Ltd All Rights Reserved The final interpretation right of...

Page 5: ...TTZ10EJ ML10EJ ML340EJ From 0900200110 to present NOTE Product model is applied in product nameplate for distinction of products of different main parameters Product trade identification is applied in...

Page 6: ...This Page Intentionally Left Blank...

Page 7: ...ers the basic parts information of one or more products Therefore please use this manual according to your needs If you find problems in the manual or have suggestions for improve ment feel free to sh...

Page 8: ...This Page Intentionally Left Blank...

Page 9: ...the Battery level 5 3 6 Pre operation Function Test 6 1 Preparing for a Pre operation Func tion Test 6 1 Ground Controls 6 1 Platform Controls 6 4 Testing the Drive Speed 6 8 Testing the Emergency Low...

Page 10: ...Nov 2020 ii GTTZ10EJ Operation Manual Appendix 2 Prepare the Work Record Before Delivery A 3 Appendix 3 Maintenance Inspection Report A 5...

Page 11: ...or is responsible for reading understanding and implementing the operation and safety procedures in this manual and for following the manufacturer s instructions before beginning any work Read underst...

Page 12: ...Nov 2020 iv GTTZ10EJ Operation Manual This Page Intentionally Left Blank...

Page 13: ...und clearance pothole guard deployed 0 02 m 0 79in Tire size diameter width type 406 127mm solid 16 5in solid Platform dimension L W H 0 99m 0 7m 1 1m 39 27 5 43in PERFORMANCE PARAMETERS Platform rate...

Page 14: ...sure against ground 1180 KPa 171 Psi ENVIRONMENT REQUIREMENT Max allowable wind speed indoor outdoor 0 m s indoor 12 5 m s outdoor 0 mph indoor 28 mph outdoor Max allowable altitude 1000 m 3281 ft All...

Page 15: ...MACHINE SPECIFICATIONS GTTZ10EJ Operation Manual 1 3 Nov 2020 Chart of motion Figure 1 1 Chart of motion...

Page 16: ...Nov 2020 1 4 GTTZ10EJ Operation Manual This Page Intentionally Left Blank MACHINE SPECIFICATIONS...

Page 17: ...GTTZ10EJ Operation Manual 2 1 Nov 2020 2 MACHINE COMPONENTS Figure 2 1 18 19 20 17 12 14 13 8 7 6 5 10 4 2 3 15 16 1 11 9 24 23 22 21 25...

Page 18: ...ast section 4 14 Turntable cover RH 23 Slewing unit 6 Mast section 3 15 Power disconnect switch 24 Steer cylinder 7 Mast section 2 16 Charger plug cable 25 Chassis 8 Mast section 1 17 Steering front w...

Page 19: ...ot avoided could result in minor or moderate injury NOTICE Indicates a situation that can cause damage to the engine personal property and or the environment or cause the equipment to operate improper...

Page 20: ...achine is on solid level ground Select only the low speed when driving the machine on a slope Do not use the tilt alarm as a level indicator The tilt alarm on the platform will sound only if the machi...

Page 21: ...are in good condition the slotted nuts tightened and the cotter pins complete Do not use a battery that weighs less than the original one 30kg 66 lb and do not remove or modify the counterweight or o...

Page 22: ...Do not lift the platform when the wind speed exceeds 12 5 m s 18 mph If the wind speed exceeds 12 5 m s 18 mph after the platform is lifted fold the platform and do not continue to operate the machine...

Page 23: ...Gradeability means the maximum allowable tilt angle of the machine when it is on solid ground and the platform is only capable of carrying one person As the weight of the machine s platform increases...

Page 24: ...nd do not remove or modify the counterweight or other parts inside the battery box The battery not only provides power it also serves as a counterweight The battery is vital to maintaining the stabili...

Page 25: ...sight and the presence of blind spots when moving or operating the machine The non staff must maintain a minimum of 2m 6 6ft distance from the machine while it is travelling or swinging When the work...

Page 26: ...er on the ground to operate the machine Maintain proper distance between operator machine and fixed object EXPLOSION AND FIRE HAZARDS EXPLOSION AND FIRE HAZARDS Do not use the machine or charge the ba...

Page 27: ...nerate explosive mixtures of hydrogen and oxygen gases Keep any device that may cause sparks or flames including cigarettes smoking materials away from the battery to prevent explosion Do not touch th...

Page 28: ...ways ensure you read and understand all operation and maintenance requirements in this manual and the Main tenance Manual WELDING HAZARDS Comply with the welder manufac turer s recommendations for pr...

Page 29: ...SAFETY GTTZ10EJ Operation Manual 3 11 Nov 2020 NOTICE After using the machine the power disconnect switch must be turned off...

Page 30: ...Nov 2020 3 12 GTTZ10EJ Operation Manual This Page Intentionally Left Blank SAFETY...

Page 31: ...he work site Check the safety decals name plate on the machine Only use the machine according to the instructions in this manual and for its intended purpose During the jobsite inspection the operator...

Page 32: ...Nov 2020 4 2 GTTZ10EJ Operation Manual This Page Intentionally Left Blank JOBSITE INSPECTION...

Page 33: ...out the prior written permission of the manufacturer If an additional device is installed on the platform or guardrail for placing tools or other materials this will increase the platform weight and s...

Page 34: ...ructure and welding cracks Nuts bolts and other fasteners NOTICE If damaged parts incorrect installation or missing parts are discovered please replace immediately and install correctly if the fastene...

Page 35: ...t the emergency stop buttons at ground and platform controls to the ON position 2 Turn the key switch at ground controls to Platoform 3 The battery level is indicated on the display of plaform control...

Page 36: ...Nov 2020 5 4 GTTZ10EJ Operation Manual This Page Intentionally Left Blank PRE OPERATION INSPECTION...

Page 37: ...the machine Only use the machine according to the instructions in this manual and for its intended purpose Conducting a pre operation function test helps you dis cover potential problems before you s...

Page 38: ...om up down function button 2 Mast up down function button 7 Key switch ground platform control select switch 12 Up rotate left control button 3 Turntable rotate function button 8 Platform control posi...

Page 39: ...round platform control select switch 1 Turn the key switch at ground controls to the ground control position all functions shall operate only at the ground controls the platform controls is inoperativ...

Page 40: ...the enable button and the down rotate right control button the turntable should rotate right Jib boom up down 1 Push the jib boom up down function button 2 Simultaneously press and hold the enable bu...

Page 41: ...n 9 Drive reverse lower direction arrow 2 Joystick 6 Horn button 10 Display 3 Rocker switch for turntable rotate left wheel steer left functions 7 Emergency stop button 11 Drive function button 4 Rock...

Page 42: ...er the platform is clear of persons or obstructions Preparation 1 Turn the key switch at ground controls to the platform control position 2 Pull out the emergency stop buttons at ground and platform c...

Page 43: ...r switch on top of the joystick the turntable should rotate counterclockwise Jib boom up down 1 Push the jib boom lift function button 2 Press and hold the enable button on the joystick slowly deflect...

Page 44: ...max drive speed is achieved and the front wheels reach the first line start the time counting 11 When the front wheels reach the second line stop the time counting and slowly bring the machine to a st...

Page 45: ...Place a wooden block under the protive plate The wooden block measures 50mm 100mm 50mm 2in 4in 2in 9 Press and hold the enable button on the joystick and slowly deflect forward the joystick to raise...

Page 46: ...The wooden block dimesion L W H is 150 100 43mm 5 9 3 9 1 7in With the machine in stowed position drive the machine on the blocks the alarm should not sound 11 Raise the mast until the lower limit swi...

Page 47: ...ing to the instructions in this manual and for its intended purpose This section provides specific instructions for all the as pects of machine operation The operator is responsible for following all...

Page 48: ...E Figure 7 1 Position of least forward stability 1 Mast fully raised 2 Jib boom horizontal 3 Turntable rotated 90 4 The machine will tip over in the direction as indicated by the arrow if overloaded o...

Page 49: ...overloaded or operated beyond the limits of the maximum operating slope EMERGENCY STOP Push in the emergency stop button at the platform or ground controls to OFF position all machine functions will n...

Page 50: ...be used to stablize the machine from motion When the platform or jib boom is caught overhead If the platform or jib boom becomes jammed or snagged in overhead structures or equipment rescue all peopl...

Page 51: ...own the machine should steer left EMERGENCY TOWING DRAGGING UNSAFE OPERATION HAZARD Unless in case of emergency situations machine malfunction power loss or loading unloading it is strictly prohibited...

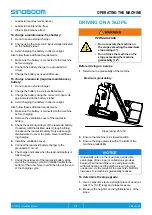
Page 52: ...en the bolts to disengage the brake from the drive motor 6 Repeat the procedure above to the other wheel reducer After the both brakes are disengaged from the drive motors the machine is all set for t...

Page 53: ...ly add enough distilled water to cover the plate Never overfill dur ing charging 4 Install the ventilation cover 5 Connect the lead acid battery charger to the grounded AC circuit 6 The charger indica...

Page 54: ...8 GTTZ10EJ Operation Manual OPERATING THE MACHINE Figure 7 9 3 Slope grade H L x 100 NOTICE The machine must not drive for over 2min on the maximum permissible slope grade to prevent the tires runnin...

Page 55: ...nto the transport vehicle ensure that the slope is within the limit of the machine gradeability refer to 1 Machine Specifications page 1 1 Be sure the machine is on a level surface or secured before r...

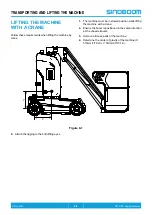
Page 56: ...hine by crane 1 The machine must be in stowed position while lifting the machine with a crane 2 Ensure the boom is positioned in the same direction as the chassis travels 3 Remove all loose parts of t...

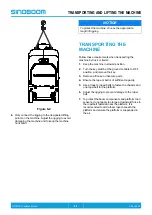
Page 57: ...r trailer 1 Keep the machine in stowed position 2 Turn the key switch at the ground controls to OFF position and remove the key 3 Remove all loose or insecure parts 4 Ensure the rope or belt is of suf...

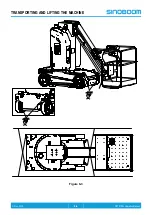
Page 58: ...Nov 2020 8 4 GTTZ10EJ Operation Manual TRANSPORTING AND LIFTING THE MACHINE Figure 8 3...

Page 59: ...While maintaining the machine replace any parts on the machine using the same parts or the same parts of the original machine Unless otherwise specified perform all maintenance procedures according to...

Page 60: ...el support 1 2 6 Steer cylinder 1 2 3 Slewing bearing 1 2 6 9 Slewing motor 1 2 3 6 Mast boom components Steel cable 1 2 13 8 Chain 1 2 6 11 13 8 Mast sections 1 2 9 11 Wear pads 1 2 11 Platform compo...

Page 61: ...jib boom 10 Load sensing system 10 Hydraulic and electrical components Hydraulic oil 4 8 Hydraulic tank 1 2 3 4 7 Hydraulic cylinders 1 2 3 10 14 Hand pump 1 2 3 10 Hydraulic filters 1 2 3 8 Hydrauli...

Page 62: ...a pre delivery inspection could reveal potential problems with the machine before you be gin putting the machine into service 3 Never use a damaged or malfunctioning machine Tag the machine and do no...

Page 63: ...complete mark the appropriate box 4 If any inspection results are NO the machine must be stopped and re inspected after repair is completed and check in the box marked REPAIRED Select the appropriate...

Page 64: ...components Inspect tires rims and fasteners Electrical and hydraulic systems Inspect hydraulic filter elements Every 6 months or 500h of operation YES Machine is in Good Condition NO Machine Has Dama...

Page 65: ...ct the battery Replace hydraulic filter elements Bi annually or every 2000h of operation YES Machine is in Good Condition NO Machine Has Damage or Malfunction REPAIRED Machine Has Been Repaired Proble...

Page 66: ...Nov 2020 9 8 GTTZ10EJ Operation Manual MAINTENANCE MAINTENANCE INSPECTION REPORT Inspector signature Inspector date Inspector title Inspector company...

Page 67: ...lvent based cleaners which can damage safety label materials Do not operate machines without decals nameplates UNSAFE OPERATION HAZARD All safety decals must be legible to alert personnel of safety ha...

Page 68: ...Nov 2020 10 2 GTTZ10EJ Operation Manual DECALS NAMEPLATES INSPECTION DECALS NAMEPLATES GB...

Page 69: ...res 1 15 216060000004 Decal Caution tape 50mm wide 2 16 215050000012 Blind rivet 4 8 ZnD GB T 12618 2 4 17 109002100004 Nameplate GB 1 18 109002100012 Decal Charge voltage 1 19 101056103002 Decal Main...

Page 70: ...Nov 2020 10 4 GTTZ10EJ Operation Manual DECALS NAMEPLATES INSPECTION No Part No Description Qty Remarks 36 109002103012 Decal Brake release 1 37 101014100036 Decal Warranty 1...

Page 71: ...DECALS NAMEPLATES INSPECTION GTTZ10EJ Operation Manual 10 5 Nov 2020 DECALS NAMEPLATES CE METRIC...

Page 72: ...14 Decal No smoking or fires 1 15 216060000004 Decal Caution tape 50mm wide 2 16 215050000012 Blind rivet 4 8 ZnD GB T 12618 2 4 17 109002100018 Nameplate CE 1 18 109002100012 Decal Charge voltage 1 1...

Page 73: ...DECALS NAMEPLATES INSPECTION GTTZ10EJ Operation Manual 10 7 Nov 2020 No Part No Description Qty Remarks 35 109002103011 Decal Steel cable repair 1 36 109002103012 Decal Brake release 1...

Page 74: ...Nov 2020 10 8 GTTZ10EJ Operation Manual DECALS NAMEPLATES INSPECTION DECALS NAMEPLATES CE IMPERIAL...

Page 75: ...014 Decal No smoking or fires 1 15 216060000004 Decal Caution tape 50mm wide 2 16 215050000012 Blind rivet 4 8 ZnD GB T 12618 2 4 17 109002100018 Nameplate CE 1 18 109002100012 Decal Charge voltage 1...

Page 76: ...Nov 2020 10 10 GTTZ10EJ Operation Manual DECALS NAMEPLATES INSPECTION No Part No Description Qty Remarks 35 109002103011 Decal Steel cable repair 1 36 109002103012 Decal Brake release 1...

Page 77: ...DECALS NAMEPLATES INSPECTION GTTZ10EJ Operation Manual 10 11 Nov 2020 DECALS NAMEPLATES ANSI...

Page 78: ...ires 1 15 216060000004 Decal Caution tape 50mm wide 2 16 215050000012 Blind rivet 4 8 ZnD GB T 12618 2 4 17 109002103001 Nameplate ANSI 1 18 109002100012 Decal Charge voltage 1 19 101016100031 Decal M...

Page 79: ...DECALS NAMEPLATES INSPECTION GTTZ10EJ Operation Manual 10 13 Nov 2020 No Part No Description Qty Remarks 36 109002103012 Decal Brake release 1 37 101040103015 Decal Annual inspection 1...

Page 80: ...Nov 2020 10 14 GTTZ10EJ Operation Manual This Page Intentionally Left Blank DECALS NAMEPLATES INSPECTION...

Page 81: ...ition Hydraulic oil level high position Temperature Replace with tires of the same specifications Only trained maintenance personnel can access the bulkhead Electrocution hazards on platform Electrocu...

Page 82: ...atform Fall hazards Never climb on boom Platfrom capacity Platform up down Max platform height For indoor use For outdoor use Side force Electrocution hazards Wear protective clothing and glasses Batt...

Page 83: ...l Inspection Machine Buyer Renter Inspector Signature Inspector Title Inspector Company NOTE 1 Prepare the machine before delivery which includes performing a pre delivery inspection following mainte...

Page 84: ...Nov 2020 A 4 GTTZ10EJ Operation Manual This Page Intentionally Left Blank DECALS NAMEPLATES INSPECTION...

Page 85: ...vel Inspect battery level Functions and controls Inspect ground controls Inspect platform controls Inspect emergency lowering Inspect drive speed Inspect pothole protection Inpsect tilt protection Inp...

Page 86: ...heel support Lubricate slewing bearing Inspect tires rims and fasteners Inspect slewing bearing bolts Mast boom components Lubricate chains Electrical and hydraulic systems Inspect hydraulic cylinder...

Page 87: ...aired Problem Description Electrical and hydraulic systems Replace hydaulic oil Every 5 years or 5000h of operation YES Machine is in Good Condition NO Machine Has Damage or Malfunction REPAIRED Machi...

Page 88: ...d 50 358 Clarendon St South Melbourne VIC 3205 Australia E mail au sinoboom com 112 Robinson Road 03 01 Robinson 112 Singapore 068902 Hunan Sinoboom Intelligent Equipment Co Ltd No 128 East Jinzhou Av...

Reviews: