


96
GB
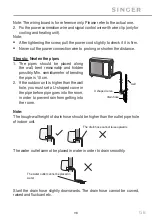
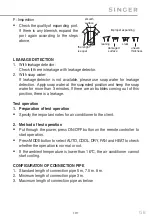
Step two: Install drain joint
1.
Connect the outdoor drain joint into the
hole on the chassis, as shown in the picture
below.
2. Connect the drain hose into the drain vent.
Note: As for the shape of drainage joint, please refer to the current product.
Do not install the drainage joint in the severe cold area. Otherwise, it will be
frosted and then cause malfunction.
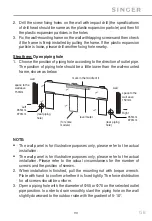
Step three: Fix outdoor unit
1. Place the outdoor unit on the support.
2. Fix the foot holes of outdoor unit with bolts.
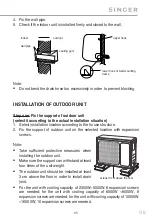
Step four: Connect indoor and outdoor pipes
1.
Remove the screw on the right handle of
outdoor unit and then remove the handle.
Note: When there’re multiple cables passing through it, the
cross-hole of handle should be knocked off and eliminate the
sharp burrs for avoid damaging the cables.
2. Remove the screw cap of valve and aim the
pipe joint at the bellmouth of pipe.
chassis
foot holes
foot holes
outdoor drain joint
drain vent
drain hose
screw
handle
cross
hole
liquid pipe
gas pipe
gas valve
liquid
valve
Summary of Contents for SNG21-09IVi
Page 3: ...3 GR 1 2 3 4 5 6 7 service...
Page 4: ...4 GR R32 R32 GWP 675 R32 R32 R32...
Page 5: ...5 GR service 4m2 R32 1 band wifi 2400MHz 2483 5MHz 2 wifi 20dBm...
Page 6: ...6 GR q q q q q q q q q blue fins q...
Page 7: ...7 GR q q q q q q q q q...
Page 8: ...8 GR q q q q q q 3 q q q q...
Page 9: ...9 GR q q q q q q q NEC CEC q q q q q...
Page 10: ...10 GR q q q q q q q q q q m2 49 q...
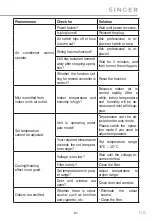
Page 11: ...11 GR DB WB C DB WB C 32 23 43 26 27 24 18 15 C 43 C Temp indicator Power indicator aux...
Page 12: ...12 GR...
Page 13: ...13 GR I Feel TURBO AUTO 8 C X FAN WiFi LIGHT...
Page 14: ...14 GR q q beep q q Light 1 ON OFF 2 MODE AUTO COOL DRY FAN HEAT AUTO AUTO FAN SWING...
Page 16: ...16 GR AUTO DRY X FAN FAN 2 AUTO FAN HEAT 2 FAN 4 SWING 2...
Page 18: ...18 GR 3 5 9 WIFI WiFi WiFi 5 WiFi WiFi MODE WiFi 1 WiFi 10 Light...
Page 22: ...22 GR I FEEL c d c d LOCK MODE d MODE d C F 1 ON OFF 2 MODE 3 c d AUTO 4 FAN 5 SWING...
Page 23: ...23 GR 1 2 7 1 5V 3 8 aux AUTO...
Page 24: ...24 GR 1 2 aux...
Page 25: ...25 GR 3 45 C 4 1 2 3 4...
Page 26: ...26 GR service 5 service 1 2 3 service 1 2...
Page 27: ...27 GR 3 8...
Page 28: ...28 GR 3...
Page 29: ...29 GR AUTO AUTO 16 C 30 C...
Page 30: ...30 GR 5 8 U8 H6 H3 E1 C5 F1 F2 F0...
Page 31: ...31 GR 210 5386490...
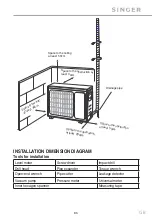
Page 32: ...32 GR 15cm 250 cm 15cm 300cm 15cm...
Page 33: ...33 GR 50cm 30cm 30cm 50cm 200cm...
Page 34: ...34 GR 1 2 3 4 5 6 7 8 1 2 3 4 5 6 2 5 7 8...
Page 35: ...35 GR 1 2 3 4 5 1 2 3 4 5 6 7 8...
Page 36: ...36 GR 9 R32 1 2 3 4 5 9 12 10 17 21 16...
Page 37: ...37 GR 1 2 3 1 150mm 150mm 55mm 70mm 55mm 70mm...
Page 38: ...38 GR 2 3 55 70 5 10 1 2 55 70 5 10...
Page 39: ...39 GR 1 2 3 4 1 m 1 4 15 20 3 8 30 40 1 2 45 55 5 8 60 65 3 4 70 75...
Page 40: ...40 GR 2 1...
Page 41: ...41 GR 2 3 4 5 M 9K 12K N 1 3 2...
Page 42: ...42 GR 1 2 3 4 1 2 3...
Page 43: ...43 GR 4 5 1 2 3 3...
Page 44: ...44 GR 2300W 5000W 6000W 8000W 10000W 16000W 1 2 1 2 1...
Page 45: ...45 GR 2 3 4 1 m 1 4 15 20 3 8 30 40 1 2 45 55 5 8 60 65 3 4 70 75...
Page 46: ...46 GR L N M M 9K 12K 2 1 10 2 U U...
Page 47: ...47 GR O O O...
Page 48: ...48 GR 1 2 3 0 1 4 1 2 0 1MPA 5 6 2 7 Lo Hi...
Page 50: ...50 GR 1 2 3 1 2 ON OFF MODE AUTO COOL DRY FAN HEAT 16oC 1 5 7 5 8 2 3 3...
Page 54: ...54 GR 2...
Page 55: ...55 GR R32...
Page 56: ...56 GR 1 2...
Page 57: ...57 GR 3 30 40 1 4 5 6...
Page 58: ...58 GR 7 8 Ampere...
Page 59: ...59 GR...
Page 60: ...60 GR 80...
Page 61: ...61 GR...