


91
GB
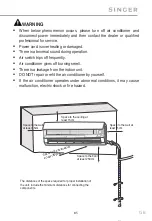
Note:
§
Pay attention to dust prevention and take
relevant safety measures when opening the
hole.
§
The plastic expansion particles are not provided
and should be bought locally.
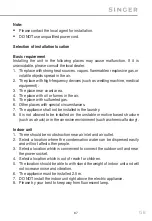
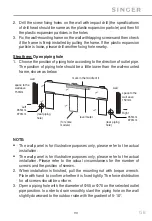
Step four: Outlet pipe
1.
The pipe can be led out in the direction of
right, rear right, left or rear left.
2.
When select leading out the pipe from left
or right, please cut off the corresponding
hole on the bottom case.
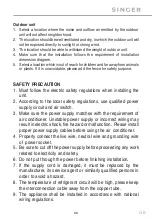
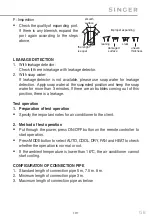
Step
fi
ve: Connect the pipe of indoor unit
1.
Aim the pipe joint at the corresponding
Bellmouth.
2. Pretightening the union nut with hand.
3.
Adjust the torque force by referring to the
following sheet. Place the open-end wrench
on the pipe joint and place the torque wrench on the union nut. Tighten the
union nut with torque wrench.
Φ
55/
Φ
70
5–10°
indoor
outdoor
rear left
rear right
right
cut off the
hole
left
left
right
pipe joint
union nut
pipe
torque wrench
indoor pipe
pipe
union nut
open-end
wrench
Hex nut
diameter
tightening
torque (
Ν
-m)
1/4’’
15~20
3/8’’
30~40
1/2’’
45~55
5/8’’
60~65
3/4’’
70~75
Summary of Contents for SNG21-09IVi
Page 3: ...3 GR 1 2 3 4 5 6 7 service...
Page 4: ...4 GR R32 R32 GWP 675 R32 R32 R32...
Page 5: ...5 GR service 4m2 R32 1 band wifi 2400MHz 2483 5MHz 2 wifi 20dBm...
Page 6: ...6 GR q q q q q q q q q blue fins q...
Page 7: ...7 GR q q q q q q q q q...
Page 8: ...8 GR q q q q q q 3 q q q q...
Page 9: ...9 GR q q q q q q q NEC CEC q q q q q...
Page 10: ...10 GR q q q q q q q q q q m2 49 q...
Page 11: ...11 GR DB WB C DB WB C 32 23 43 26 27 24 18 15 C 43 C Temp indicator Power indicator aux...
Page 12: ...12 GR...
Page 13: ...13 GR I Feel TURBO AUTO 8 C X FAN WiFi LIGHT...
Page 14: ...14 GR q q beep q q Light 1 ON OFF 2 MODE AUTO COOL DRY FAN HEAT AUTO AUTO FAN SWING...
Page 16: ...16 GR AUTO DRY X FAN FAN 2 AUTO FAN HEAT 2 FAN 4 SWING 2...
Page 18: ...18 GR 3 5 9 WIFI WiFi WiFi 5 WiFi WiFi MODE WiFi 1 WiFi 10 Light...
Page 22: ...22 GR I FEEL c d c d LOCK MODE d MODE d C F 1 ON OFF 2 MODE 3 c d AUTO 4 FAN 5 SWING...
Page 23: ...23 GR 1 2 7 1 5V 3 8 aux AUTO...
Page 24: ...24 GR 1 2 aux...
Page 25: ...25 GR 3 45 C 4 1 2 3 4...
Page 26: ...26 GR service 5 service 1 2 3 service 1 2...
Page 27: ...27 GR 3 8...
Page 28: ...28 GR 3...
Page 29: ...29 GR AUTO AUTO 16 C 30 C...
Page 30: ...30 GR 5 8 U8 H6 H3 E1 C5 F1 F2 F0...
Page 31: ...31 GR 210 5386490...
Page 32: ...32 GR 15cm 250 cm 15cm 300cm 15cm...
Page 33: ...33 GR 50cm 30cm 30cm 50cm 200cm...
Page 34: ...34 GR 1 2 3 4 5 6 7 8 1 2 3 4 5 6 2 5 7 8...
Page 35: ...35 GR 1 2 3 4 5 1 2 3 4 5 6 7 8...
Page 36: ...36 GR 9 R32 1 2 3 4 5 9 12 10 17 21 16...
Page 37: ...37 GR 1 2 3 1 150mm 150mm 55mm 70mm 55mm 70mm...
Page 38: ...38 GR 2 3 55 70 5 10 1 2 55 70 5 10...
Page 39: ...39 GR 1 2 3 4 1 m 1 4 15 20 3 8 30 40 1 2 45 55 5 8 60 65 3 4 70 75...
Page 40: ...40 GR 2 1...
Page 41: ...41 GR 2 3 4 5 M 9K 12K N 1 3 2...
Page 42: ...42 GR 1 2 3 4 1 2 3...
Page 43: ...43 GR 4 5 1 2 3 3...
Page 44: ...44 GR 2300W 5000W 6000W 8000W 10000W 16000W 1 2 1 2 1...
Page 45: ...45 GR 2 3 4 1 m 1 4 15 20 3 8 30 40 1 2 45 55 5 8 60 65 3 4 70 75...
Page 46: ...46 GR L N M M 9K 12K 2 1 10 2 U U...
Page 47: ...47 GR O O O...
Page 48: ...48 GR 1 2 3 0 1 4 1 2 0 1MPA 5 6 2 7 Lo Hi...
Page 50: ...50 GR 1 2 3 1 2 ON OFF MODE AUTO COOL DRY FAN HEAT 16oC 1 5 7 5 8 2 3 3...
Page 54: ...54 GR 2...
Page 55: ...55 GR R32...
Page 56: ...56 GR 1 2...
Page 57: ...57 GR 3 30 40 1 4 5 6...
Page 58: ...58 GR 7 8 Ampere...
Page 59: ...59 GR...
Page 60: ...60 GR 80...
Page 61: ...61 GR...