EN
38
Sew 1-step Buttonholes
2
1
4
3
A
D
a
b
E
B
C
Buttonhole sewing is a simple process that provides reliable
results. It is strongly suggested to always make a test
buttonhole on a sample of your fabric before working on your
garment. Stabilizer should alsways be used when making
buttonholes.
Making a Buttonhole
Making a Buttonhole on Stretch Fabrics (E)
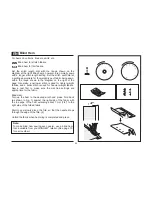
1. Using tailor's chalk, mark the position of the buttonhole on the
fabric.
2. Attach the buttonhole foot and set the Pattern Selector Dial to "
".
Set stitch length dial to "
". Set the stitch width at "6". The
width however may need to be adjusted according to the project.
Sew a test first to determine this.
3. Lower the presser foot aligning the marks on foot with the marks
on the fabric (A). (The front bar tack will be sewn first.) (Align the
mark on the fabric (a) with the mark on the foot (b).)
4. Open the button plate and insert the button (B).
5. Lower the buttonhole lever and gently push it back (C).
6. While lightly holding the upper thread, start the machine.
7. Buttonhole stitching is done in the order (D).
8. Stop the machine when the buttonhole cycle has completed.
When sewing buttonholes on stretch fabric, hook heavy thread or
cord under the buttonhole foot. When the buttonhole is sewn the
legs will overcast the cord.
1. Mark the position of the buttonhole on the fabric with the tailor's
chalk, attach the buttonhole foot, and set the pattern selector dial
to "
". Set stitch length dial to "
".
2. Hook the heavy thread onto the back end of the buttonhole foot,
then bring the two heavy thread ends under & to the front of the
foot, insert them into the grooves and temporarily tie them there.
3. Lower the presser foot and start sewing.
*Set the stitch width to match the diameter of the gimp thread.
4. Once sewing is completed, gently pull the heavy thread to
remove any slack, then trim off the excess.
PUS
H
PUSH
M
Summary of Contents for Scholastic 85SCH
Page 1: ...Manuel d Instruction Instruction Manual Manual de Instrucciones 85SCH ...
Page 2: ......
Page 66: ......
Page 68: ...021Q6D0107 EN ES FR ...
Page 70: ......
Page 71: ...850SCH 2 3 4 THREAD OVERLOCK MACHINE WITH DIFFERENTIAL FEED Instruction Manual ...
Page 72: ......
Page 74: ......
Page 75: ...This product is not intended for industrial use ...
Page 77: ......
Page 78: ......
Page 79: ......
Page 80: ......
Page 81: ......
Page 82: ......
Page 83: ......
Page 84: ......
Page 85: ...2 ...
Page 86: ......
Page 87: ......
Page 88: ......
Page 89: ...7 6 ...
Page 90: ......
Page 91: ...6 5 ...
Page 92: ......
Page 93: ......
Page 95: ......
Page 96: ......
Page 97: ......
Page 98: ......
Page 99: ......
Page 100: ......
Page 101: ......
Page 102: ...2 0 2 0 2 0 3 5 4 0 4 0 5 0 ...
Page 103: ...needle ...
Page 104: ......
Page 105: ......
Page 106: ...4 0 5 0 5 0 0 0 0 8 0 8 5 8 5 ...
Page 107: ......
Page 108: ...28 ...
Page 109: ...2 0 2 0 4 0 ...
Page 110: ...3 0 3 0 5 0 3 5 3 0 3 5 ...
Page 111: ......
Page 112: ...24 ...
Page 113: ......
Page 114: ......
Page 115: ......
Page 116: ...39 ...
Page 117: ......
Page 118: ...25 ...
Page 119: ......
Page 120: ...26 48 ...
Page 121: ...49 ...
Page 122: ...50 850SCH 2 3 4 338 280 265 6 2 ...
Page 123: ...51 ...
Page 124: ...850SCH SURJETEUSE 2 3 4 FILS ENTRAINEMENT DIFFERNTIEL Manual de Instrucciones ...
Page 126: ......
Page 127: ...Este producto no es para uso Industrial ...
Page 132: ...5 COMPONENTES PRINCIPALES ...
Page 134: ...9 PREPARACION PARA EL ENHEBRADO ...
Page 135: ......
Page 136: ......
Page 137: ...2 ...
Page 138: ...2 ...
Page 139: ......
Page 140: ...2 ...
Page 141: ...7 ...
Page 142: ...2 ...
Page 143: ...Vista correcta Vista incorrecta 6 ...
Page 144: ...12 COMO CAMBIAB LOS HILOS PROCEDIMIENTO DE ATADURA ...
Page 147: ...16 TRANSPORTE DIFERENCIAL ...
Page 148: ......
Page 149: ...17 COMO DESACOPLAR LA CUCHILLA SUPERIOR MOVIL Portacuchilla movil ...
Page 151: ...19 COMO COSER CON BRAZO LIBRE TRABAJO TUBULAR ...
Page 153: ...21 ENCADENADO Y COSIDO DE PRUEBA ...
Page 160: ...23 COMO COSER UN DOBLADILLO ENROLLADO 8 ...
Page 163: ......
Page 165: ...Lado superior Lado inferior ...
Page 166: ...Retire Retire ...
Page 167: ...Corte Corte Corte ...
Page 168: ...Posicion de la aguja 9 ...
Page 169: ......
Page 170: ...25 MANTENIMIENTO DE LA MAQUINA ...
Page 171: ......
Page 172: ......
Page 173: ...27 RELACION ENTRE TIPOS DE TELA HILO Y AGUJA Organdi ...
Page 174: ...28 ESPECIFICACION 850SCH 338 280 265 2 3 4 6 2 ...
Page 175: ......
Page 176: ......
Page 177: ...850SCH SURJETEUSE 2 3 4 FILS ENTRAINEMENT DIFFERNTIEL Manuel D instructions ...
Page 178: ......
Page 180: ......
Page 181: ......
Page 186: ...5 PARTIES PRINCIPALES ...
Page 188: ...9 PREPARATION POUR L ENFILAGE ...
Page 189: ...10 COMMENT RETIRER ET INSERER LES AIGUILLES Talon plat vers l arriere I ...
Page 190: ...11 ENFILAGE DE LA MACHINE ...
Page 191: ...2 ...
Page 192: ...2 ...
Page 193: ......
Page 194: ...2 ...
Page 195: ...7 ...
Page 196: ...2 ...
Page 197: ...Enfilage correct Mauvais enfilage 6 ...
Page 198: ...12 COMMENT CHANGER DE FILS EN LES NOUANT ...
Page 199: ...13 COMMENT REGLER LA LONGUEUR DE POINT 14 COMMENT REGLER LA LARGEUR DU SURJET ...
Page 201: ...16 ENTRAINEMENT DIFFERENTIEL ...
Page 202: ......
Page 203: ...Support du couteau mobile ...
Page 205: ...19 LE BRAS LIBRE TRAVAIL TUBULAIRE ...
Page 206: ...Selecteur du doigt mailleur 20 SURJET STANDARD ET OURLET ROULOTTE I ...
Page 207: ...21 DEGAGEMENT DE LA CHAINETTE ET TEST DE COUTURE ...
Page 214: ...23 COMMENT REALISER UN OURLET ROULOTTE 8 ...
Page 217: ......
Page 219: ...Envers Endroit ...
Page 220: ...Retirer Retirer ...
Page 221: ......
Page 222: ...9 ...
Page 223: ......
Page 224: ...25 ENTRETIEN DE LA MACHINE ...
Page 225: ......
Page 226: ......
Page 227: ......
Page 228: ...850SCH 850SCH ...
Page 229: ......
Page 230: ...Printed in China 364300 022 1 ...


