background image

12

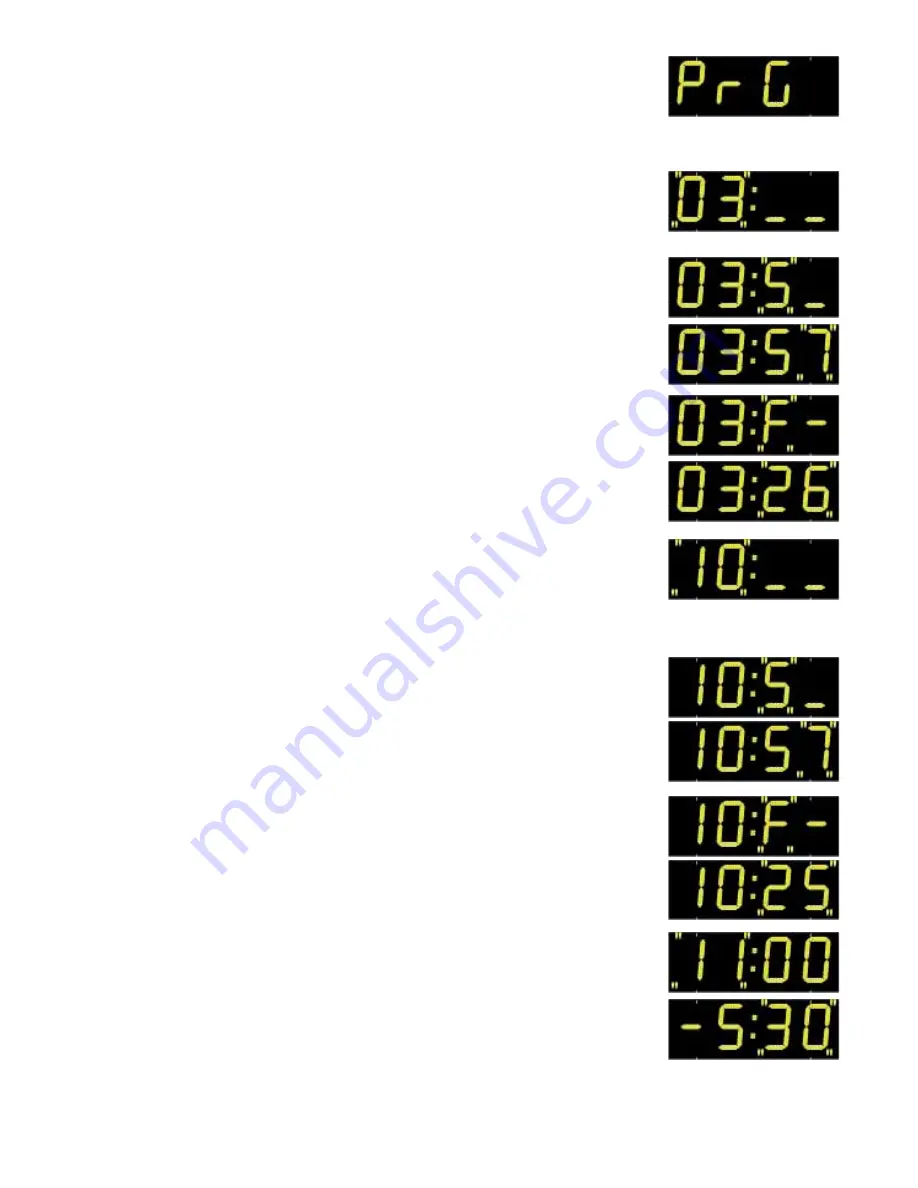
«PrG» programmable mode : mode to enter summer/winter and winter/
summer time change dates and time difference.

a. If the «PrG» menu is chosen, press the [S] button to validate.

b. The number of the month for the winter/summer time change blinks. 

Modify with the [+] button.

c. Validate the month with the [S] button.

d. The third figure, corresponding to the day in the month for the 

winter/summer time change blinks.

  If the date is not fixed :

-  Modify the third figure, corresponding to the number of the week 

in the month (from 1 to 5) with the [+] button. Validate with [S].

-  Modify the fourth figure, corresponding to the number of the day 

in the week (from 1 to 7 : 1 Monday and 7 Sunday) with the [+] 
button. Validate with [S].

  If the date is fixed :

-  Select F for the third figure with the [+] button. Validate with [S].

-  Enter the number of the day in the month (from 1 to 31) with the 

[+] button. Validate with [S].

e. The number of the month for the summer/winter time change blinks. 

Modify with the [+] button.

f.  Validate the month with the [S] button.

g. The third figure, corresponding to the day in the month for the 

summer/winter time change, blinks.

  If the date is not fixed :

-  Modify the third figure, corresponding to the number of the week 

in the month (from 1 to 5) with the [+] button. Validate with [S].

-  Modify the fourth figure, corresponding to the number of the day 

in the week (from 1 to 7 : 1 Monday and 7 Sunday) with the [+] 
button. Validate with [S].

If the date is fixed :

-  Select F for the third figure with the [+] button. Validate with [S].

-  Enter the number of the day in the month (from 1 to 31) with the 

[+] button. Validate with [S].

h. The hours of time difference blink. Modify with the [+] button (from 

-11 h to +11 h). Validate with the [S] button.

j.  The minutes blink. Modify with the [+] button (00 or 30). Validate 

with the [S] button.

Summary of Contents for LED Kit H/T

Page 1: ...49340 TR MENTINES FRANCE Tel 33 0 2 41 71 72 00 Fax 33 0 2 41 71 72 02 www bodet com Ref 606252C When receiving this product check that it has not been damaged during transport and notify the carrier...

Page 2: ...ay 14 IV Technical specifications 15 V Installation recommendations 16 CAUTION this equipment must be serviced by an approved technician The guarantee shall be cancelled if any modifications are made...

Page 3: ...x includes the CPU board and the power unit This box is thicker than the double sided box The double sided box is supplied with the display unit only and with a flat cable to be connected directly to...

Page 4: ...the mains power supply 5 Close the box and reinstall the four screws See the corresponding literature The polarity of the power supply must conform with the screen printed markings To side 1 main lin...

Page 5: ...nsole only must never be modified position DIP 9 to ON and DIP 10 to OFF Close the console and press a button The HF receiver on the H T LED board is then configured so that it will only work with the...

Page 6: ...ings menu To define the LED kit H T settings use the two buttons on the front panel of the single sided LED kit H T or the HF radio control console Select or S button Long press 3 seconds to access th...

Page 7: ...ence and summer winter time change options modify the time base and select the temperature unit Celsius or Fahrenheit Caution This menu is intended to be used by technicians only TEST to test the disp...

Page 8: ...starts when the S button is released 6 The year blinks 2000 to 2099 Modify with the button 7 Press the S button to validate the year and to go on to the adjustment of the number of the day in the mont...

Page 9: ...9 Press the S button to validate the parameter and to go on to the adjustment of the third alternation parameter 10 The third alternation parameter blinks h t d or Modify with the button 11 Press the...

Page 10: ...utton 5 Press the S button to validate the order and to go on to the selection of synchronisation mode 6 The synchronisation mode blinks independent Ind Radio rAd or GPS GPS Modify with the button 7 P...

Page 11: ...USA Central zone USAC Chicago GMT 06 hours Winter to summer time second Sunday in March at 2 a m Summer to winter time first Sunday in November at 2 a m USA Mountain zone USAM Denver GMT 07 hours Wint...

Page 12: ...ith S Enter the number of the day in the month from 1 to 31 with the button Validate with S e The number of the month for the summer winter time change blinks Modify with the button f Validate the mon...

Page 13: ...me is to be displayed CITY Zone Reference zone Time difference GMT LOS ANGELES USAP United States Canada 08 MEXICO USAC United States Canada 06 CHICAGO USAC United States Canada 06 NEW YORK TORONTO US...

Page 14: ...the LEDs should light up 3 Press the S or to go on to the next test 4 All the LEDs should go out 5 Press the S or button to display the version 6 Display of the position of each digit 7 Display the EP...

Page 15: ...enna independent time base precision of 0 2 second day Power supply 110 240 V 50 60 Hz Black flush fitting case including LED display units power unit and control board The display kit must be fitted...

Page 16: ...ed 2 or 3 cm in front of the figures To ensure correct reading of all the figures allowing for parallax errors the distance between the LED digits and the external structure must be properly calculate...

Reviews: