background image

SL-881 6G Handheld HDMI/MHL Audio and Video Generator/Analyzer 


User Guide 
 

48 

© 2016-2017 Simplay Labs, LLC., 

Simplay-UG-02001-E 

All rights reserved. CONFIDENTIAL 

8.


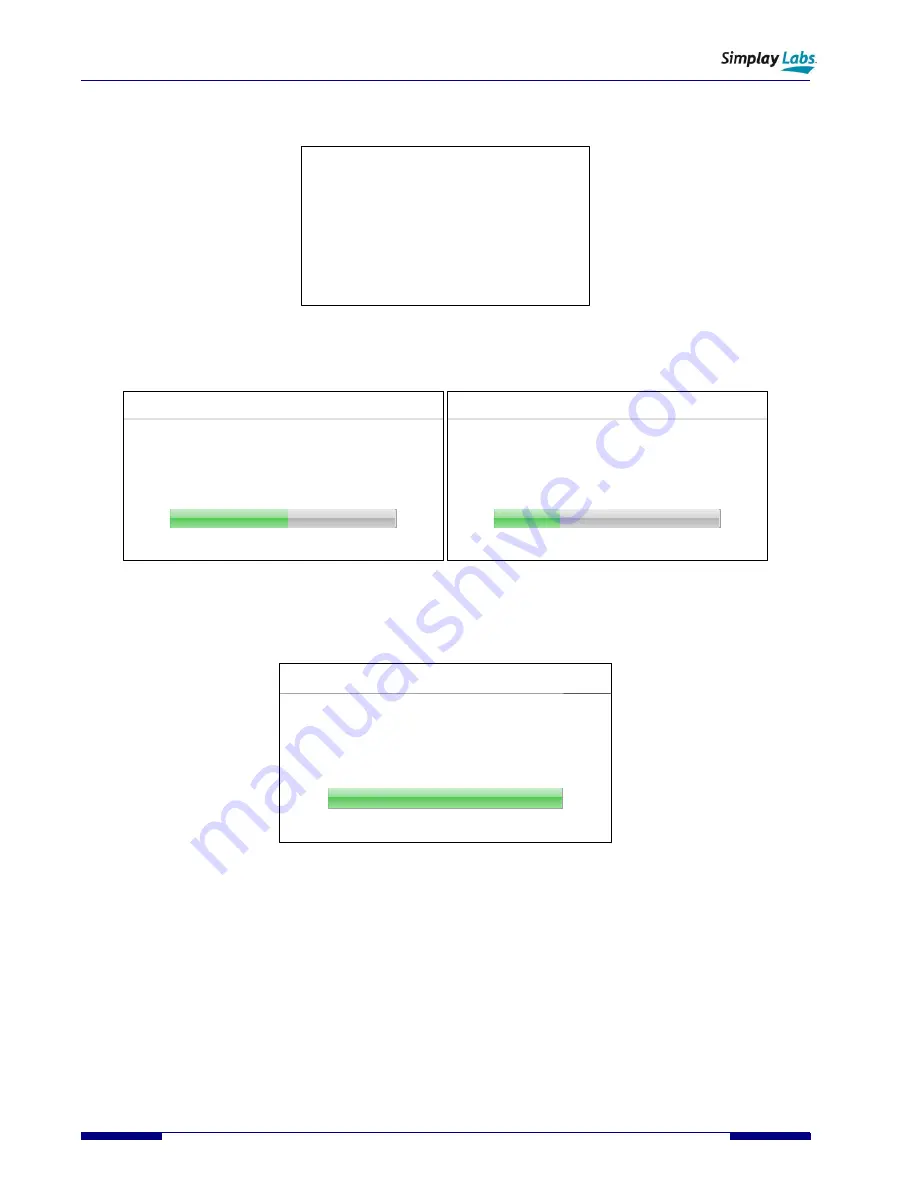
Firmware update starts running automatically (

Figure A.4

). You can release the UPG button now.


Updating Firmware
Burn AVG.bin to Flash 

………………

……


Figure A.4. Image Update Window Shown on the SL-881 LCD Touch Screen 

9.


After that step is done, Video Transceiver and RTL firmware will be updated automatically as shown in

 Figure A.5

.  


Firmware Update

51%

Updating Video Transceiver FW ...

Firmware Update

28%

Updating RTL ...


Figure A.5. Transceiver FW and RTL Updating Windows shown on the SL-881 LCD Touch Screen 

10.


After all firmware is updated successfully, follow the instruction to power off then power on the SL-881, as shown 
in 

Figure A.6

.


Firmware Update

100%

Firmware updated successfully.

Power off

then power on the AVG platform.


Figure A.6. Image Update Completed Window Shown on the SL-881 LCD Touch Screen 

Summary of Contents for SL-881

Page 1: ...SL 881 6G Handheld HDMI MHL Audio and Video Generator Analyzer User Guide Simplay UG 02001 E April 2020 ...

Page 2: ...k Devices 16 3 Optional SL 881 AVG Software 17 Downloading the SL 881 AVG Software 17 3 1 1 Contents of the Software Package 17 System Requirements 17 Installing the SL 881 AVG Driver 18 Installing the SL 881 AVG Software 19 Licensing 20 3 5 1 Getting License File 20 3 5 2 Loading License File 22 4 Enhanced SL 881 AVG Test Mode 24 Performing EDDC Compliance Test 24 Running Cable Loop back Test 30 ...

Page 3: ...3 8 AVG Software Main Window on Test Computer 20 Figure 3 9 Connect Device Dialog 20 Figure 3 10 No License File Found Dialog 20 Figure 3 11 License Manager Dialog 21 Figure 3 12 The Windows Save As Dialog 21 Figure 3 13 Send by Email Dialog 21 Figure 3 14 License Requirement File to Simplay Labs 22 Figure 3 15 License Menu Item Enabled 23 Figure 3 16 Options Enabled in AVG Software Main Window 23...

Page 4: ...1 Firmware Installation Package 47 Figure A 2 SL 881 Firmware binary file 47 Figure A 3 System Settings Window Shown on the SL 881 LCD Touch Screen 47 Figure A 4 Image Update Window Shown on the SL 881 LCD Touch Screen 48 Figure A 5 Transceiver FW and RTL Updating Windows shown on the SL 881 LCD Touch Screen 48 Figure A 6 Image Update Completed Window Shown on the SL 881 LCD Touch Screen 48 Figure...

Page 5: ...inition Link MHL 3 x specifications This User Guide provides details on how to setup and test source sink or repeater devices for compliance to the HDMI version 2 0a and MHL 3 x specifications For the latest updated software drivers see online at https www simplaylabs com Support For the latest updated documentation see online at https www simplaylabs com Support Documentation SL 881 Hardware Figu...

Page 6: ...IAL Figure 1 3 SL 881 AVG Rear Panel SL 881 Controls Indicators and Interface Connectors Figure 1 4 shows the location of the SL 881 AVG enclosure features input and output ports power and reset switches LCD touch screen display and SD card slot LCD Touch Screen 1 2 3 4 5 7 6 8 9 10 11 12 13 14 15 16 Figure 1 4 Locating SL 881 AVG Components Top View ...

Page 7: ...he battery charge is complete 15 LED Power DC power indicator when red the power adapter is connected and the SL 881 is powered on 16 LCD Touch Screen Enables SL 881operation in standard test mode See Section 1 3 1 2 for a description of the touch screen icons and their functions SL 881 Test Modes The SL 881 AVG is designed to offer two distinct modes of operation Standard Test Mode see Section 1 ...

Page 8: ...rt Section 2 4 EDID Load Loads EDID data from SD card and program to HDMI INPUT port Section 2 5 Factory Test Runs batch testing for a device connected to HDMI OUT 1 or HDMI OUT 2 ports Section 2 6 Settings Displays AVG firmware related information LCD touch screen to list current settings and parameters 1 3 2 Enhanced Test Mode Enhanced test mode features become available only when installing opt...

Page 9: ...evices Source devices or output port of repeater device Inside the Box The SL 881 AVG delivery includes the following items 5 V power supply Prime pass HDMI cable USB A to USB mini B cable MHL cable HDMI to Mini B USB SD card This card is required to transfer and program the EDID contents of the HDMI INPUT port and also for firmware upgrading Header cable 10 pin with daughter card IMPORTANT Save t...

Page 10: ...ng with source device or the output port of repeater devices you can perform actions 2 and 4 mentioned in Section 2 3 and Section 2 5 When in Standard test mode testing with sink device or the input port of repeater devices you can perform actions 1 3 and 5 mentioned in Section 2 2 Section 2 6 and Section 2 4 Setting up Connections Connect the SL 881 to the source device or the output port of the ...

Page 11: ...with MHL Sink Device in Stand alone Mode Generating Video Signals When Running with Sink Devices The SL 881 can be used to generate multiple output signals to sink devices or the input port of repeater devices You can modify parameters of the output signal at run time This procedure shows how to generate output signal when running with a sink device 1 Use the HDMI cable to connect the HDMI sink de...

Page 12: ...eld Function Resolution Change output video timings from 480p to 4k Video Pattern Change output video patterns up to 30 video patterns are supported Signal Type Change output mode HDMI DVI HDCP Change output HDCP revision HDCP 2 x 1 x Off Color Space Change output color spaces RGB YC444 YC422 YC420 Color Depth Change output color depth 8 10 12 bits per pixel per channel Audio Source Change output ...

Page 13: ... MHL source device as shown in Figure 2 3 2 Power on the SL 881 3 On the LCD touch screen Figure 1 5 choose Video Analyzer The Video Analyzer window appears Figure 2 6 Video Analyzer Pixel Freq I P Hpol Vpol Htotal Hactive Hsync Hfront Vtotal Vactive Vsync Vfront N A HDMI N A Video Format Video Timing Audio Format HDR Info Figure 2 6 Video Analyzer Window Field Function Pixel Freq detected pixel f...

Page 14: ...ose EDID Read The Read EDID from Sink DUT window appears Figure 2 7 Read EDID from Sink DUT From HDMI OUT1 Refresh Block 1 Block 0 00 01 02 03 04 05 06 07 00 00 00 00 00 00 00 00 00 00 00 00 00 00 00 00 00 01 02 03 04 05 06 07 08 09 0A 0B 0C 0D 0E 0F 00 00 00 00 00 00 00 00 00 00 00 00 00 00 00 00 00 00 00 00 00 00 00 00 00 00 00 00 00 00 00 00 00 00 00 00 00 00 00 00 00 00 00 00 00 00 00 00 00 00...

Page 15: ...nto the SD Card slot 3 On the LCD touch screen Figure 1 5 choose EDID Load The Load EDID to Sink TE window appears See Figure 2 8 Load EDID to Sink TE 16 Refresh Local Disks SD Card EDID_data bin Load File Cancel Figure 2 8 Load EDID to Sink TE Window 4 Select the EDID file EDID_data bin to load 5 Select Load File or Cancel from the pop up menu that is not visible on screen If you click Load File ...

Page 16: ...w to perform factory test when running with sink devices 1 Use the HDMI cable to connect sink device to the SL 881 HDMI OUT 1 port as shown in Figure 2 2 2 Power on the SL 881 3 On the LCD touch screen Figure 1 5 choose Factory Test The Factory Test window appears Figure 2 9 Factory Test EDID Checksum OK HDCP 2 2 PASS 1 2 3 4 5 Text Output Patterns Color Bars Red Green Color Bars Color Bars Resolu...

Page 17: ... We recommend you installing the driver first 3 Purchase and activate the software license The license must be purchased Downloading the SL 881 AVG Software The optional SL 881 AVG software can be downloaded from the Simplay website to your test computer To download the software see the Simplay Labs site at https www simplaylabs com Support 3 1 1 Contents of the Software Package Download the firmw...

Page 18: ...er_installation folder from your test computer Click VCP_V1 4 0_Setup to install VCP driver as shown in Figure 3 2 Figure 3 2 Install the VCP Driver 2 After the VCP driver installation is completed open readme txt Figure 3 2 Follow the steps in the How to use section in readme txt to install the dpinst driver Based on your Operating System if you have 64 bit Windows run dpinst_amd64 exe if you hav...

Page 19: ...VG software 1 Open the SL881_AVG_software_installation folder from your test computer Click setup exe as shown in Figure 3 5 to install the SL 881 AVG software Figure 3 5 Locate and Open Setup exe 2 The Welcome to the Simplay AVG Setup Wizard dialog opens as shown in Figure 3 6 Click Next Figure 3 6 Welcome to the AVG Setup Wizard 3 When the SL 881 AVG software installation is completed the AVG ap...

Page 20: ...u need to get and load the license file to activate the software If you install the AVG software for the first time follow these steps to get an AVG software license 1 Make sure the SL 881 is powered on and is connected to your test computer Open the SL 881 Application shortcut from your test computer desktop Figure 3 7 You get the main window of the AVG software Figure 3 8 Figure 3 8 AVG Software...

Page 21: ...8 choose Help License The License Manager dialog appears Figure 3 11 Figure 3 11 License Manager Dialog 7 Click Create to generate a license requirement file avg 8 The Windows Save as dialog pops up Figure 3 12 Save this license requirement file to your test computer Figure 3 12 The Windows Save As Dialog 9 The Send License Requirement File dialog pops up Figure 3 13 Figure 3 13 Send by Email Dial...

Page 22: ...the license requirement file you previously saved Then Microsoft Outlook window pops up Manually attach the license requirement file avg which you previously saved to the email Fill in your distributor vendor s email address Send the email to your distributor vendor The distributor vendor will forward this request to Simplay Labs and purchase the license key on your behalf The distributor vendor w...

Page 23: ...ager dialog appears Figure 3 11 Click Load to load the license file lic 9 After loading the license file from the AVG software main window the EDDC SCDC Compliance Testing the DDC I2C Activity Monitor and the Load or Edit Reference EDID options are enabled as shown in Figure 3 16 The connection between the SL 881 and your test computer is completed You can start using the SL 881 AVG software Figur...

Page 24: ...s You can also control SL 881 with a console application of Windows to build SL 881 in your own automation test Note In this enhanced test mode the LCD touch screen of the SL 881 is not operational Most of the operation is performed on your test computer unless there is message pop up prompting you to check the connections between the devices and the SL 881 Performing EDDC Compliance Test 1 From t...

Page 25: ... Dialogs 4 After editing CDF variables choose the items from the Source Tests area or the Sink Tests area Figure 4 1 Click Run to run the selected items 5 A dialog pops up Figure 4 3 asking you to connect the source or sink device to the test computer After the connections are set up click OK Figure 4 3 Instruction Dialogs 6 The selected tests run as shown below Figure 4 4 and Figure 4 5 ...

Page 26: ...nd Video Generator Analyzer User Guide 26 2016 2017 Simplay Labs LLC Simplay UG 02001 E All rights reserved CONFIDENTIAL Figure 4 4 EDDC Source Test with Log File Figure 4 5 EDDC Sink Test with Log File 7 This step is Sink Test specific ...

Page 27: ... select HDR infoFrame type Use Min R Min G and Min B buttons to set Primary points to reflect minimum Red Green and Blue coloremetry Use BT 601 BT 709 and BT 2020 buttons to set Primary points to reflect BT 601 BT 709 and BT 2020 coloremetry Fill in Primary 1 Primary 2 Primary 3 and White Point fields to set Primary and White points with arbitrary values The primary range is from 0 to 1 0 Drag the...

Page 28: ...viewer feature is available since SL 881 AVG software version 1 16 and hardware version 2 10015008 To download the software refer to Downloading the SL 881 AVG Software Figure 4 8 Sample DDC Waveform Use Open DDC Waveform button to load desired DDC waveform file Use and buttons to view previous and next DDC waveform file Use R button to reset waveform displaying Use and buttons to navigate to prev...

Page 29: ...SL 881 6G Handheld HDMI MHL Audio and Video Generator Analyzer User Guide Simplay UG 02001 E 2016 2017 Simplay Labs LLC 29 All rights reserved CONFIDENTIAL Figure 4 9 Sample Test Report ...

Page 30: ...Figure 3 16 click Cable Loop back Testing The Cable Loop back Test window appears Figure 4 10 Figure 4 10 Cable Loop back Test Windows There are two modes of Cable Loop back test single mode and batch mode 4 2 1 Single mode If you want to run the test in single mode be sure NOT to check the Batch Test checkbox bottom area in Figure 4 10 1 Select one or multiple items in the Test List area Figure 4...

Page 31: ... the Auto Increase checkbox is not checked Cable Name remains the same after each test 4 Click Run to run the items selected in Step 1 5 A dialog pops up Figure 4 12 asking you to connect the cable device to the AVG platform After the connections are set up click OK Note Connect the cable to the 6G Output port which supports Cable Loop Back test The 3G Output port does not support Cable Loop Back ...

Page 32: ...eport 4 2 2 Batch mode When running in the batch mode 1 Check the Batch Test checkbox Figure 4 15 2 Select item s in the Test List area Figure 4 15 3 Use Repeat Times listbox to select how many times to repeat the test 4 When Auto Increase checkbox is checked Cable Name will be changed to Cable002 and increase after each complete test run If the Auto Increase checkbox is not checked Cable Name rem...

Page 33: ...lick the item in the Test List area The detailed result will be shown in the Detailed Result area Figure 4 16 The green lines show the ideal signal waveform The orange triangles show the noise jitter detected during the test Figure 4 16 Cable Loop Test Detailed Result Area 8 Click the Report button Figure 4 16 The Report file in HTML format is opened and is automatically saved under Documents Simp...

Page 34: ...k DDC I2C Activity Monitor The DDC I2C Monitor window appears Figure 4 17 2 From the DDC Monitor window to decide which DDC bus to monitor select the Rx Port Tx Port or External radio button Figure 4 17 DDC Monitor Test Window When you select the Rx Port radio button a dialog pops up Figure 4 18 asking you to connect the source device to the test computer After the connection is set up click OK Fi...

Page 35: ...g pops up Figure 4 19 asking you to connect the sink device to the test computer After the connection is set up click OK Figure 4 19 Output Port Monitor Instruction Dialog When you select the External radio button a dialog pops up Figure 4 20 asking you to connect the sink and source devices to the test computer After the connection is set up click OK Figure 4 20 Pass Through Monitor Instruction D...

Page 36: ...igure 4 21 to scroll the current log to the bottom 5 Check Collapse Same option Figure 4 21 to collapse the same log 6 Click the Clean button Figure 4 21 to clean the current log and decoding data displayed in the window when necessary 7 Click the Save button Figure 4 21 to save the current log to local PC 8 Click the Load button Figure 4 21 to load back log file from PC 9 Right click the log area...

Page 37: ...SL 881 6G Handheld HDMI MHL Audio and Video Generator Analyzer User Guide Simplay UG 02001 E 2016 2017 Simplay Labs LLC 37 All rights reserved CONFIDENTIAL Figure 4 22 DDC Log Filter ...

Page 38: ... window of your test computer Figure 3 16 click Load or Edit Reference EDID 2 From the EDID Editor window select the EDID which you want to review edit or program to the SL 881 Figure 4 23 Figure 4 23 EDID Editor Test Window Reviewing EDID file To review selected EDID data click the EDID Review button Figure 4 23 EDID Review Edit window appears Figure 4 24 Contents of the EDID file are displayed ...

Page 39: ...3 to load customer s EDID data in either binary bin or text txt format When customer s EDID data is selected to load the EDID Review button changes to the EDID Edit button in the EDID Editor Test window C Click the EDID Edit button EDID contents are displayed in detail in the EDID Review Edit window Figure 4 24 o Modifying the EDID contents A Select the tab contents of which you want to modify Fig...

Page 40: ...ction is available since SL 881 AVG software version 1 16 and hardware version 2 10015008 To download the software refer to Downloading the SL 881 AVG Software 4 5 1 Hardware and Software Requirements The following hardware and software are required to run the SL 881 with console control Hardware requirements o SL 881 AVG platform Figure 1 1 o USB A to USB mini B cable Software requirements o Cons...

Page 41: ...s LLC 41 All rights reserved CONFIDENTIAL 4 From the Windows explorer navigate to the folder where AVG_Console exe locates A typical location is C Program Files x86 Simplay Labs Simplay AVG Manually typing the path of AVG_Console exe in the Command Prompt window Figure 4 28 Figure 4 28 Entering AVG_Console exe Path ...

Page 42: ...tor Analyzer User Guide 42 2016 2017 Simplay Labs LLC Simplay UG 02001 E All rights reserved CONFIDENTIAL 5 Run AVG_Console exe with parameters Figure 4 29 Supported parameters are listed in Table 4 1 Figure 4 29 Running AV_Console exe with Parameters ...

Page 43: ...r75 1 half_red75 2 half_green75 3 half_blue75 4 half_magenta75 5 half_cyan75 6 half_yellow75 7 half_white75 8 black 9 checkerboard 10 bluescreen 11 doublepluge 12 sharpness 13 colortint 14 grayramp 15 evothvline 16 freqsweep 17 frmgeom 18 rgbgray 19 rgb3bars 20 half_clrbars75 21 diagram 22 hdrdemo Cable Loop Test cable r 1 640x480p60 2 3 720x480p60 4 1280x720p60 16 1920x1080p60 95 3840x2160p30 97 ...

Page 44: ...al pixels Return value in pixel count vact Vertical active pixels Return value in pixel count vsnc Vertical sync pixels Return value in pixel count vfrt Vertical front porch pixels Return value in pixel count vic VIC code in AVI infoFrame As defined in CEA861 Spec ar Aspect ratio 0 None 1 4 3 2 16 9 3 64 27 4 Square pixel cs Color space 0 RGB 1 YC444 2 YC422 3 YC420 cd Color depth 0 None 1 8bits 2...

Page 45: ...096x2160p30 22 1440x576i50 16 9 102 4096x2160p60 4 5 4 Pattern Parameter Description Value Description Value Description 0 color_bar75 12 sharpness 1 half_red75 13 colortint 2 half_green75 14 grayramp 3 half_blue75 15 evothvline 4 half_magenta75 16 freqsweep 5 half_cyan75 17 frmgeom 6 half_yellow75 18 rgbgray 7 half_white75 19 rgb3bars 8 black 20 half_clrbars75 9 checkerboard 21 diagram 10 bluescr...

Page 46: ...r 4K 60 Hz resolution AVG_Console exe cable r 97 To run a Cable Loop Test for 4K 60 Hz resolution without cable connection checking AVG_Console exe cable r 97 conn 0 To generate HDR pattern with 1080p 60 Hz size percentage 50 IRE percentage 70 HDR infoFrame type SMPTE AVG_Console exe gen r 16 p 7 pw1 5 pw2 7 hdr To get input signal timing information e g horizontal active pixels count AVG_Console ...

Page 47: ...ns one AVG bin file Figure A 2 which is to be used below Figure A 2 SL 881 Firmware binary file Follow the steps below to perform the SL 881 firmware update 1 Copy the AVG bin files you downloaded to the SD card 2 Plug in the SD card and power on the SL 881 3 The SL 881 LCD touch screen main window appears as shown in Figure 1 5 From now on all the operation is performed on the SL 881 AVG 4 Choose...

Page 48: ...t step is done Video Transceiver and RTL firmware will be updated automatically as shown in Figure A 5 Firmware Update 51 Updating Video Transceiver FW Firmware Update 28 Updating RTL Figure A 5 Transceiver FW and RTL Updating Windows shown on the SL 881 LCD Touch Screen 10 After all firmware is updated successfully follow the instruction to power off then power on the SL 881 as shown in Figure A ...

Page 49: ...Figure 1 5 Click Settings 2 The System Settings window appears Compare the System FW Version Video Transceiver Version and RTL Version in the current window Figure A 7 with the one Figure A 3 you have written down If the version number changes as expected the firmware is updated successfully System Settings Hardware Version 1 1 Product Info System FW Version Copyright Simplay 2015 www simplaylabs ...

Page 50: ...een Please press the touch screen to continue Figure B 1 Touch Screen Calibration Window Shown on the SL 881 LCD Touch Screen 2 Touch any position on the touch screen to start the calibration 3 A message appears on the top left corner on the touch screen Figure B 2 Follow the instruction press the circle Runtime calibration please touch the screen at the center of the ring Press here upper left po...

Page 51: ...CONFIDENTIAL References This is a list of the standards abbreviations appearing in this document Abbreviation Standards Publication Organization and Date HDMI High Definition Multimedia Interface Version 2 0 HDMI LLC September 4 2013 HDMI CTS High Definition Multimedia Interface Version 2 0 Generic Compliance Test Specification October 4 2013 ...

Page 52: ...G platform Updated SL 881 AVG Software with HDR Debug test and DDC waveform viewer features Details of the changes and additions Updated Figure 1 5 LCD Touch Screen Main Window Added Figure 2 3 Connecting with MHL Source Device in Stand alone Mode and Figure 2 4 Connecting with MHL Sink Device in Stand alone Mode Added MHL related contents to step 1 in both Generating Video Signals When Running wi...

Page 53: ... if claims are made within the warranty period For notifications to Simplay Labs or products outside the warranty period the process will be the same but charges may apply Contact details may be obtained on Simplay Labs website https www simplaylabs com Support Warranty Customers are requested to perform the following actions before claiming Simplay Labs product as defective Owner must notify Simp...

Page 54: ...used under license from MHL LLC in the United States or other countries All other trademarks and registered trademarks are the property of their respective owners in the United States and or other countries HDMI Licensing LLC MHL LLC and Simplay Labs LLC are wholly owned subsidiaries of Lattice Semiconductor Inc The absence of a trademark symbol does not constitute a waiver of the trademarks owner...

Page 55: ...SL 881 6G Handheld HDMI MHL Audio and Video Generator Analyzer User Guide Simplay UG 02001 E 2016 2017 Simplay Labs LLC 55 All rights reserved CONFIDENTIAL Simplay Labs LLC www simplaylabs com ...

Reviews: