


16
REPLACING MOUNTING BASE
– cont’d
3. Rotate the pad counter-clockwise with
the screwdriver until the screwdriver
makes contact with the counterweight
(3).
4. While looking between the base and
the plastic housing, rotate the pad and
counterweight until you can see one of
the two gear housing mounting screws
(4).
NOTE:
There are two screws, one on
each side.
NOTE:
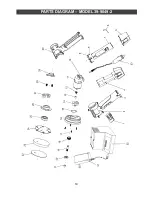
Refer to Figure 13 on Page 17 for
details on removing the two gear housing
mounting screws. The exploded view of the
mounting pad assembly has been
illustrated with the counterweight (3)
rotated away from the screwdriver to
provide a clear view of the components.
When removing the gear housing mounting
screws, the counterweight must be
touching the screwdriver to properly align
the screwdriver with the screws.
5. Remove the first gear housing
mounting screw (4).
NOTE:
If the hole in the base does not
align perfectly with the screw, make
sure the counterweight is touching the
shaft of the screwdriver.
6. Repeat steps #2 to #5 above to locate
and remove the second gear housing
mounting screw.
NOTE:
The second mounting screw is
located on the opposite side of the
gear housing (5).
7. Once both gear housing mounting
screws are removed, lift the base and
gear housing assembly out of the main
housing.
NOTES:
a) Keep the gasket (6) for use in
installing the new base and gear
housing assembly.
b) The base and gear assembly are
not repairable and must be replaced
as a complete unit.
To install the new base assembly, simply
reverse the steps in the above procedure.
MAINTENANCE
Fig. 12