background image

20

8. c

leaning


and

 m

aintenance

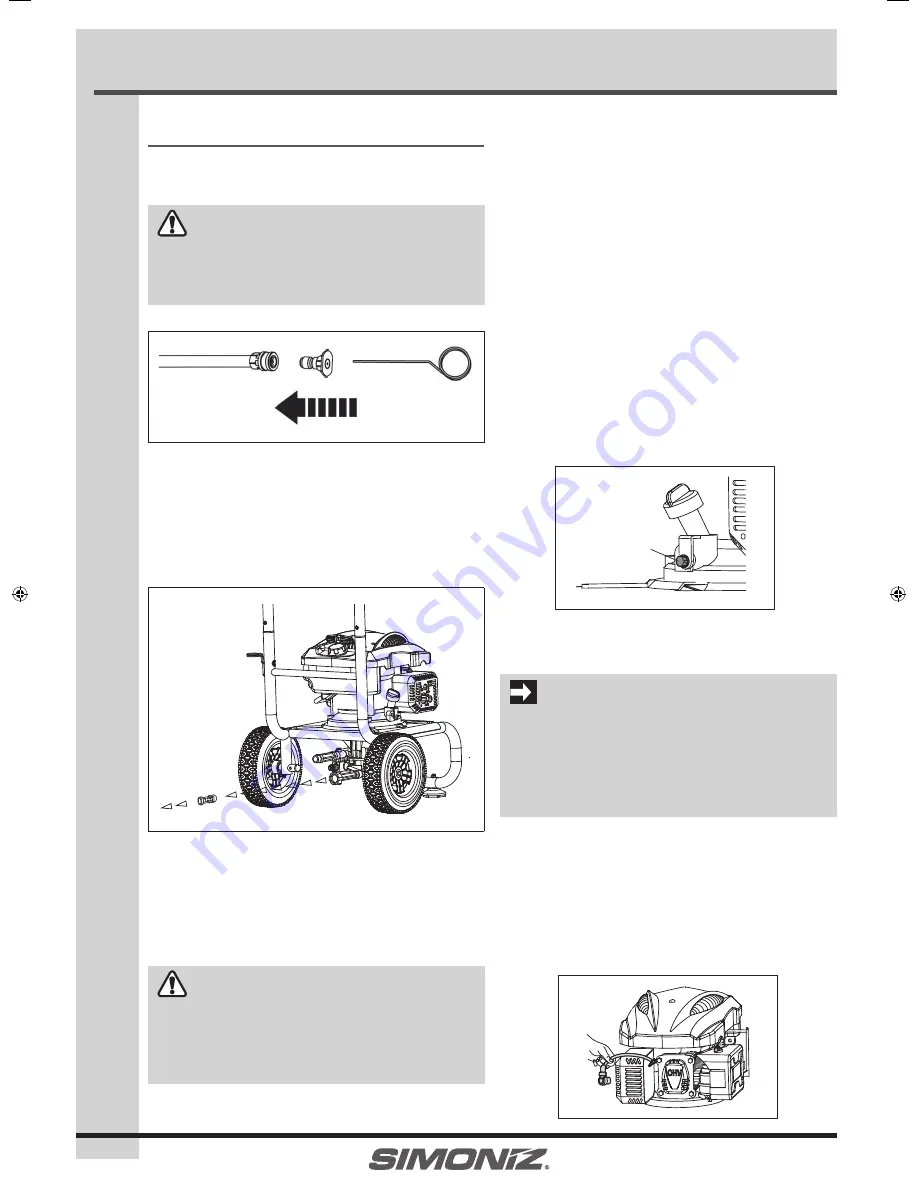
8.1 Cleaning the Spray Tips

  WARNING 

Clogging of the spray tip increases the water pressure and 
might damage the pump unit. 

Clean the spray tip by carefully inserting the provided cleaning 
needle, or a thin, sharp object (e.g., paper clips) into the tip to 
remove deposits.

8.2 Cleaning Water Inlet Filter


This pressure washer is equipped with a water inlet filter.


The water inlet filter must be kept clean at all times, 
otherwise it can restrict the water flow to the pump unit 
and damage it.


Remove and clean the water inlet filter.

  WARNING 

DO NOT 

operate this pressure washer without the water inlet 

filter in place, as deposits could build up internally and affect 
the functioning of the unit.   

8.3  Engine Maintenance

Draining Engine Oil 

The engine oil should be replaced after the first 20 hours of 
operation, or after the first month of use. After that, it should be 
replaced every 100 hours or every 6 months. 

To Drain the Engine Oil:

1.  Loosen the oil tank dipstick.
2.  Place an oil container underneath the opening on the main 

frame.

3.  Remove the oil plug and drain the oil.
4.  Once the oil has been completely drained, retighten the hex 

screw and oil tank dipstick.

Recommended Engine Oil 

Add oil as described in chapter 

g

 Adding/Checking Oil. 

  IMPORTANT

Used oil is a hazardous waste product and must be disposed 
of properly. Do not discard with household waste. Check with 
your local authorities, service centre, or Canadian Tire for safe 
disposal / recycling facilities. 

Inspecting, Replacing or Cleaning the Spark Plug

The spark plug should be checked every 100 hours of operation or 
every 6 months. 

To Replace or Clean the Spark Plug:

1.  Disconnect the spark plug wire by pulling it off the spark plug. 


Cleaning and Maintenance

Oil Plug

UG01_2700PSI_E.indd   20

2016-12-01   5:32 PM

Summary of Contents for 039-8055-2

Page 1: ...In order to ensure you have the best possible experience please read through the following instructions If you require any help please contact the customer service department at 1 866 4SIMONIZ 1 866 4...

Page 2: ...leaning with Detergents 16 6 2Working with the Detergent Injection Tube 16 6 3Working with the Foam Blaster 17 7 Operating Instructions 19 7 1 Using Pressure Washer 19 7 2 Shutting Down and Cleaning U...

Page 3: ...WARNING Indicates a potentially hazardous situation which if not avoided could result in death or serious injury CAUTION Indicates a potentially hazardous situation which if not avoided could result...

Page 4: ...MUFFLER BECOMEVERY HOT DURING AND AFTER USE AVOIDTOUCHING THE ENGINE ORTHE MUFFLER DURING OR AFTER USE WARNING PERSONAL SAFETY Stay alert watch what you are doing and use common sense when operating...

Page 5: ...her source of ignition such as a water heater furnace clothesdryer orthelike Allowtheenginetocool before storing indoors CAUTION ENGINE SAFETY Certain components in this product and its related access...

Page 6: ...f fire or explosion especially in a closedarea Therefore donotsprayflammableliquids Do not use acids and solvents with this product either These products can cause physical injuries to the operator an...

Page 7: ...run unless the product is connected to a water supply Ensure water is running through the pressure washer before attempting to start the engine Never run caustic fluids or acid through this product IM...

Page 8: ...Quick connectWand 1 UG01 050 0002 I Gun Assembly 1 UG01 020 0003 J Pressure Hose 1 UG01 050 0004 K Foam Blaster 1 set XE18 060 0000 L Detergent InjectionTube comes pre attached on the machine 1 UG01 2...

Page 9: ...r minute LPM 4 gallons per minute GPM or the pump might be damaged Theflowratecanbedeterminedbyrunningwater for one minute into an empty container The watersupply temperaturemust not exceed 40 C 104 F...

Page 10: ...Attach gun holder gun support and hose hook on the main frame and handle respectively F Assemble the bottle holder to the frame by tightening the wing nut G Connect pressure hose to the pump outlet an...

Page 11: ...and debris removal 15 Yellow Thin angled spray for detailed cleaning 25 Green Medium angled spray for detailed cleaning 40 White Large pattern for wider cleaning applications Detergent Black This nozz...

Page 12: ...ays check the oil level before starting the engine making sure the pressure washer is on a level surface Always use oil type SAE 10W 30 which can be found at your local CanadianTire store Product no 2...

Page 13: ...orleaks Replaceifnecessary Iffuelspills waituntilitevaporatesbeforestartingengine Fill the fuel tank outdoors or in well ventilated area S FuelTank Capacity 1 2 L 1 Stop the engine gStopping Engine an...

Page 14: ...ean air filter element for every 50 hours of use every 10hoursunderdustyconditions Washinhighflashpoint solvent squeeze dry dip in clean engine oil and squeeze out excess oil 5 4 Purging F Releasethes...

Page 15: ...you feel resistance and then pull rapidly to avoid engine kickback CAUTION Returntherecoilstartergripgentlytoitsstartingposition to prevent damage to the starter or the housing d Once engine starts u...

Page 16: ...at 1 866 4SIMONIZ 1 866 474 6664 if you have any questions or concerns IMPORTANT Working with a detergent ensures quick soaking of the dirt and allows the high pressure water to penetrate and remove...

Page 17: ...igh pressure 5 When you are finish working with detergent place the siphon tube into a bottle with clean water and spray water for one minute to rinse the detergent injection tube and remove any soap...

Page 18: ...may clog it CAUTION Damage may occur to painted surfaces if chemicals are allowed to dry on them Wash and rinse a small section at a time f 1 Set detergent ON OFF knob to ON position to work with det...

Page 19: ...safety lock on the spray gun and rest the gun on lower and upper supports WARNING Turn off the water supply and pull the trigger to depressurize the unit Failure to do so might result in personal inj...

Page 20: ...ngine oil should be replaced after the first 20 hours of operation or after the first month of use After that it should be replaced every 100 hours or every 6 months To Drain the Engine Oil 1 Loosen t...

Page 21: ...of children and do not allow persons unfamiliar with the product or these instructions to operate it This product is dangerous in the hands of untrained users Cover and store indoors in a dry well ve...

Page 22: ...es dryer Also avoid any area with a spark producing electric motor or where power tools are operated If possible avoid storage areas with high humidity because that promotes rust and corrosion Place t...

Page 23: ...uty Maintenance Free Axial Cam Thermal ReliefValve Included DetergentTube with Filter 3 SiphonTube MaximumTemperature of PumpedWater 40 C 104 F Engine Power OHV 5 5 HP No Load Speed 3800 RPM High Pres...

Page 24: ...le position Clogged carburetor Clean the carburetor Refer to the instruction manual Carbon build up on spark plug Clean the spark plug Refer to the instruction manual Incorrect starting method Use cor...

Page 25: ...lean nozzle with tip cleaner Water or oil leaks out of Pump Damaged seal ring Call theToll Free Hotline Cold water keeps draining out of thermal relief valve Defective thermal relief valve Call theTol...

Page 26: ...replace the detergent suction tube The discharge nozzle is obstructed Blow out or remove debris with a fine needle Detergent ON OFF knob at OFF position Set to ON position The trigger can t be squeez...

Page 27: ...t its discretion Shipping charges may apply Ninety 90 DayWarranty Accessories Triggergun hose spraywandsandotheraccessoriesareguaranteedforninety 90 daysfromthedateofpurchase Youmaypurchase accessorie...

Page 28: ...ned in the warranty card and on manufacturer s website Please review carefully as it Record engine information to reference when ordering parts or obtaining warranty coverage Engine Model Specificatio...

Page 29: ...rate engine with heat shields or guards removed WARNING Rotating Parts can cause severe injury Stay away while engine is in operation Keep hands feet hair and clothing away from all moving parts to pr...

Page 30: ...Start Checklist 1 Check oil level Add oil if low Do not overfill 2 Check fuel level Add fuel if low Check fuel system components and lines for leaks 3 Check and clean cooling areas air intake areas a...

Page 31: ...r rope guide 3 Place choke control into OPEN position Warm engine 1 Place choke control into OPEN position Choke is usually at OPEN position when restarting a warm engine 2 Slowly pull starter handle...

Page 32: ...lug Level should be up to point of overflowing filler neck First 5 Hours of operation Change Oil Every 8 Hours of operation or Daily Check engine oil level Clean area around muffler and controls Every...

Page 33: ...NOT approved and should NOT be used effects of old stale or contaminated fuel are not warrantable Fuel must meet these requirements Clean fresh unleaded gasoline Octane rating of 87 R M 2 or higher Re...

Page 34: ...2 Be careful to prevent dirt and debris from falling into the air cleaner assembly 3 Separate the Air Filter 4 Inspect the air filter Clean dirty air filter with warm water and mild soap Allow air fi...

Page 35: ...Dirty Debris Screen Incorrect Oil Level Engine Overloaded Dirty Air Cleaner Faulty Spark Plug Will Not Start Hard Starting Stops Suddenly Lacks Power Operates Erratically Knocks or Pings Skips or Mis...

Reviews: