5. Installation
5.1. Checks
- Check that the Conveyostat
®
is undamaged and that you have received the correct version.
- Check that the data on the packing slip corresponds with the data shown on the product
received.
- Check that the output voltage of the high voltage supply corresponds with the operating
voltage of the Conveyostat
®
.
If you have any problems and/or in the case of ambiguity: please contact SIMCO or your
regional agent.
5.2. Installation
Install the Conveyostat
®
as close as possible to the location where static charges are causing
trouble. This is usually at the input to a container or cyclone.
Install the Conveyostat
®
in your conveyor piping to make it an integrated element of your pneu-
matic conveying system.
The Conveyostat
®
can be mounted in any position. Make sure that the material follows the
direction of the arrow on the Conveyostat
®
.
If you have any questions concerning location or installation: please contact SIMCO or your
regional agent.
Attention:
- The material must always go through the Conveyostat
®
in the direction indicated by
the arrow. If the material goes the other way around, the Conveyostat
®
may become
clogged.
5.3. Electrical connection
1. Install the high voltage power unit in the required place.
2. Connect the high voltage cables to the assembly clamps supplied.
Warning:
-
Do not kink the high voltage cables and do not lay them in sharp bends.
-
Do not lay these cables alongside sharp metal parts.
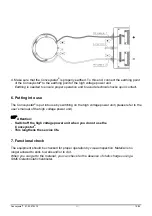
3. Connect the high voltage cables to the high voltage power unit.
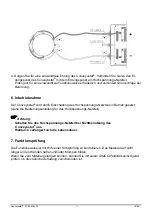
When connecting the high voltage cables make sure to connect the anti-static bars alter-
nately to a transformer (please refer to the user’s manual of the high voltage power unit).
Conveyostat
®
97.52.97.23.10
12
10/06


